1963 THUNDERBIRD SPORTS ROADSTER
Complete Rotisserie Restoration
in progress now
December 9, 2004 update:
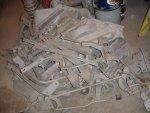
The major sandblasting operation has been completed and the tent disassembled.
Theres quite a pile of parts that have been sandblasted. I still have
many small parts to do, but they'll all fit inside my sandblast cabinet.
It's a lot cleaner to use that.
I'm on to more fun stuff now. I've removed the bad sections of the floors and
battery tray areas and tomorrow should be able to get the new pieces
welded in. Then it's my plan to paint all the suspension
and other parts that get black and store them out of the way in back
before I start removing the paint on the body panels. After I get
all the paint stripped with aircraft stripper, I'll do all the new
seam seal and begin the filler work in preparation for primer and new paint.
I'll be disassembling the rear end along the way too to install
new pinion and axle seals and a carrier gasket. I don't want anything
leaking out of my rear end ;-)
I'll finish all the components (heater, top frame etc) after the car is
back on all 4's so I can install them as I complete them.
It's getting fun, fun, fun now!
Nice clean steel
Is your rear end this clean?
Both floors cut out
Drivers floor cut out
Battery Tray cut out
December 11th:
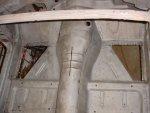
Here're a couple pictures of the floor and battery tray repair work.
Note that the repair panels have been cut to fit exactly where the
rusted areas were. The patches are "butt welded", ,
There is no "overlapping" of the metal anywhere. Overlapped
welds tend to collect dirt and moisture and promote rust.
All the welding I'll be doing on this Tbird,
will be "Butt Welded", edge to edge.
and the welds are continuous (skip welded), and then ground flat.
This elimates any overlapped edges
you get when you use panel flangers
The overlapped edges are a prime place to trap dirt and moisture leading to future rust.
Whereas butt welded seams completely eliminate this possibility.
I use "Intergrip" clamps which I purchased from Eastwood Tools (www.eastwoodcompany.com).
They align the panels edge to edge and surface to surface leaving a .040" gap
which is perfect for a full weld penetration. See them in action in the photos below.
Another thing to note is that you should skip around when you're welding sheet metal patches,
In other words, DO NOT do one continuous weld of any length because the heat build up
may (most likely will) cause warpage.
This can be significantly reduced by welding about an inch
and moving to another section and welding an inch and
continuing that process until the entire weld is complete.
When it's done, if I wouldn't have told you you'd never know.
Why do I tell you? Because I like to know what I'm buying,
and I believe you have a right to know too.
Floor patch in place
Floor patch welded
Weld Ground flat
Bottom ground flat too
Battery tray welded in
Page 1
Page 8
Page 9
Page 10
Email
Tom Maruska
Return to