
Making a Bluescreen Object for Transparent Pasting in PSP4.x
Copy all graphics to a working folder and make some backup copies of what will be our template.
Some graphics do not lend themselves well to the floodfill technique. We shall choose one that has a uniform background. The one in this example lends itself nicely.
Step 1:
Enable the following using the view selection from the menu:
tool palette
color palette
style bar
Display the photo
Step 2:
Now we are going to experiment with a flood fill

Set the background color to something significantly different from the object (the jet in this case). Blue should work. Do this by clicking on the lower right box on the color palette. A selection palette will come up. Click on the blue. Note in this color palette example that the foreground color is set to red and the background color is set to blue.
With the paint can
![]() selected from the tool
palette, move it over the background and click with the right mouse button. You
will get something like the following photo. The results are controlled by the
Match mode, Tolerance, and Fill style shown on the style bar
selected from the tool
palette, move it over the background and click with the right mouse button. You
will get something like the following photo. The results are controlled by the
Match mode, Tolerance, and Fill style shown on the style bar
You can undo the flood fill by selecting edit -- undo from the menu
Notice that we almost have what we want -- a nicely defined foreground graphic.
Select edit -- undo from the menu and go to the next step.

Step 3:
Notice that we
have magnified the picture by 2 to 1 (with the magnifying glass) and painted
some blue around part of the foreground object using the paint brush ![]() .
This will give us a nice flood fill. The painting in this case is done using the
right mouse button. The left button would give us red.
.
This will give us a nice flood fill. The painting in this case is done using the
right mouse button. The left button would give us red.

Now let's do some more trial flood fills experimenting with the tolerance selection from the style bar. If we don't like the results we can edit -- undo. The next photo shows a descent result
.
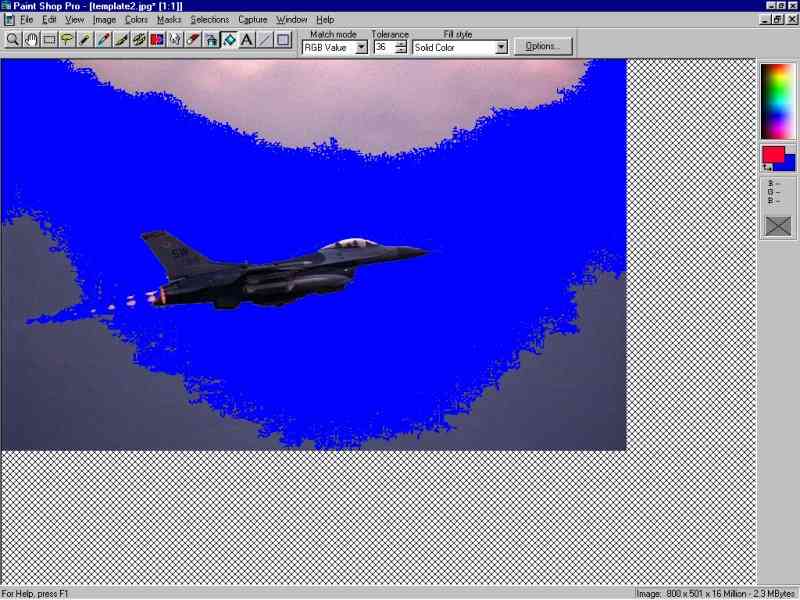
We can clean up this photo a bit more by cutting out the remaining background clutter using the lasso tool or just leave it as it is. We now have our blue screen template.
To paste an object over a background first make sure the following setting is made from the menu selection file -- preferences -- general program preferences on the misc. tab.

The selection of interest is the % tolerance to background color when pasting a transparent selection. We might have to experiment with this value when pasting our transparent selections. If it is set too high then some of the foreground image will wash out. If it is set too low then some of the background might come through when pasting.
To paste, lasso the foreground object (the jet) and copy it.
Bring up the background image and paste as a transparent selection.
Note that if we bring up PSP from scratch the background color might not be set correctly for the template in use. Just set it by selecting the eyedropper from the tool palette and clicking with the right button while hovering the cursor over the color.
After we paste an image over a background, it may look a bit ragged around the edges. This can be remedied with the cloning tool.
![]() See PSP help on using this tool.
See PSP help on using this tool.