 |
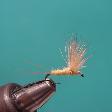
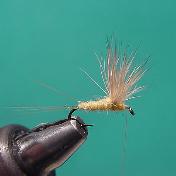
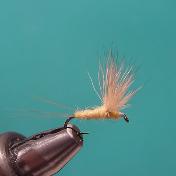
| SULFUR COMPARADUN |
|

|
| Hook- Mustad 94840, Size 16 Thread- Danville's 6/0, Pale Yellow Wing- Short Fine Deer Hair, Bleached Tail- Microfibetts, Ginger Body- Superfine, Sulfur Orange |
| The Comparadun is a simple and easy to tie pattern that can be real effective on selective trout. It works as an emerger as well as a crippled dun. It was developed in the mid 60's by Al Caucci and uses many of the features of the Haystack that Fran Betters made famous. |
 |
 |
 |
 |
 |
 |
 |
 |
 |
 |
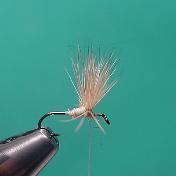
| Step 1: Start your thread on the hook and place a good tying base of thread to the hook shank. Stop your thread when your two eye lengths from the front of the hook. |
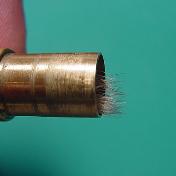
| Step 2: Select a bunch of deer hair that is slightly larger in size than a number 2 pencil. The amount of hair will be less for a smaller hook and more for a larger hook. Place the hair into a stacker and stack your hair so the tips look like the tips in the picture. Take the hair out of the stacker carefully to keep the tips even. Remove any fuzz or stray hair strands. Switch the hair to your left hand with the tips pointing toward the eye of the hook. Again, do this carefully to keep the hair tips even. |
| Step 3: The next step is to tie in the hair wing. Do this by placing the bunch of hair on top of the hook shank with the tips facing toward the eye of the hook. Use a pinch wrap to secure the hair and pull strait down with enough pressure to flare the hair as shown. Once you have this wrap two or three more tight wraps on the hair moving back toward the bend of the hook while still holding on to the butts of the hair. This will help lock the wing into place. Your wing might look like a mess at this point but it will get better. |
| Step 4: After you place enough tight wraps to lock the wing into place, clip the butt of the wing and use more thread wraps to cover the butts up as shown. These thread wraps help to clean things up a little and also build a good base to apply dubbing. Some people prefer to add a drop of head cement at this point, but I find it not necessary. |
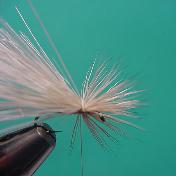
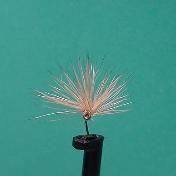
| Step 5: Wrap the thread to the front of the wing. Grasp the hair and pull it all to the top of the hook. Use jam wraps to elevate the wing so it is perpindicular to the hook shank. Once it is secure, manually spread out the wing so it forms a 180 degree fan effect. Place a few more wraps of thread in front and behind the wing to help lock the wing in this position. |
| Step 6: This is a front view of the wing,. Notice the 180 degree fanning |
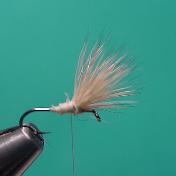
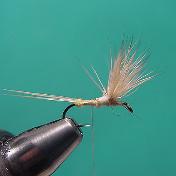
| Step 7: Once the wing is in place, wrap the thread back toward the bend of the hook stopping just short of the bend. Apply a ball of dubbing and secure the Microfibetts as shown. |
| Step 8: Using the dubbing ball, split the tail as you wrap the thread back toward the rear of the hook. (To learn this technique, see my Clear Wing Spinner tutorial in the fly archives) The split tail helps to stabilize the fly on the water and keep it floating properly. |
| Step 9: Now your ready to apply the dubbing. Wrap the dubbing toward the eye of the hook. Start with a small amount and add more dubbing as you go forward to give the fly a tapered look. |
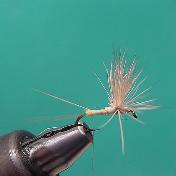
| Step 10: Once you have the dubbing applied, all that is left is a whip finish and a little head cement to the head of the fly. This fly is very simple and also pretty durable. The photography isn't the best but I think it should allow you to learn the techniques. Enjoy and email me if you have any questions or suggestions. |