 |
|
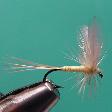
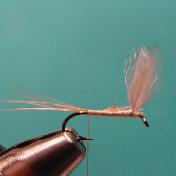
| QUILL BODY SULFUR |

|
 |
 |
 |
 |
 |
 |
 |
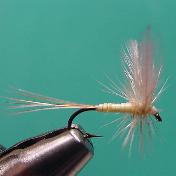 |
| Hook: Mustad 94840 Size 16 Thread: Danville's 6/0 Cream Tail: Barred Ginger Hackle Fibers Body: McClean's Quill Body Material, Yellow Wing: Whiting Hen Neck, Medium Dun Hackle: Whiting Barred Ginger Saddle Hackle |
| The Sulfur Dun is a very handy fly to have in your fly box here in Pennsylvania. I use this pattern to imitate not only the "sulfur" mayflies that hatch in late May to early June, but it also comes in handy as a Light Cahill imitation, and also will work pretty well for the late season White Flies that blanket the streams and rivers. |
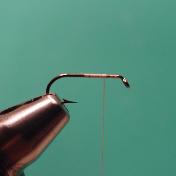
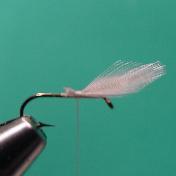
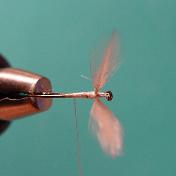
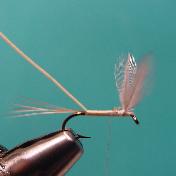
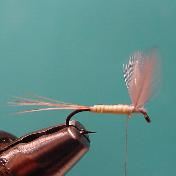
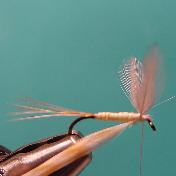
Step 1 Fix the hook to your vise and run the thread toward the bend of the hook stopping at about two to three eye lengths back. Step 2 Select two hen neck feathers that are the same size and shape. Put them together so that their natural curves are opposite pointing outward. Measure the length of the wing equal to the hook shank. Tie the wing in using a Pinch wrap and place two or three tight thread wraps in behind the wing toward the bend of the hook as shown. Step 3 Pull the wings upward until they are perpendicular to the hook shank with your left hand. With your right hand wind thread to the front of the wing and place a few wraps directly in front of the wing pinching it in place. Now spread the wings apart and place loose figure 8 wraps between the wings until they are in the position you prefer. Put a few tight wraps behing the wings to lock them in place and your wings are finished. Step 4 Continue to wind thread back the hook shank until you reach the halfway mark. Here you will tie in your tailing material. I use a pinch wrap for this also and measure the length of the tail equal to the shank length of the hook. Once your tail is secured and in the correct position, wrap the thread back towards the bend of the hook, stopping just short of that point. Step 5 Next tie in your body material. Tie in the quill material so that the quill forms an underbody stopping at the tie in point for the hackle. Wind the thread back toward the eye of the hook covering all the tie in materials forming a smooth tapered underbody. This is important to assure a smooth quill body. At this point you can place a small amount of head cement on the underbody to give the fly some durability. Step 6 Wrap the quill forward being careful to place each wrap butted up against the last. Stop at the tie in point for the hackle and tie off the body. You can now coat the body with head cement to increase the durability of the fly. If you do this, wait for the body to dry completly before moving on. Step 7 At this point, tie in your hackle. Tie the hackle in on the near side of the hook shank. with the shiny side of the hackle feather facing upward. This will allow the natural cupping of the hackle to face backward as I wrap the hackle. This is just my preference, as there are many who prefer the cupping to face the other direction. Step 8 Wrap the hackle toward the eye of the hook. I prefer to place about three wraps behind the wing and 2-3 wraps in front of the wing. I prefer to tie a sparse hackled fly as I feel it works better for me. This also may vary from person to person. Tie off your hackle and form a neat tapered head. Add a drop of head cement to the head of the fly and your finished. |