 |
|
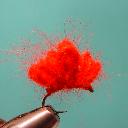
| Sucker Spawn |
| The Sucker Spawn is a favorite for Lake Erie steelhead fisherman. It is a simple pattern to tie yet very effective. It is also an effective trout pattern when nothing else seems to be working. Angora yarn is the material of choice because of its "sticky" properties. The angora sticks like velcro to the inside of the fish's mouth making it very difficult for the fish to spit the fly out. |
| Hook: Eagle Claw Size 14 Scud Hook Thread: 6/0 Uni-Thread, Fire Orange Yarn: Angora Yarn, Dyed Red. |
 |
 |
 |
 |
 |
 |
 |
 |
 |

|
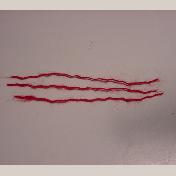
| Step 1: Start out by selecting a piece of Angora Yarn approximately 4 inches in length. I used a magic marker and place marks on my tying bench to measure the correct length. It saves time. |
| Step 2: Separate the strands of Angora Yarn. Angora has three strands and that is the perfect number to tie this fly. Be careful when you separate, take your time to not break the strands or pull out too much of the fuzz. The fuzz is what makes this pattern effective. |
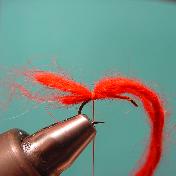
| Step 3: Wrap a thread base on your hook shank and stop the thread when you are above the barb on the hook. Hold the three strands of angora and tie them in using a pinch wrap as shown. Use three tight wraps to secure the yarn to the hook, then make another three tight wraps in front of the yarn to really lock it in place. clip off the tag as close to the thread wraps as possible and place a drop of head cement on the wraps. Some like to leave the tag on the fly and even tie in some flash, but I have found no advantage to doing this. |
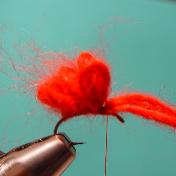
| Step 4: Now make small loops with the 3 strands of angora and tie them on top of the hook shank again using a pinch wrap. The end loops should fan out on both sides of the hook shank. As before use three tight wraps to secure the yarn, and three more tight wraps in front of the yarn to lock it in place. |
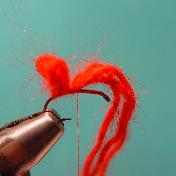
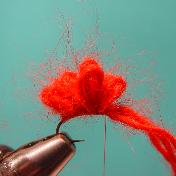
| Step 5: The following steps are the same as step 4. Continue to make loops and securing them to the hook shank. As you go towards the eye of the hook, make the loops larger until you reach the highest point of the bend of the hook. Then the loops should get smaller and smaller as you work your way to the eye of the hook. |
| Step 6: This is the point where the loops should start getting smaller, you want to see a nice curve to the loops in accordance with the bend of the hook. |
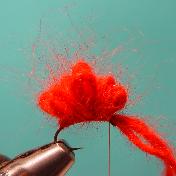
| Step 7: Again the loops are getting smaller on the front half of the fly. My standard tie is five loops, two loops building to the apex of the hook bend, the loop at the apex, then two others to the eye of the hook. |
| Step 8: Once you reach the eye of the hook, make your final loop and pull the yarn strait up and place tight wraps to lock the yarn in before clipping off the yarn. |
| Step 9: Clip off the excess yarn and form a neat head. Whip finish and place a couple drops of head cement to the fly. This fly is very durable as the more it gets torn up the better it fishes. Enjoy! |