(click on a letter to view the topic)
|
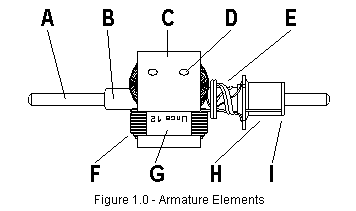
Looking at an Armature Sitting there in a bag or tube, for example, what should you look at and for? In no particular order, save for the way the letters ended up in the illustration, here's what I look at (remember: your mileage may vary): A - The Shaft. Not a lot to see in the tube, other than surface condition, length, and end finish. A "drill blank" shaft description tells you, well, almost nothing meaningful about the nature of the material or its composition. Ok, I grant you it probably means "steel." That fact does not impart, however, any guarantees of |
|||||||||||||||||||||||||||||||||||||||||||||||||||||||||||||||||
material composition, hardness, temper, ductility, or, most importantly in the practical-consideration department, any straightness and/or concentricity. As to actual material differences between manufacturers, a little experience with a Dremel cut-off disk while shortening arm shafts will tell you that not everyone uses the same material, even if they do manage to achieve approximately the same surface hardness and finish. There are no quick and easy ways to tell if a shaft is straight,
particularly if it's rattling around in its shipping tube. Heck, there aren't a lot of
quick and easy ways of checking those things out of the tube, for that matter. Given the
shortness of even the unmodified shafts, it's sometimes impossible to tell whether a
measured eccentricity is caused by shaft displacement or stack lamination error. Politely
ignore anyone who claims to able to straighten "bent" arms after you think a bit
on what they'd supposedly use as a reference center line in their process. My solution to
worrying about shaft errors? I play the law of averages and don't worry about it much, if
at all. I do, however, try hard not to drop them on the floor. B - Spacer. Simply provides what you'd have to anyhow to keep the windings from occasionally slamming into the can end. Too short you can live with, too long you might have to shorten. There are a number of bad, slow ways to shorten the spacer (including some found in the "Tools" Section), and few good, quick ways. The easiest solution is to pick arms that don't appear to have extraordinarily long spacer elements in the first place, making sure that any shortening problems fall within the capability of something like the Magnehone arm facing tool. If you're still wondering why a sleazy little component like an arm
spacer should occupy any attention at all, consider this: after you spend the hours
necessary to build a really good can and magnet setup, what are your options when the
magnetic "center" of your carefully honed combination offsets the arm into one
bushing/bearing or the other? Checking for sufficient end-to-end clearance without the
magnets installed simply indicates that the arm will fit in the can/endbell assembly.
Additionally, not all cans, magnets, endbells, bushings, bearings, and armatures are
precisely the same length, nor does everyone locate magnets within all those parts in
precisely the same location. Given the possibilities, I opt for the shortest (legal)
length possible and pray that the entire brush "footprint" falls completely on
the commutator. So far (mostly), so good. Just another thing to think about while you're
looking at the arm at your local track. |
||||||||||||||||||||||||||||||||||||||||||||||||||||||||||||||||||
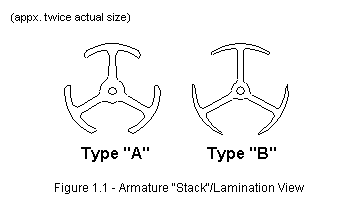 |
Lamination Design - The last few years have seen an interesting development in the configuration of the stack laminations themselves. Several armature manufacturers have reintroduced what, for purposes of discussion, might be termed a "lightweight" lamination profile. In Illustration 1.1, left, the drawing labeled Type "A" represents an average conventional lamination, while that labeled Type "B" generically represents current lightweight designs. The difference to us is both substantial and meaningful. First, the lightweight design simply weighs less than the conventional one. |
|||||||||||||||||||||||||||||||||||||||||||||||||||||||||||||||||
I can’t honestly tell you that I fully comprehend the nature of the opening and closing electromagnetic fields a working motor creates. Nope. But I can tell you that given the same force (e.g., field strength and magnets, for example), less mass accelerates quicker. In these arm designs, the most weight has been removed from the outer circumference of the cross-section, normally the most productive location to lighten a rotating device (the least productive being the dead center, which makes all of us that use hollow axles... never mind). Another consideration is wire length and weight. For reasons that I’m sure seemed valid at some time in the past, all Group armatures have their nature expressed as "number of turns of X gauge wire." Think about that a minute. Given a specified minimum stack length and a specified minimum wire gauge, the total amount of wire necessary to accomplish legality includes the 180° radius each wrap must have at each end of the stack. A thinner web means a smaller initial wrap radius, which means each subsequent wind over that radius is similarly smaller. It may not be a huge amount in total, but it is unquestionably less wire for the same specification than an armature of another design. Less wire means less weight and... yep, that too. Beyond that, you would do well to remember that there are
people who, unlike me, do understand the nature of an armature and
its relationship to and within a particular permanent magnet field. They
also understand lamination configurations and steel saturation
coefficients. Some
of them design and manufacture armatures for slot car drag racing, so try
to pay attention to who's actually making arms specifically for our
application, and not repackaging designs that won Box Stock at the East
Gerbil Gran Prix in 1992. D - Balancing Holes and Balance - Here one again encounters a wide variety of opinions, and these differences revolve around the size and number of balancing holes present. The "no holes" school argues that the absence of balancing work, or at the very least, an absolute minimum of holes, indicates an inherently better balanced arm that needed less work to start with. They wonder how differences in the stack face caused by holes affect its relationship with the magnetic field, and they argue that an absence of holes and tooling marks imparts less aerodynamic drag to the spinning arm. The "holes" school contends, essentially, that more is better; any and all holes reduce the mass of the arm, and the other stuff doesn't count for anything meaningful. Beats me. My tendency is to lean to the "less is better" side. Remembering that armatures, ideally, need to be balanced to achieve dynamic as well as radial rotational "equilibrium," the absence of balancing holes tells me that the mass is most likely rotationally even, and, hopefully, dynamically as well. Or maybe not. Although I used to work for a manufacturer of industrial balancing equipment, and have spent many a boring hour watching machinists jam Mallory metal into holes in crankshaft counterweights, my sole experience with actually balancing arms occurred during the Golden Age of Slot Car Racing with stuff I wound myself (a block of wood and two razor blades is not what we're looking for here). That experience, and a little bit of observation and inspection tell me a few things. First, no matter what the accuracy and precision of the equipment, the operator actually balancing the arm, and the care he/she takes in doing it, are probably as important as the equipment. Second, not all operators are created equal, nor are the standards and tolerances they work to. Third, no degree of smoke and mirrors regarding what a "special" balance job can do will turn a dog arm into a good one, or a good one into a great one; if it ain't there to start with, it most likely ain't 'gonna be there after a balance job. Last, unless and until I have equipment of equal precision to check the balance, there's not much I can do about it other than trust the manufacturer. Which, looking at an armature in a package, I usually do, unless a) the holes look absolutely abysmal, rough and uneven in contour, usually indicating that someone should have changed the drill bit or plunge mill before they made my arm, b) the holes seem abnormally wide or deep (check the cross section of a stack in Figure 1.1, or look at an arm, and ask yourself how deep into that web section you really want to drill), or c) there simply seem to be too many of them. To which I used to add d) there are balance holes in all
the stacks. Uh, no. Not being a professional armature balancer (among other things), and
forgetting totally about the dynamic nature of rotational mass, I figured that balance was
attained by establishing the best stack and altering the two remaining ones to match its
condition. Too many late nights overbalancing too many crankshafts, I guess. Said matching
technique can be great for rotational balance, but not necessarily correct for dynamic
balance. If you need a clearer explanation of this concept, talk to your favorite arm
reconditioner about how and why they do it. Additionally, one enlightened manufacturers
also has a very informative article covering this area on the company Web site, so do
yourself a favor and check it out. For the sake of accuracy, here's a
direct link (with specific permission) to the Pro Slot article "Balancing
Acts" by Dan DeBella. E - Commutator
"Wrap"/Tie - These unsung little fibers go pretty much
unnoticed unless they're a total mess, with stiff, epoxied ends sticking out at excessive lengths
and/or odd angles. Or, far less likely, unless the manufacturer forgets both their purpose
and the right amount of epoxy, at which point they stop performing their primary function. Input parameters are the following: gear ratio = 3.69:1, tire diameter = 1.00", tire growth factor calculated at 0.000010 (Inches/(mph*mph)), which is reasonably conservative. Near the traps, you get:
Change the gear ratio, put that great 20 arm in a bushing Pro Stock Truck setup, and it's a wonder that we're not cleaning arm parts off the ceiling a lot more often. Even a Grp 12 in a Pro Mod is churning away in the traps (the same parameters with a 12/52 ratio calculate almost 87,000 rpm at a 62 mph trap speed). However you want to look at it, these little suckers are spinning.
Unc Rerails The Train - Honestly, the condition of the wrapping is way down on my list of Important Stuff to Look
For on an Armature, right below quality of stack dye, but slightly above the printing
quality of the header card it comes on. Why? Mostly because arm manufacturers do a decent
and tidy job on the wrapping these days, so much so that problems in this area are the
rare exception, rather than a common occurrence. It was not always thus, shall we say, so
count the blessings of technology, take a quick look at them, and move on to other things
in your inspection. F - Windings - Although
what's involved here can make or break the true quality of an armature, what's
visible here is substantially less. A quick inspection will tell you nothing about
exact wire gauge, total length of the wire, total resistance, field sharing, or any of the
variables that contribute to an armature's actual performance. All you can see,
in essence, is execution, and sometimes that tells you a great deal. G - The Tag - This simple bit of printed whatever might, in some respects, be the most important component of your arm. Without it, at least in most heads-up Classes, you don't get to play with your little friends. On Group arms, it has to be there; it's the basic identifier that classifies the arm. A complete motor inspection may include measuring dimensions or even unwrapping the winds from an armature in the case of a protest, but it starts with simply looking at the tag. Do yourself a favor and avoid those that are almost illegible due to folds or epoxy thickness. Avoid the temptation to scratch it with the end of a hobby knife to see how stiff it is or whether or not it will move when you push on it. Do yourself one more favor: try to recognize a manufacturer's arms by the nature of the tag, not the arm color. Each manufacturer uses a distinctive font and size on their arms. Arm dye is cheap, and a lot of people have it. One might make sure that one knows what one is really looking at before a) exchanging hard cold for a used or "almost new" arm not in its original packaging, or b) before you start ragging on someone's arm for being a "pile." |
||||||||||||||||||||||||||||||||||||||||||||||||||||||||||||||||||
 |
H
- Commutator - All things considered, this little device engenders more
discussion, confusion, and general head-scratching than all the other components of an
armature do combined. It's a reasonably simple concept where, once again, execution plays
a major role. Unlike some other areas of an arm, this is one where you can tell
something about what you're looking at, provided you have some idea of what
you're looking at. So let's see what's going on here. |
|||||||||||||||||||||||||||||||||||||||||||||||||||||||||||||||||
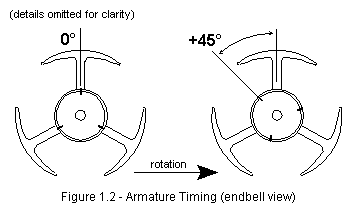
system" for turning the poles of the armature on and off in their function as electromagnets. "Armature timing" is the term used to describe the relationship, in degrees, of the segments of the commutator to the stacks or poles of the arm. As you can see in Figure 1.2, above, arm timing is expressed in degrees of advance from a base of zero at the nominal centerline of each stack. Looking at the com end of an arm, one with 0° of timing (left) would have the trailing edge of its com slot(s) - or the beginning of the next segment - lined up with the center of each stack, while one with 45° of advance would locate the same portion of the slots that many degrees of advance before the center of its stack. The differences between one level of timing and
another may appear slight, but slight is all it takes to make a major
timing change at the com. Consider it this way: given a com diameter of
.202", one degree of timing at the com is approximately
.00176" of its circumference (diameter * pi / 360). Put another
way, a .5 mm pencil line is more than 11 "com degrees" wide at
the same diameter. |
||||||||||||||||||||||||||||||||||||||||||||||||||||||||||||||||||
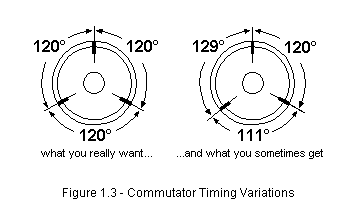
| back to armature illustration | Timing Variations - Despite having winding and manufacturing equipment that would have made researchers at Los Alamos envious a few decades ago, things occasionally don't go quite as planned. One of the more common problems you might run into is one that theoretically can't happen. All manufacturers use fixtures that precisely locate a commutator before a slitting saw or wheel actually creates the gap. This fixture then rotates 120ş and the steps are repeated. The nature of the process is such that it cannot, in theory, do anything other than create 3 com segments of exactly equal proportions. You know what's coming next here, don't you? Of course you do: sometimes, it doesn't seem to work. |
|||||||||||||||||||||||||||||||||||||||||||||||||||||||||||||||||
 |
||||||||||||||||||||||||||||||||||||||||||||||||||||||||||||||||||
|
As I've mentioned elsewhere in this site, I have a one neat arm timing device that utilizes some pretty precise positioning and machining to locate and arm in the middle of nearly half of a 12" cam timing wheel (I guess the 18" one was out of the question). No, it's not a CAD-CAM quality device, but it does take its measurement via a sharply tapered pin that centers in the slot of the com. Based on my usual guesstimates (and an occasional exploratory examination of com slot widths with micro feeler gauges in .001" increments), I'm reasonably confident I can read degrees pretty close to what the armature was theoretically produced at. Since is really isn't as precise as the equipment that made the arm, give me 3-5ş of reading error and I'll be happy. What doesn't make me happy is when I get something like Figure 1.3, above. I've purchased arms that were so far off a symmetrical 120ş relationship - actually worse than the diagram depicts - that I (and others) could see it without measuring or checking it. One could see the differences by simply looking down at a perpendicular angle to the com, not to mention looking at the end. No, it can't happen. Yes, it does happen. I usually have or can find an explanation (or at least a story) for pretty much everything, but neither I nor more than a few manufacturers I've discussed it with can actually explain it very well. Which means that you, as the consumer, might want to look at that tube a little more closely the next time you buy an armature. While you're peering at the com (and while your friendly track owner is getting really annoyed about how much time you're taking to just buy a ****** armature), take a look at the finish of the slots in the commutator as well. After cutting, these slots have to be deburred (and, one assumes, subsequently cleaned) by hand, to the best of my knowledge. Make sure that any possible flash along the slot has been removed (or be prepared for some really quick brush break-in), and that no extraneous nicks, gouges, or scratches have been left for you to deal with. After looking at several gajillion arms over the years, I've found precisely two with problems that might have been caused by an errant hand operation, so your odds of finding a problem here should be pretty slim. |
||||||||||||||||||||||||||||||||||||||||||||||||||||||||||||||||||
|
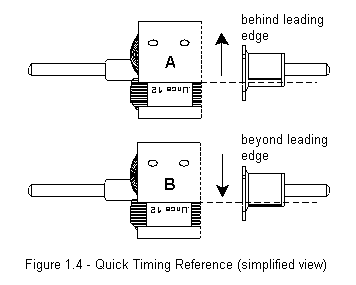
Unc's Quick and Dirty Com Timing Reference System - (or: your guess is as good - or better - than mine) You can, plus or minus a few degrees, come fairly close to reading the effective timing of an armature by learning to recognize the relationship of any given com slot to the leading edge of its respective stack. Given normal C-Can arm and commutator diameters and varying stack widths, Figure 1.4, left, shows a com slot that appears to trail the leading edge of a stack ("A"), and one that appears to lead it by some amount ("B"). The former will generally be lower-timed, and the latter higher-timed. My rule of thumb is that something that looks like "B" will generally end up degreeing between 38-42ş of advance on my measuring tools. Not something that one can explain without having |
|||||||||||||||||||||||||||||||||||||||||||||||||||||||||||||||||
|
a lot of arms to compare, but certainly something that eventually comes after some experience in messing with them. This "ballpark" system occasionally comes in handy as both a warning system ("Hmm. The package says 42ş, but the slot appears to be centered on the stack.") and as a quick selector mechanism when trying to figure out what arm to try next in that motor that runs like ****. Nothing to take to the bank, but occasionally useful nonetheless. |
||||||||||||||||||||||||||||||||||||||||||||||||||||||||||||||||||
|
I - Com Cap or End - Either by the nature of the commutator's construction, or by intent and/or design, you'll periodically run into an armature that has a significant extension of material beyond the normal copper face of the com. While not all that common, several manufacturers have in the past produced open C-Can arms with com caps. Commonly made of aluminum with a hard anodized nonconductive coating (think cobalt endbell insulating properties here), the caps are designed to retain the com segments, offering additional restraint (beyond that designed into the com in the first place) in arms that may be subjected to extremely high rpm (or: gear your Top Gun car 10:50, check the mph, and go through that calculation stuff we did a while ago). Are they necessary? Occasionally, as evidenced by picking up a car and noting that the commutator and endbell are no longer there, as I did some time ago. I have to say, however, that unlike our cobalt brethren (and may God have mercy on their wallets), I actually haven't seen an open C-Can arm blow up for a few years, and I've watched some absolutely horrific spin sessions during that time. Oh. You blew one up yesterday? Sorry. Guess the arm should have had a com cap, huh? A much more common situation is the existence of some of the com's insulating base material in an extension beyond the length of the com segments themselves, forming a "spacer" of as much as .030" to .050" thickness. Either by design or by inadvertence (I never actually inquired which), this normally isn't a functional concern. It is, however, occasionally a practical concern, particularly when total installed length or practical magnetic centers are involved. See Measuring Section 3, "Installed Armature Length," below, for some conditions where this might become meaningful in your motor-building process. |
||||||||||||||||||||||||||||||||||||||||||||||||||||||||||||||||||
|
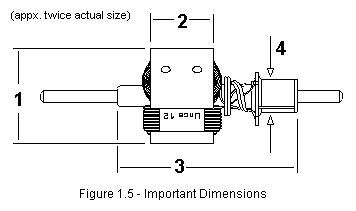
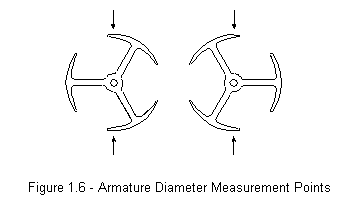
Measuring
an Armature 1 - Stack/Lamination Diameter - The nominal dimension given for C-can armatures is, for reasons most likely known only to God and the fine folks at Mabuchi, .513". SDRA Rules (among others) permit a tolerance of +/- .003", thus permitting a maximum of .516" and a minimum of .510". In this circumstance, it's probably best to extend the decimal place a further digit, as most precision measuring |
||||||||||||||||||||||||||||||||||||||||||||||||||||||||||||||||||
(click on a number to display the topic) |
||||||||||||||||||||||||||||||||||||||||||||||||||||||||||||||||||
devices easily resolve to .0005" or .0001". Why bother? Let's say you buy that new Snarling Wombat Grp. 12 arm from your local track. It looks fine in the tube, and passes all the visual checks you've learned to make. You slip it into a setup, finish the motor, solder on a gear, break it in, and install it in your fresh Factory Modified. Comes the day of the proverbial "Big Race," you TQ and manage to win. You're really happy, right up to the point where the Race Director tells you to remove the motor from the car and the arm from the motor for a mandatory post-victory teardown and inspection. Slipped your mind, didn't it? Upon measurement with the tools at hand, your arm measures .5090" to .5095", no matter who does it. Unhappily, the Race Director informs you that your armature doesn't meet the Rules, which comes as great news to the second place guy who's waving his .5110" armature around like it's the Olympic torch. Moral of the story? Like it says in several other places around this site, if there's a minimum/maximum dimension , number, or tolerance expressed somewhere in the Rules you're racing under, you had better measure it/them before someone else does. "I didn't know!" or "It came that way!" may be true, but the caliper doesn't really care, so perhaps you should. Measure the diameter with the most precise tool you own; if you don't own one that can do it (and I suspect you should, if you're serious enough about this hobby to be racing Classes where armature diameter is specified, right?), find someone you trust that does. Have that person measure it for you with a set of calipers or a micrometer that reads to at least a .0005" resolution. |
||||||||||||||||||||||||||||||||||||||||||||||||||||||||||||||||||
 |
|
How I measure armature diameter - There are a number of different ways to go about it, but here's the sequence of steps I use. First, make sure the arm is clean, normally not a problem with new arms, but necessary after they've been in use for a bit. Second, make sure the measuring faces of the calipers or the anvils of the micrometer you're using are also clean. It doesn't take much nearly-invisible debris to throw either of these devices off by .0005" or even .001". Third, measure the arm at a number of different points. I start with my trusty digital calipers (which I presume, |
||||||||||||||||||||||||||||||||||||||||||||||||||||||||||||||||
erroneously or otherwise,
is the same type of tool that will most likely
be used to measure any of my arms at a Race), and generally measure the diameter at 12
points: both ends of the stack (2) at both sides of the stack (x 2) on all three stacks (x
3). Yes, I know that the last 4 of these measurements are redundant, having been done from
the other direction, but I do them anyhow. Shows you what I know, huh? If any of the
readings are even close to suspect, I retake all of them with a digital micrometer that
resolves to .00005" (or: close enough for slot car drag racing). |
||||||||||||||||||||||||||||||||||||||||||||||||||||||||||||||||||
2 - Stack/Lamination Length - This is another dimension where published Rules and specifications tell you what will and will not pass muster. For C-Can arms, the two important numbers are fairly easy to remember, and, it follows, to check. SDRA Rules specify a .350" (8.89 mm) stack length for Grp 12 armatures, and a .440" (11.17 mm) length for all others, including Grp 20 arms. As the armature laminations frequently have a coating, not to mention the possibility of errant wire binding epoxy, it's best to measure every stack for this dimension. This measurement is best performed with the tips of your
digital or dial caliper (a micrometer would be more accurate but a little unwieldy in
these circumstances). Just remember that the calipers are most likely made from hardened
stainless or conventional steel, and the tips can be sharp, at least insofar as
the insulation on the wraps of wire at the end of the stacks is concerned. It may be
difficult, but it's possible to damage that insulation with the caliper tips through
carelessness or inattention, so pay attention and treat the arm like the investment it is. |
||||||||||||||||||||||||||||||||||||||||||||||||||||||||||||||||||
3 - Installed Armature Length - While not a "critical" dimension, where a maximum or minimum length is expressed in most Rules, this length can easily become one when the armature you want to use doesn't fit in its intended setup. How? Some reasonably common possibilities: First, the total component length, as illustrated by "3", above, is actually longer than the dimension between the two bushings or bearings as they are installed in your can and endbell (with the endbell properly attached to the can via tightened screws). This condition is fairly easy to check early on in the motor-building process, but sometimes more difficult to correct than one might think. Some material may be removed from the face of the commutator judiciously, usually with something like the Magnehone arm facing tool mentioned above. Second, the "magnetic center" of the arm within the magnets may offset the arm in one direction or another, causing interference, and hence, unwanted constant friction, with one bearing/bushing or the other. Some people seem to believe that this isn't really meaningful with ball bearings, and that the bearings are really don't care much about side loads. Hot tip: yes, they do care about side loads. A brief foray into Bearing Land: within the economic limitations of bearings we can afford for these motors (yes, there are more expensive bearings, and no, you don't really want to know how much they cost), we're limited to radial-load bearings with a limited number of balls, usually between 6 and 8 (we'll skip the "sealed" vs. "non-sealed" question for the moment, as it isn't meaningful in this discussion). The balls run in two races, inner and outer, that contact approximately 85-90% of the ball diameter, the difference being the gap in the center. As the balls are restrained from vertical movement by these races, they are similarly restrained from horizontal movement. Any side load from the armature transmitted to the bearing forces the inner race away from its alignment with the outer race, and imparts an increase in friction in an almost geometrical proportion to the force applied. Ok, so smoke doesn't pour out of your motor when it happens. Usually. But if it does happen, you're encountering friction that doesn't necessarily have to be there. Just something to think about. How much shorter should the arm be than the internal dimension of the setup? Short answer: Beats me. Long answer: with magnets installed and honed, I use a minimal number of spacers, and apply the "evidence of contact" theory with bushings, and the "best guess" theory with bearings. "Evidence of contact" means that during break-in, as I disassemble the motor periodically for cleaning and inspection, I check the inner surface of the bushings for any evidence of contact from arm spacers. If I see signs of contact, I reduce the spacer "package" on that end of the arm by .002"-.003", and put a dot of Dychem on the bushing to check for repeated wear. I do that until the dot of Dychem remains untouched. If I see none, I ignore it until rebuild time, whereupon I may do the whole business over again, depending on what I see on the bushings. |
||||||||||||||||||||||||||||||||||||||||||||||||||||||||||||||||||
4 - Commutator Diameter - Like installed armature length, the com diameter isn't really a "critical" dimension, at least as far as legality is concerned. It is, however, important for other meaningful reasons, and the wise racer keeps track of the dimension with a high degree of accuracy. Why? The first, and most practical, reasons are cost and utility. Armatures are not free (surprise), and they have, at best, a reasonably limited lifespan. When you happen upon a really good one, you know some things up front: the more you run it, the more you race it, the more wear the com sees - an inescapable fact of slot car life. Every rebuild that involves turning the com concurrently reduces what is a finite amount of com material. So, in my approach to them, I keep two things in mind: removing the absolute minimum amount of material necessary to completely refinish the com surface and paying attention to how many times and when I've already done it. This, along with a measurement of current finished diameter, gives me a ballpark projection on the expected lifespan of the armature, which I usually think of in terms of "events," not weeks or months. It also gives me some fair early warning about starting the elusive search for a "better" replacement arm. Second, and probably a more important reason, is that there is a practical safe limit to how small a com may be turned and/or how thin the com segments may be (this, of course, coming from a guy who some time ago ran his favorite Koford Grp 27 Pro Stock motor down to a diameter so small the corrugations of the "S" com base peeked though over about a third of its length - but..., ahem, I'm better now). |
||||||||||||||||||||||||||||||||||||||||||||||||||||||||||||||||||
|
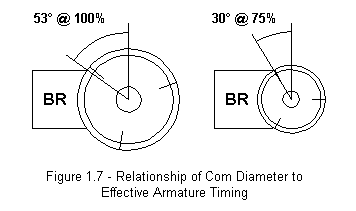
Other Interesting Things to Think About The com diameter has a small but measurable effect on the actual timing of the armature, at least as it relates to how the motor sees it. Figure 1.7, left, using an extreme example, shows that while the brush face width remains the same, its effective "degree distance" increases as the com diameter is reduced. The way things work out, reducing the diameter of the com always retards, however minimally, the practical timing of an arm in relation to its original diameter. It follows, as you can also see above, that commutator segment "overlap" degrees the brush imparts also increase as the diameter goes down. I can't speak for the negatives or |
|||||||||||||||||||||||||||||||||||||||||||||||||||||||||||||||||
|
||||||||||||||||||||||||||||||||||||||||||||||||||||||||||||||||||
|
positives of the overlap situation with any degree of certainty, but have always suspected that the timing "effect" may be one of the reasons people swear a rebalance made an arm "come alive." It may well be that such a small change could have a quite noticeable effect on the armature/magnets/gearing relationship. Rebalancing an arm is normally preceded by turning the com (at least in my experience), and some who rebalance have a set diameter they turn all coms to if they exceed that number. If you think this doesn't really matter, you have yet to a) send new arms out to be ground down to .5105" with an average com diameter of .2043" and have them come back with an average com diameter of .1957", and b) read the paragraph(s) immediately following "Commutator Diameter." As a matter of manufacturing and production convenience, I understand the reasoning and the process. As the owner of the arms, however, I don't particularly like it for the reasons outlined above. |
||||||||||||||||||||||||||||||||||||||||||||||||||||||||||||||||||
|
Summary -
I suspect by this point (and by this amount of page-scrolling)
you're thinking "That's it!? This is all this ******* can tell me
about C-Can armatures?" Yep, pretty much, at least insofar as a page
titled "The Basics" is concerned. From my perspective, there's
a clear difference between what I've observed and consequently
understood and/or extrapolated (translation: guessed) well enough to
talk about here, and those things I've observed or noted and don't feel
comfortable discussing or can't pragmatically explain (translation:
"Say whaa? Why the **** is it doing that?") Such are the
drawbacks of a liberal arts education: the ability to deduce and reason,
but no clue what to deduce and reason about. |
||||||||||||||||||||||||||||||||||||||||||||||||||||||||||||||||||