
| Expanding your first map and add weapons |
|
In this tutorial we will make our map bigger by making another room and connect the two rooms with a corridor. When we made our basic map, it's time to place some weapons and health. I suppose you all made the first tutorial, if you didn't I strongly recommend doing the first tutorial. It will just help you getting more easily through this tutorial. If you forgot how to do something basic like applying textures, just read the first tutorial again and you will know. Let's begin by starting the Unreal Editor (you already know how to do this , right?). Minimize the texture browser that blocks your view.
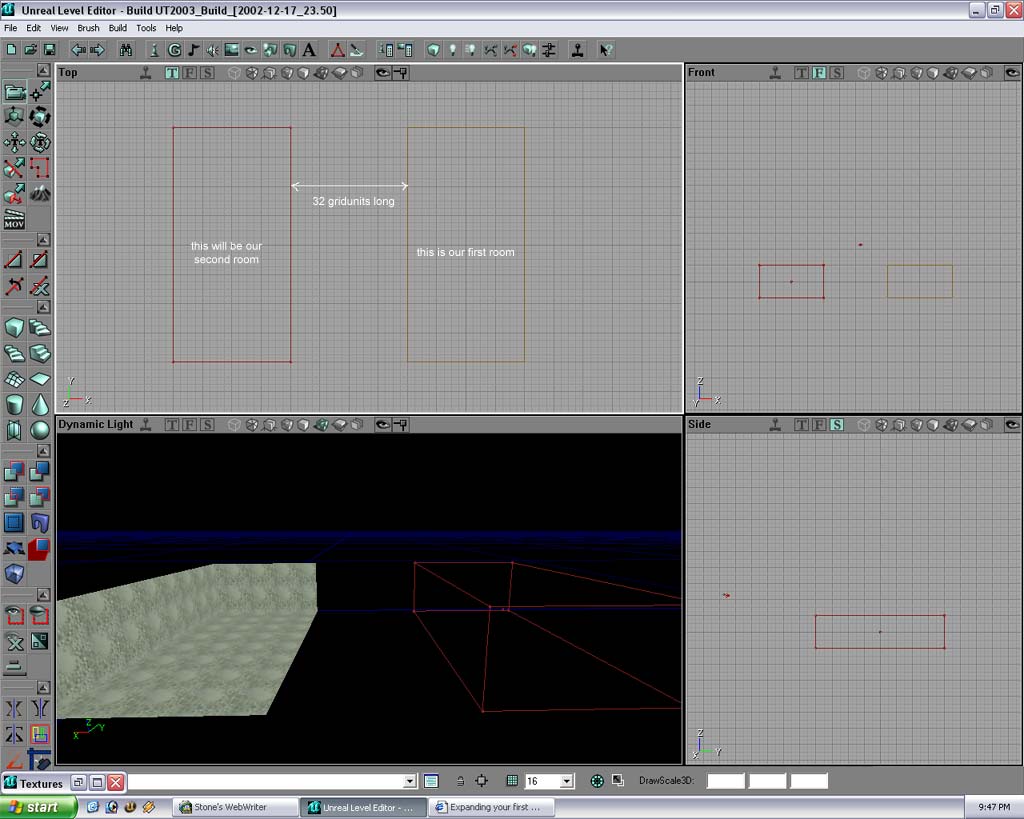
Now rightclick the cube button Maybe you need to move a little bit in the 3dviewport to see the brush. I suppose you know how to move around, again if you don't just look in the first tutorial. Navigating the viewports is essential to complete this tutorial.
Ok, so now you have your brush ready to substract our room out of the world. You do this by leftclicking the "substract" button
If you didn't already, set the grid to 16 units to make alignment of brushes easy. You can do this by rightclicking one of the 2d viewports and choose "grid" in the menu and then click "16 units" from the other menu that appears. Now each grid unit is 16 units big. 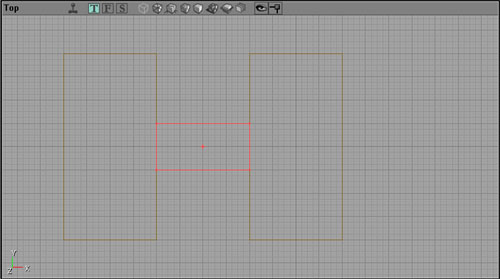 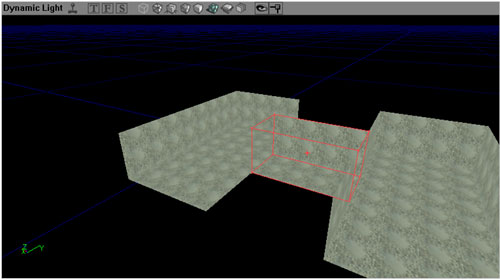 Now we have our map. We just need to texture it. To get the texture browser back, go to the main menu and click "view" then click "show texture browser". You can also achieve this by simply clicking the texture browser icon Now comes the part where you all were waiting for: Adding some weapons to your map. It isn't very difficult actually.
First find your texture browser again. The texturebrowser is actually not only a texture browser window. If you look good you will see that there are many other tabs that you can choose from. This time we need the so called "Actor classes" tab. Click on it and you will see this: 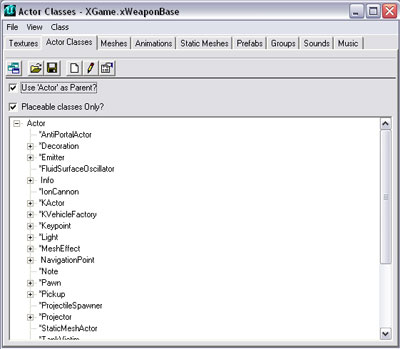 Search for "xPickUpBase" in this list. Click then on the "+" next to it to get an other list. From the new list choose "xWeaponBase". Just click it once and make sure it is selected. Nothing will happen, the engine just remembers that you selected it. Now minimize the "Actor classes" window and rightclick in the 3d viewport on the floor. In the menu that appears choose "Add xWeaponBase Here". If you did this, you see that the weaponbase is added. Now align it to perfectly match to the floor. I've put my weaponbase in the middle of my room. Use the front or side viewport to align the weaponbase to the floor. The weaponbase will appear as a green mesh in the 2d viewports. Add another weaponbase in the other room by also rightclicking on the floor in your second room and choosing "add xWeaponBase Here". Align it again to the floor if necessary. Now we just have the weaponbases. We need to tell the Unreal engine what kind of weapon will appear above the weaponbase during gameplay. We will do this by adjusting the weapon base properties. Rightclick the weaponbase in whatever viewport (the weaponbase will then highlight). In the menu that appears choose "xWeaponBase properties (1 selected)". When you do this the window where you can adjust weaponbase properties appears. 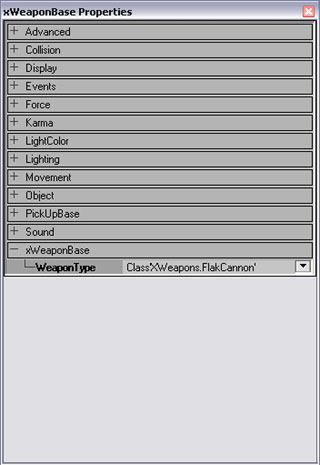 Go to weaponbase click on the "+" to expand that menu. And choose a weapon that you like from the dropdown menu. Do the same for the other weaponbase. Note that the weapon will not appear in the editor but only in the game. Adding a healthbase is basically the same procedure. Open the actor browser again. Go to "xPickUpBase" but instead of choosing "xWeaponbase" choose "HealthCharger". The engine again knows that you selected it so the option to add it will appear if you rightclick the floor in your 3dviewport. From that menu you choose "Add HealthCharger Here". I added the HealthCharger in the corridor. Just do the same as I did and compare your result with mine in the picture later on.  We are almost finished now. Just add some lights (playing in the dark isn't very smart don't you think?) by right clicking on the place were you want the light to be and select "add Light here" from the menu. I suggest putting lights in every uppercorner of a room and one in the middle of the room. Also put a light in the corridor (Maybe this is to much light, but if you want your room look more dark then just remove some lights by selecting them and pressing the delete button on your keyboard). Add some playerstarts by rightclicking somewhere on the floor and choosing "Add Player Start Here". Make sure the playerstart is just a little above the ground to avoid problems during gameplay. If you put a playerstart for instance just under the floor the game will crash or the players cannot respawn properly at that respawnpoint. After all this you have to do something very important before you can play this map. It's called rebuilding the map. We already did this in the first tutorial if you remember. "Rebuilding the map" means that the engine calculates various things like light intensity, shadows and many other geometrical things. You have to do this to see a map the way you meant it to be. So when you make a map or change something, never forget to rebuild (and then save). You can rebuild by selecting "build all" from the "build" menu or by pressing F8 and then click "build".
If you save a map it will be saved by default in the "C:\UT2003\Maps" folder. If you want to play your level press CTRL+P and UT2003 will load your map. You can also do this by selecting "play level" in the build menu. If you want your level to appear in the menu inside UT2003 then you have to call it "DM-something" so that UT2003 recognizes it as a deatchmatch level.
Now you can compare your result to mine: 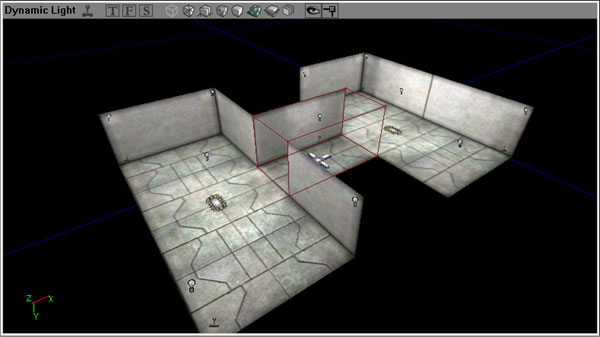 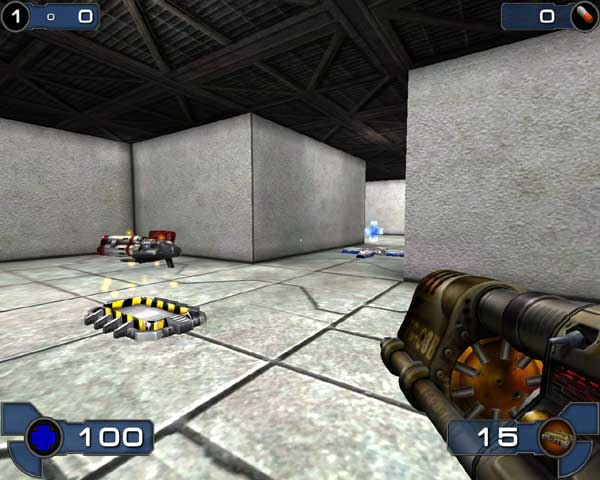 If there is something that you don't understand because I didn't explain it well, or if you get stuck in the middle of the tutorial, mail me so I can finetune this tutorial. Mail me at:
webmaster@unrealfraggers.tk |
Unreal® II© Unreal® 2003 2001 Epic Games Inc. Raleigh, N.C. USA Unreal and the Unreal logo are registered trademarks of Epic Games, Inc. ALL RIGHTS RESERVED