Observatory

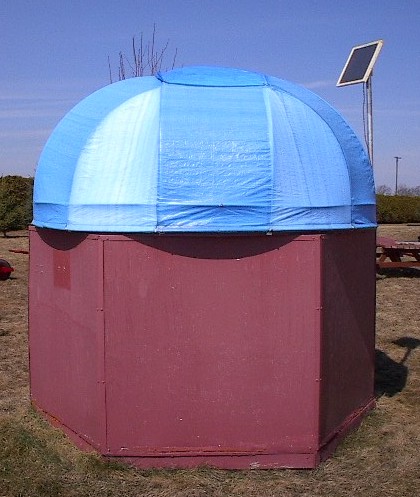
Figure 1: Observatory with Solar Panel Installed.
When building my observatory a few years ago, I made the decision to use a 12 Vdc power supply to supply my electrical needs for my equipment. I choose this type of electrical supply for the following reasons:
- I could place the observatory anywhere on the property
- Most of my equipment could run off of 12V, and those that didn’t could be powered from the 12 Vdc with an inverter.
- Did not want the hassle and expense of digging a trench to run a cable.
Although this setup worked quite well it had some drawbacks-namely keeping the battery charged. Many a night I would want to do some astrophotography and to my dismay, the battery would almost be dead. To get around the inconvenience of taking the battery home periodically for charging, I decided to install a solar panel to keep it topped up.
Recently, at a hamfest (basically a giant garage sale for amateur radio equipment), I picked up a 12V-1A solar panel for $35.00. Now all I had to do was mount it and connected it to my battery. I mounted the solar cell in a wooden case with a plexi-glass cover for protection (from flying balls etc.). This wooden mount is angled at 30º from the vertical so that the maximum strength of the sun hits it in winter when it is needed most.
In addition to adding the solar panel, I also wanted to improve the power supply. The original power supply was a commercially available “porta-pack” that I got from Canadian Tire for $39.99 a few years ago. This type of supply is excellent for powering your equipment when out at a star party, but just doesn’t have the capacity when it comes to a permanent installation. To increase the capacity I obtained a 7.5 A-hr battery (i.e., it will take 7.5 hours to discharge it at 1 amp). In addition, I also added switches to control the lighting and a car adapter plug to power any accessories I have. Click here for a circuit diagram of this system.

Figure 2: A closeup of the new power supply.
The solar cell is connected directly across the leads of the battery (positive to positive and negative to negative). This charges the battery during the day for use at night. At this point, you can install an optional diode to block current from flowing from the battery to the solar cell at night, but I found that this was probably not necessary and omitted it. The battery is what actually supplies the current to the observatory. It passes through a fuse (always good electrical practice) to my lighter socket and the lighting,. I installed a 3 position switch that allows me to turn on either the red light (for viewing charts etc.) or both the red and white lights at the same time. The diode D1, is used to block current to the white light when the switch is in the down position. When the switch is in the up position, the current will flow through D1 to light L1 (red light) and also through L2 (white light) giving me the desired results.

Figure 3: New power Supply as Installed.
In the future I would like to install additional light plugs (to power additional devices) and adding a LED bar graph to indicate the charge left in the battery.
To date this setup seems to be working well. I still have to see how it performs in the winter time when it is cold, as there is little sun and the sun is at a low latitude.