
Welcome to the Cabinet section of our site. This part is to detail the building and/or converting
an arcade cabinet to play more than one game. Currently weve completed one standup arcade
cabinet (conversion) and we are in the process of building our own cocktail cabinet from scratch.
Please enjoy our pictures and if you have any comments, please feel free to contact us.
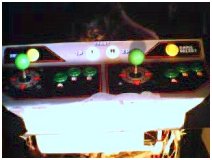
This is what the joystick panel looks like. Its a standart 2 stick setup with 3 buttons per player. includes one/two person start (wired to key #1 and #2 for Mame). The yellow 'game select'button is wired to key #return for simple game selection and the left 'Enter' button is blank, awaiting action. Credits are keyed up by pressing the coin return button (at the top).

This is the joystick panel, but then opened up. It works on a hinge type system and uses locks to strap it down to the cabinet. (inside ofcourse :) As you can see, its pretty messy in there >;)
Ive used the original SEGA control panel that was on the machine when I got it, though stripped the buttons and sticks and installed new ones. The stuff that was on there, though still functional, was very thrashed (also they were the standart microswitch sticks, i got the ultimate Wico leaf sticks. and installed them. They work like a charm.

The Ducks Guts. hehe, this is what runs the whole show, an AMDk62 -350, overclocked to 400mhz. 32 megs of ram and a voodoo3 2000 vidio card. (no TV-out though :( Its quick enough for the pre 1995 games, but the newer games do get a bit of slow-down effect. I bet some extra ram would go a long way here. (if any of you are feeling generous? :)
Below the computer, there is a keyboard (yes, under that mess of wires and consists of a standart Keyboard hack. Very handy as you also need a keyboard to make changes to the system. The wiring loom ive used was with the cab when i got it. I just changed it all around.

This is the top of the cabinet, obviously. When i got it, all the other stuff was still in there, I ditched the old 10 inch monitor and wanted to hack off the insert for the monitor also, though the cover for the coinslot (right side) is also in the same one piece. (as are the speaker covers). I still havent quite decided what to do with this yet, but hell it works. (by the way, thats a Konami Soccer Superstars ..........)

This is what the inside of the top looks like when open, notice the coinslot and also notice the huge amount of room in there. Speakers are also hooked up to the PC, via a soundblaster Pro board.

Just a quick shot of the bottom of the cab, nothing of intrest here. Although just for the hell of it, all the locks work as does the coin box (below right, lucky if you can make it out :)
Thats about it kiddies. Oh yah, ive currently got a 17 inch PC monitor in there, but iam thinking about getting a 20 inch TV or an arcade monitor to fit in there. (anybody wanna gimme a TV? :) hehe The bezel that came with the cabinet had to take a back seat, but with the dark tinted glass, you cant even see the back carboard that ive stuck around the monitor. Works pretty well actualy. If anyone is intrested in the keyboard hack, ill stick a bunch of pictures up for you. just let me know. :)

This is my newest cab, its not finished yet, but you can see how far its come along. Standart one player action, with standart Keyboard hack. simple and easy.
for those with eagle eyes among you, yup, thats a 21 inch RasterOps (gdm1950) 5-bnc fixed freq monitor in there, uses Advancemame to bring up the games as it only runs in certian freqs. Got the monitor for 5 bucks at an auction.

This is the same cab, but this time with the smokes glass Bezel. Makes it look nice. This unit is far from complete, as you can see, the back plate mountings are missing as are the coin slots. but ive got all the gear, just need to find the time to slap it all on there. You can also see the retro-fit joystick on the panel. the buttons are a little off and have to be redone, thus its not painted and covered.