A simple AI
This tutorial is a sort of continuation of my last tutorial, namely How to use the keyboard. I recommend doing this tutorial first, if you haven't done that already.
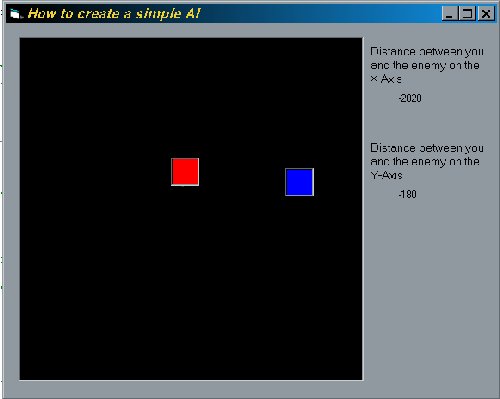
-First we create the form and the things on it. The following things are necessary:
It can look like this:
-Now comes the coding!! Add a module and paste the following code into that module (I've explained it all in my last tutorial).
Global Const
LeftButton = 37
Global Const RightButton = 39
Global Const UpButton = 38
Global Const DownButton = 40
Global Const
LeftButtonFlag = 1
Global Const RightButtonFlag = 2
Global Const UpButtonFlag = 4
Global Const DownButtonFlag = 8
Global
KeyState As Integer
Function CheckKey(KeyFlag As Integer)
CheckKey = KeyState And KeyFlag
End Function
- Paste the following code into the form (I've also explained this is my last tutorial)
Private Sub
Form_KeyDown(KeyCode As Integer, Shift As Integer)
Select Case KeyCode
Case LeftButton
KeyState = KeyState Or LeftButtonFlag
Case RightButton
KeyState = KeyState Or RightButtonFlag
Case UpButton
KeyState = KeyState Or UpButtonFlag
Case DownButton
KeyState = KeyState Or DownButtonFlag
End Select
End Sub
Private Sub Form_KeyUp(KeyCode As Integer, Shift As Integer)
Select Case KeyCode
Case LeftButton
KeyState = KeyState And (Not LeftButtonFlag)
Case RightButton
KeyState = KeyState And (Not RightButtonFlag)
Case UpButton
KeyState = KeyState And (Not UpButtonFlag)
Case DownButton
KeyState = KeyState And (Not DownButtonFlag)
End Select
End Sub
-Double click on timer1 and paste the following code into the timer event (even this is explained in my last tutorial, what a good tutorial!!)
If
CheckKey(LeftButtonFlag) Then
If picHero.Left > 50 Then
picHero.Left = picHero.Left - 50
End If
End If
If CheckKey(RightButtonFlag) Then
If picHero.Left < 5400 Then
picHero.Left = picHero.Left + 50
End If
End If
If CheckKey(UpButtonFlag) Then
If picHero.Top > 50 Then
picHero.Top = picHero.Top - 50
End If
End If
If CheckKey(DownButtonFlag) Then
If picHero.Top < 5400 Then
picHero.Top = picHero.Top + 50
End If
End If
Call EnemyAI
- If you are still alert, the line Call EnemyAI has attracted your attention. This line of code makes VB call the function EnemyAI every 20 milliseconds (the interval of the timer). We're now going to make this function to give the enemy some (artificial) brains. The application is already playable, you can "walk" around (slide is a better word), but (with a lot of imagination) the enemy will only stare at you and do nothing. Paste the following code into the form.
Private Sub EnemyAI()
Dim Width As
Integer
Dim Height As Integer
'y-coordinate of the enemy.
Width = picEnemy.Left - picHero.Left
Height = picEnemy.Top - picHero.Top
If Width > 800 Then
picEnemy.Left = picEnemy.Left - 30
End If
If Width < -800 Then
picEnemy.Left = picEnemy.Left + 30
End If
If Height > 800 Then
picEnemy.Top = picEnemy.Top - 30
End If
If Height < -800 Then
picEnemy.Top = picEnemy.Top + 30
End If
lblYDistance = Height
lblXDistance = Width
End Sub
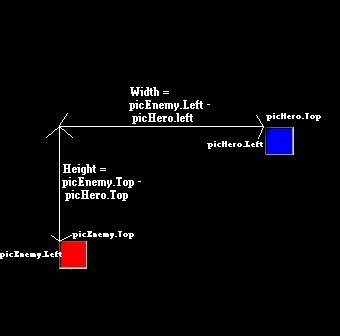
I've declared two variables, Width and Height. Then I give them a value that represents the distance between you and the enemy. Width is the distance between you and the enemy on the X-Axis and height is the distance between you and the enemy on the Y-Axis. I've made a simple image to make things more clear.
The If...Then statements checks if the enemy it within range. If the Width > 0 then the enemy is on the right side of the hero, so if you want the enemy to walk towards the hero, to the left, you have to make the picEnemy.left property smaller. (the smaller picEnemy.left, the more the enemy is on the left) This is done in the following line of code: picEnemy.Left = picEnemy.Left - 30 The number 30 is the size of the 'steps' that the enemy makes towards the hero (the player).You can make this number bigger, so that it looks like the enemy is going faster. If the enemy is at the left of the hero, then is Width < 0 and the enemy has to walk to the right. The code for this: picEnemy.Left = picEnemy.Left + 30. Try and play a bit with the code, this is a good way to understand it.
The same thing counts for the Height. If the Height > 0, then the enemy is below the player. (The bigger Enemy.Top, the lower the enemy is) So the enemy has to walk up. This can be done by making the property Enemy.Top bigger by lowering it with a number every time the function EnemyAI is called. The code for this: picEnemy.Top = picEnemy.Top - 30 I think you will now understand the last thing also, namely the case that the enemy is above the player. Try to figure this out by yourself.
You may ask why I have used 800 instead of 0 in the lines If Height/Width < (-)800 Then. I've done this because the enemy would otherwise walk right through you and would never stand still. Now the enemy will stop if he's within range. Again, I recommend trying some other numbers then 800 and see what happens.
We're almost ready!! The last lines lblYDistance = Height and lblXDistance = Width aren't very hard to understand, it just let's the value of the Width and the Height seen on the form with the help of the labels.
That was it! I hope you've
learn't something. Click HERE to download this
tutorial.
if you have any questions or comments or whatever, feel free to
e-mail me by clicking Here.