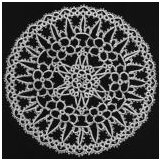
Tatting is a form of lace which was very popular during the Victorian era.
It basically consists of hitch knots arranged in circles (rings) and lines
(chains). These rings and circles are repeated in infinite variety to form a
doily, Christmas ornaments, baby bonnets, trimmings and many more things.
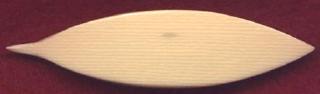
A good link to check out a story about an imitation-ivory tatter made for
Lydia Pinkham's Medicine Company located in Lynn, Massachusetts by Whitehead
& Hoag Company of Newark, New Jersey. Whitehead & Hoag were manufacturers of
cellulose nitrate and celluloid acetate novelties such as campaign buttons,
trade cards, gun sights, notebooks and commemorative medals.
Whitehead & Hoag Co.
Lloyd

Blackwork
The art of Blackwork, a simple yet challenging counted thread embroidery, was widely practiced in the Elizabethan era. Because print fabrics were essentially unknown, ladies ornamented clothing and household items with stitchery. Although many different types of embroidery were used, Blackwork has come to be considered particularly evocative of the Tudor/Elizabethan era. One of the primary reasons for this is the splendid portraits painted by Hans Holbein. His attention to detail extended to the patterns embroidered on the clothing of his clients. Today, the stitching technique used in most blackwork is called the Holbein Stitch in his honor.

Ladies wore full sleeves embroidered with plants and animals. To protect the delicate stitchery, sometimes sheer fabric outer sleeves were worn. Blackwork embroidery was not limited to the garments of the fairer sex. Many portraits of the men feature richly decorated shirts and collars. It was not uncommon to receive callers from one's bed...giving the host a chance to show off exquisitely worked night shirts and caps. Ruffs and cuffs were also embroidered with this technique.
Calli Victoria presents a link to a "History in Embroidery">
sampler. It is HERE and this beautiful sampler
shows the Battle of Britain, Shakespeare, the Space Shuttle,
and much more. The pattern can be purchased. They call it
THE MILLENIUM SAMPLER.
During the 19th century in England, rigid standards of morality and decency were to dominate the reign of Queen Victoria and the majority of the population was very poor. Education of children was sorely neglected and until the introduction of state schools, the only instruction for poor children came from Sunday schools, charity schools or orphanages. Charity samplers were developed to teach reading and writing skills by having the students work row upon row of letters and numerals onto their cloth in the hopes that they would become proficient enough in the marking of linen, mending and darning to obtain employment either in the service of a family or in the factories and mills that were the backbone of the Victorian economy.
CROCHET
THE BRONTE SAMPLERS
Time at Haworth was also devoted to needlework. Emily completed her first sampler April 22, 1828. Anne finished her first piece November 28, 1828. Both of these pieces are again similar to those of their elder sisters, aunts, and mother. The sisters each completed a second, more lengthy piece: Emily, March 1, 1829; Charlotte, April 1, 1829 and Anne January 23, 1830. All were worked with dark green silk on canvas. All of these pieces were previously in private collections. They are now in the possession of the Brontë Society and on display at the Brontë Parsonage Museum, Haworth.
Thimbles
by Blessed, Sheba, Ringtail
Zackery Taylor, and Nicole Carmella
Thimbles, Thimbles everywhere. In many sizes and many ways! See them all see them one! See the different thimbles. I need one and you need one we all need to us a thimble when we saw our poor little stockings today,
Thimbles, thimbles everyewhere! I use a thimble my dears when I sew my wonderful quilts and when I sew I sew and sew and I dont want to hurt my poor little paw so I place a thimble upon my paw and there I dont see any sores. The sewers best friend is a thimble one must say!
Thimbles, thimbles everywhere one must look around this day, I place the thimble upon my paw when I do my cross-nitch sewing and then when I make those beutiful stitches I dont allow the needle to go throuh my lovley paw! So the best friend is a thimble I must say so I dont stitch my thumb.
Thimbles, thimble everywhere! One must look to find one for when one sees a sewer one shall surly see a thimble. But I dont use the thimble for that I use it for a toy. I love to toss the thimble to and fro so as to play with it. And I love the fact that it comes in so many colors. Red, Blue, grey, and green. I love them all today. They make such lovely toys they do so dont thing a thimble just for sewing but also a toy
Thimbles, thimbles everywhere! A sewers friend it might be and also a toy to play but be not dismayed I use the thimble for collecting I do. I love to put the thimble right beside my seashells and oyster shells so as to make a pretty site. The thimbles in the very colors and sizes make such a grand collection so be not dismayed when I say a collection the thimbles shall make!
Thimbles come in many sizes and many forms so when one sees a thimble remember they are everywhere!