7
Installing from the Starter CD (Recommended)

Note: For USB connections, skip to page 9.
Note: The Starter CD includes a utility that can copy the software to 3.5" high-density diskettes or to a server.
Installation for Windows 95, Windows 98, and Windows NT 4.0
Note for Windows 95 and Windows 98 users:
If you see the message New Hardware Found at any time while installing the printer software, select Do not install a driver (Windows will not prompt you again) and click OK. If you see the Update Device Driver Wizard dialog box, click Next until you have a Finish option, and then click Finish.
Note for Windows NT 4.0 users: You must have administrator privileges to install a printer in Windows NT 4.0.
- Start Microsoft Windows and make sure no other Windows applications are running.
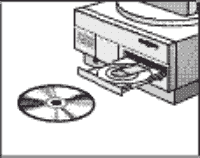
- Insert the Starter CD into your CD-ROM drive. The installation program runs automatically.
If the installation program does not run automatically, click Start, select Run, and at the command line box, type the letter of your computer's CD-ROM drive followed by :\SETUP (for example, type D:\SETUP).
- Click Install Printer Driver from the CD menu. Follow the instructions that appear on the screen to complete the printer driver installation.
Installation for Windows 3.1
- Start Microsoft Windows and make sure no other Windows applications are running.
- Insert the CD into the CD-ROM drive.
- In the Program Manager window, click File and then select Run.
- At the command line box, type the letter of your CD-ROM drive followed by \WIN31\PCL3\[language]\SETUP.EXE, where [language] is a 3-character code (see the appendix on page 39 for a list of the 3-character language codes). For example, type D:\WIN31\PCL3\ENU\SETUP.EXE, where ENU is the code for English.
- Follow the instructions that appear on the screen to complete the driver installation.
8
Print a Test Page
- Open the Printers folder in the Control Panel.
- Right click the printer icon and select Properties from the pop-up menu.
- Select Print Test Page. If the test page does not print, see page 21.
|
|
7
Instalacija sa Starter CD-a (preporučuje se)

Napomena: Za USB spajanja, preskočite na stranicu 9.
Napomena: Starter CD sadrži uslužni program koji omogućava da kopirate softver za pisač na disketu 3.5" ili na server.
Instalacija za Windowse 95, Windowse 98, i Windowse NT 4.0
Napomena za korisnike Windowsa 95 i Windowsa 98 : Ako bilo kada tijekom instalacije softvera za pisač vidite poruku New Hardware Found, odaberite Do not install a driver (Windows will not prompt you again) i kliknite na OK. Ako vidite dijaloški okvir Update Device Driver Wizard, kliknite na Next dok se ne pojavi opcija Finish , zatim kliknite na Finish.
Napomena za korisnike Windowsa NT 4.0: Za instalaciju pisača pod Windowsima NT 4.0 morate imati ovlasti administratora.
- Pokrenite Microsoft Windows i provjerite da li su sve ostale Windows aplikacije zatvorene.
- Stavite Starter CD u vaš CD-ROM pogon. Program za instalaciju pokreće se automatski.
Ako se program za instalaciju ne pokrene automatski, kliknite na Start, odaberite Run, i na komandnoj liniji, upišite slovo CD-ROM pogona vašeg računala, a nakon toga :\SETUP (na primjer upišite D:\SETUP).
- Kliknite na Install Printer Driver iz CD izbornika. Za dovršenje instalacije vašeg pisača, slijedite upute koje se pojavljuju na zaslonu.
Instalacija za Windowse 3.1
- Pokrenite Microsoft Windows i provjerite da li su sve ostale Windows aplikacije zatvorene.
- Stavite CD u CD-ROM pogon.
- U prozoru Program Managera, kliknite na File i zatim odaberite Run.
- U okviru komandne linije, upišite slovo vašeg CD-ROM pogona i zatim
\WIN31\PCL3\[language]\SETUP.EXE, gdje je [language] troslovna oznaka (u dodatku na stranici 52 potražite popis troslovnih oznaka jezika). Na primjer, upišite D:\WIN31\PCL3\ENU\SETUP.EXE, gdje je ENU oznaka za engleski.
- Za dovršenje instalacije vašeg pisača, slijedite upute koje se pojavljuju na zaslonu.
8
Ispis testne stranice
- U Control Panel otvorite folder Printers.
- Kliknite desnim gumbom na ikonu pisača i sa pop-up izbornika odaberite Properties.
- Odaberite Print Test Page. Ako se testna stranica ne ispiše, pogledajte stranu 26.
|
|