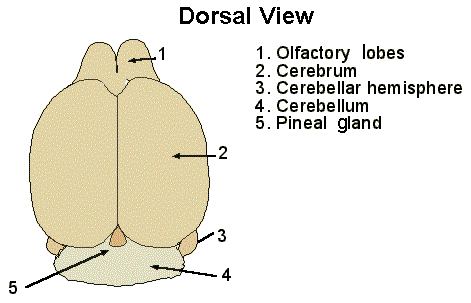
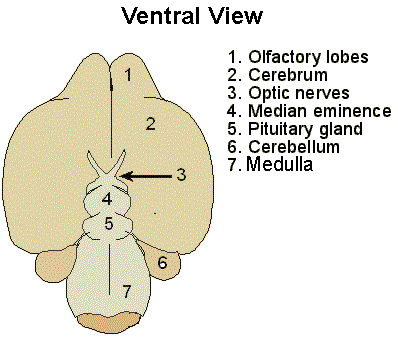
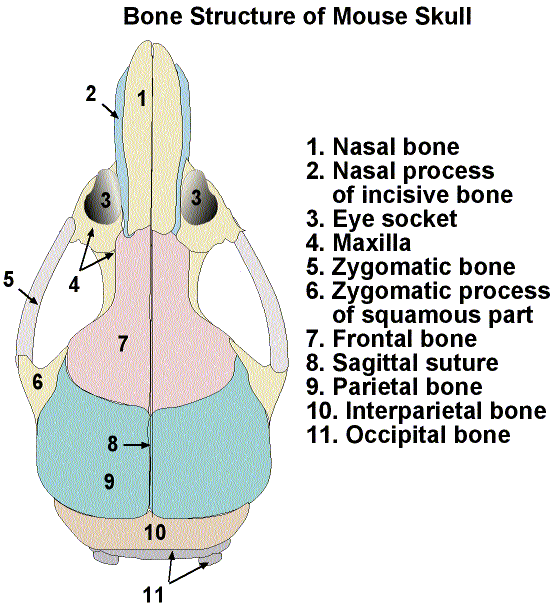
Gross Anatomy of the Mouse Brain


General Procedures
Due to certain phobias, this last step might be a little difficult
for a few people. But, you haven't gotten light headed yet, so
chances are you will do fine. If you are just interested with
structures above the neck, simply become a French Revolutionary
and cut the head off. Skin the fur off the head and discard. Cut
the jaw off by sliding your scissors through the oral cavity until
you meet the resistance of the mandibular junction and cut on
both sides. You can examine the oral cavity at this point for
any abnormalities. If nasal obstructions are a suspicion, slide
a needle into the nasopharyngeal opening located behind the soft
palate and flush with saline or preservative. If there is no blockage,
the fluid will empty through the nostrils. Check to see if the
Harderian glands located behind and edging out the eye socket
are enlarged. You do not have to remove the eye for this observation,
but if you can see a great deal of tissue poking out from the
edge of the eye, good money it is an enlarged Harderian gland.
 Removal of the Brain
Next, remove any excess tissue or muscle from the cranium.
A membrane surrounds the surface of the cranium and may cause
problems if not removed, so use your scissors to remove it as
you would rid your fingernails of their cuticles. If you removed
the head properly, you should be able to see the cerebellum at
the back of the cranium. If not, trim away the excess spinal tissue
until you reach this point. Now (drum roll please), it is time
for you to remove the brain. Using your scissors, cut along the
natural sagittal sutures in the skull making sure you keep your
scissors tips up to avoid injury to the brain. Reflect back the
bones as you go until you are cutting between the eyes. Gently,
take your forceps and just slightly pinch the surface of the brain.
Hopefully, you will lift up the meninges (the lining of the brain
and spinal cord) and you will be able to remove it. If you fail
to remember this step, you could inflict serious damage to the
brain on removal. Turn the head upside down and with gravity on
your side, use your forceps to help you ease the brain out of
the skull. At some point, you will see two thread-like structures
anchoring the brain from its ventral side. These are the optic
nerves and just use your forceps to snip them loose. Now take
your forceps, and gently ease the brain out of the skull.
Examining the Brain and Skull
Examine the brain for symmetry and a firm texture and place
in preservative. Good job. Lying on the floor of the skull is
a H shaped structure. The two parallel portions are the trigeminal
nerves and should have a smooth white appearance. Laying in the
middle of the trigeminal nerves lies the pituitary gland. In
situ, the pituitary is attached to the brain by a stalk, as
shown in the diagram. When the brain is removed, the stalk is
severed and the pituitary is left in the base of the skull. If
healthy, the pituitary should have a pinkish color and what appears
to be three rings radiating from the center (the Pars nervosa,
Pars intermedia, and the Pars distalis). Place the skull in the
preservative and YOU ARE FINISHED!!!!!
Spinal Column
If you are interested in the spinal column, your best bet
is to cut away the surrounding tissues from the vertebral column
and preserve whole. During histological sectioning, the delicate
cord encased in the vertebral column can be cut in sections so
the spinal cord can be examined.
YOU ARE DONE!!!! CONGRATULATIONS!!!!!

Site designed,
written, and selected pictures illustrated by Erin
Parsoneault, inspired
by D.E.Devor-Henneman, and edited/mentored byDr. J.M.Ward


 Removal of the Brain