| |
| Behind the Screens |
| |
| Behind the Screens |
|
|
| ILM unveils the tools it invented to craft the complex
graphics in Star Wars Episode I: The Phantom Menace |
|
|
| In November 1996, shortly after the script for Star Wars
Episode I: The Phantom Menace was written, Christian Rouet, senior technology
officer at Industrial Light & Magic, got his first look at the concept
art for what would become the most complex mixture of computer graphics
with live action the studio had ever faced. "I could see that we would
have big throughput issues," he says. "We had to make the workflow more
efficient." Two months later, 15 software engineers working under Rouet
in ILM`s R&D department began revamping the studio`s existing tools
and creating new ones to make it easier and faster for modelers, painters,
animators, CG supervisors, and technical directors to practice their craft.
Processes that were cumbersome became interactive, animation that might
have been tedious became automated, and familiar tools got facelifts. |
|
| Other than the small "rebel Mac unit" at ILM, the computer
graphics pipeline is based on SGI hardware and commercial software such
as Pixar`s RenderMan, Avid`s Softimage 3D, and Alias|Wavefront`s PowerAnimator
and Maya that are all integrated with ILM`s custom software. It`s rare
for ILM to reveal much about its proprietary tools, but this year the R&D
department created a short film describing its work, which will be shown
at the Electronic Theater during the Siggraph conference this month. Among
the upgraded tools highlighted in the film are those for facial animation
and lip synch, modeling, enveloping, socking, tracking, painting, and compositing.
New tools showcased in the short film include a dynamic simulator, a choreographer,
a 3D match-move program, and an adaptive terrain generator, among others. |
|
| Shaping |
|
| With 66 different character types to be modeled and crowds
to be animated, much of the R&D department`s focus was on making life
easier for character teams. Most characters were modeled with commercial
3D software, then refined with ILM`s Isculpt software. With Isculpt, modelers
can make symmetrical changes to a model even if the topology, geometry
types, and resolution are different in each half of the model. To deform
geometry within Isculpt, a modeler would typically use a 3D brush of arbitrary
size centered on any point in 3-space, not necessarily a vertex. "[The
brush] basically captures a bunch of geometry within a certain distance,"
says James Hourihan. |
|
| Thus, a modeler can pull, push, twist, and move geometry
around smooth surfaces; create wrinkles; and paint weights that are respected
by symmetric operations. "If you painted a seam on clothing, it could create
the opposite weights on the other side and if you were to grab the seam,
it would grab the weights all together so that you could interactively
stretch, yank, and smooth the grabbed portion," says Hourihan. One big
advantage of Isculpt: It gives modelers a way to reshape a model to, for
example, create an entire race of Gungans. |
|
| "The overwhelming challenge was in upgrading and enhancing
our tools to sustain the volume of work," says Cary Phillips. "We had to
make things faster because people would have less time to set up and animate
creatures than on other shows." Phillips was largely responsible for creating
the system known as "Caricature," first used by |
|
| animators to create facial animation and lip synch for
the dragon in Dragonheart. Although Caricature`s underlying technology
didn`t change, Phillips overhauled the interface knowing that in Star Wars,
CG characters would talk to each other. "The best thing about Caricature
is the instant feedback," says Tim Harrington, an animator who helped perform
Watto and Boss Nass. "We can dial in a face shape, move muscles, make fat
jiggle, and see results immediately." |
|
| Once a basic shape for a character has been created, the
character must be skinned and "enveloped." The skin itself is like a patchwork
quilt made of spline surfaces--four-sided patches that are stitched, or
"socked," together. The R&D team optimized ILM`s socking software,
which dated back to Terminator 2, and upgraded it to handle complex 3D
characters that often have small areas, such as the corners of a mouth,
where several patches must be stitched together. "It`s the last step of
the geometry pipeline for a creature before it goes to animation," says
Nicolas Popravka, who worked on the new software, "so it`s very sensitive."
If patches are not tightly connected, cracks show up in the final rendering.
"Cracks are the nastiest of problems because they often manifest themselves
as tiny amounts of color showing through from a surface behind, and it`s
not always obvious that a crack is causing the problem," adds Phillips. |
|
| To move the skin over the surface so that it looks as if
there are muscles beneath, ILM uses a technique called "enveloping." Put
simply, enveloping relates the skin to joints in the skeleton so that when
the skeleton moves, it pulls the skin along with it. Vishwa Ranjan rewrote
the original system, first developed for Jurassic Park, to shorten the
learning curve and make the process interactive. Equally important, the
new system created a spatial relationship of skin to joints that is now
independent from the surfaces being enveloped. This meant that envelopes
could be re-used, and the underlying model could change after it was enveloped.
"We realized that during the evolution of a creature, the model changes
more often than people might think," Ranjan says. |
|
| Choreography |
|
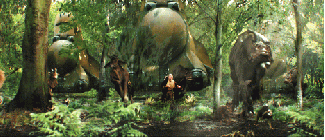
| To move characters, animators typically created key poses
in Softimage, but for individual scenes such as the stampede of CG animals
on Naboo early in Episode I, they needed to maneuver 61 scared critters.
The R&D group responded by creating "Fred." With Fred, animators first
created a library of motion cycles and transitions between the cycles for
each animal. Then they imported geometry for the 3D scene--a simple terrain
and some props--into Fred along with the characters and their traditionally
animated walk cycles. Fred separated the geometry and animation for each
character and reduced the resolution of the geometry to achieve a variety
of 3D representations that ranged from small, sprite-like stick figures
to larger, fleshed-out creatures. |
|
| "We split the animation and geometry to keep as much as
possible in memory, which makes it run really fast," explains Zoran Kacic-Alesic.
Once all the pieces are available, animators draw paths on the terrain,
assign characters to the paths, and apply motion cycles to the characters.
The paths look like multicolored ribbons, with each color in the ribbon
representing a motion cycle. To choreograph the paths of multiple characters,
Fred offers both a 2D edit decision list, which displays each clip on a
time line, and interactive 3D tools that allow the animators to slide elements
in time or in space. "It`s like a film-editing system except it also has
a 3D component," says John Horn. For example, an animator can pick up the
ribbon and move it in while a creature is running, and can change the length
of any motion cycle by stretching or shrinking the colors on the ribbon. |
|
| Simulation |
|
| Fred gives animators explicit control over a crowd of hundreds
of individual characters. To animate more characters, the effects crew
used particle animation in Maya. But to add animation to individual keyframed
characters, the R&D department created procedural animation and simulation
tools. For example, because existing tools for doing rigid dynamics couldn`t
deal with stiffly constrained systems like the droids, according to Hourihan,
ILM created its own rigid-body system that can live in a hierarchy. "It`s
in a gray area between being a kinematic chain and a rigid-body solver,"
he explains. |
|
| More widely used were the simulation tools created by John
Anderson, who explains that once his team got started, they ran hundreds
of simulations on materials ranging from soft to stiff. "Most of the characters
have procedural animation on them," says Anderson, "because it allows you
to get some complexity in the motion that`s not very expensive. The simulator
uses a physically inspired model, as Anderson puts it, with a representation
of what they determined were the important properties of the object or
material being animated. "It`s basic stuff," he says, "but what makes it
different is the degree to which we can control procedural animation to
make it fit with keyframed animation. Another advantage is that the system
works with one, two, or three dimensions. "[Simulation] is easier to control
if you don`t have undesirable degrees of freedom," Anderson says. "There`s
no sense in using a 3D representation of something if it`s fundamentally
a 2D thing." In fact, although the 3D simulator was used in The Mummy (see
May 1999, pg. 34), the procedural animation in Star Wars was primarily
1D and 2D. The string-like objects, such as the skin dangling from Sebulba`s
chin and the antennae on the sea monsters, were animated with a 1D simulation,
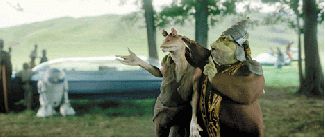
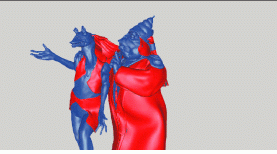
while the membrane the submarine goes through, Jar Jar`s ears and the clothes
the characters wore were animated with a 2D simulation. |
|
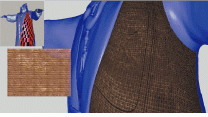
| The cloth simulation created a problem, though--it stretched
and distorted the textures. "The cloth was made of non-stretching material,
so the texture on the cloth needed to remain uniform," says Ranjan. To
solve this problem, he and John Anderson developed a "relaxation" scheme
that tried to maintain the appropriate distances for the texture on the
model during the simulation. In addition to solving the stretching problem,
the software optimized the texture coordinates so that fewer pixels could
be used, and clothing could have seams. |
|
| Generating Terrain |
|
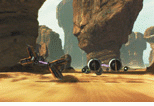
| One of the most dramatic sequences in Episode I is the
all-CG pod race. To give the pod-race team a way to work interactively
with a terrain that zips along at 600 miles per hour, and to generate the
terrain for the final shots, the R&D team created a three-part adaptive
terrain generator. In stage one, a specification was created using data
that determined how much detail was in a particular region and how high
the resolution needed to be. The actual terrain could then be generated
using information from a pre-pass, according to Alan Trombley. |
|
| In the pre-pass stage (stage two), terrain geometry was
created at all possible resolutions, and each resulting shape, or tile,
was compared to the highest-resolution tile. Thus, what was stored in memory
was information for the detail in each tile, for each resolution of each
tile, and for the difference between any tile and the tile with the highest
resolution. "The key is that this data is small, so we can hold many frames
in memory," Trombley explains. |
|
| In stage three, the software determined whether a tile
was in view. If so, it decided which version of that tile to create based
on its distance from the camera. This is similar in concept to dynamic
paging used in flight simulations, according to Rouet, with one distinction:
"It`s much more precise." Trombley agrees: "Most flight simulators don`t
care whether the terrain flickers a little as you approach it. But that
would be a disaster for us." Thus, once the system decides which resolution
is acceptable, it creates that tile and the one next in line with more
detail and higher resolution, then interpolates the geometry so that the
actual tile displayed is a blending of the two. "At the moment when the
system is going to switch to another tile, it`s actually already made the
previous tile look exactly like it," Trombley says. |
|
| Painting |
|
| Even though it would be impossible to work interactively
with a final rendering of the terrain, ILM comes close with "Irender."
Incorporated into Viewpaint, ILM`s 3D paint system, Irender provides an
interactive lighting environment and simulates a RenderMan rendering. "Previously,
painters had to wait for TDs to render a scene so they could see what the
paint looked like," says David Benson. Now they can see a fast approximation
that takes into account opacity, bump, and displacement maps. For the pod
race, Irender generated an interactive simulation of the terrain with shadows. |
|
| Viewpaint itself was revamped for Star Wars, for complex
hard surfaces such as those in the pods. "If you think that each of the
thousands of pieces of Sebulba`s pod has a shader with textures, all of
which have to be painted, you can see that navigating through such a complex
model hierarchy to pick the part to paint is by itself difficult," says
Rouet. "Plus there is a diversity of primitives: polygons, trimmed nurbs,
patches." Moreover, the team had to face issues such as texture stretching
that were unique to the hard surfaces. Ultimately, by combining Irender
with Viewpaint, the painters were able to choose cylindrical mapping, projection
mapping, or to explicitly assign textures to surfaces and see, interactively,
a simulation of the final result, according to Eric Shafer. |
|
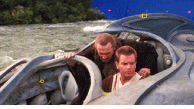
| Two other proprietary systems were used extensively for
Star Wars: a 3D tracking system that helped animators precisely place characters
in live-action scenes, and CompTime, a new compositing system. |
|
| Although some shots were composited with Sabre, ILM`s extensions
to Discreet Logic`s Flame and Inferno software, CompTime was the compositing
tool for the CG department, according to Jeff Yost. First used for one
shot in Saving Private Ryan, CompTime is based on the studio`s long-time
scripted system, but now boasts a graphical user interface and hooks for
plug-ins that can be written in Python or C++. Tim Alexander, a compositor
for Star Wars, took advantage of the plug-ins, for example, to write filters
that emulated particular camera lenses. In addition, CompTime allowed many
people work on one shot; the system merged the work together into a final
script. |
|
| Although many of these tools were created for Star Wars,
they`ve already had an impact on ILM`s work on other movies. "We were able
to get such a high throughput without lowering our quality," says Kevin
Rafferty, CG supervisor. "It will definitely affect the way we bid shows." |
|
|
|
| Barbara Robertson is West Coast senior editor for Computer
Graphics World. |
|
|
|
 To create the facial animation and lip synch for Boss Nass, animators used
ILM`s custom Caricature software.
 |
|
|
 To create Watto`s snout, modelers reshaped the basic geometry using Isculpt.
 |
 |
 |
|
 With
ILM`s Caricature software, animators have shape-blending tools for manipulating
elements in complex 3D models. Developed originally for facial animation
and lip synching, Caricature is now used for secondary animation as well.
Recently, the tools Isculpt, for resculpting models, and Carienv, for enveloping
(moving skin over muscles), have been folded into the system. With
ILM`s Caricature software, animators have shape-blending tools for manipulating
elements in complex 3D models. Developed originally for facial animation
and lip synching, Caricature is now used for secondary animation as well.
Recently, the tools Isculpt, for resculpting models, and Carienv, for enveloping
(moving skin over muscles), have been folded into the system. |
|
|
|
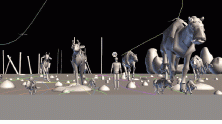 |
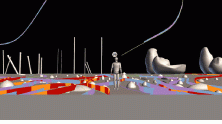 With "Fred,"
shown here, animators explicitly choreographed all the CG animals in the
stampede scene. With "Fred,"
shown here, animators explicitly choreographed all the CG animals in the
stampede scene. |
|
|
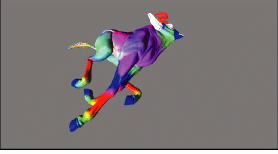 Colored areas
of influence help envelopers define skin movement. Colored areas
of influence help envelopers define skin movement. |
|
|
|
 |
 |
 Using custom
cloth-simulation software and a texture map relaxation technique, ILM`s
R&D department helped these characters become believable. Using custom
cloth-simulation software and a texture map relaxation technique, ILM`s
R&D department helped these characters become believable. |
|
|
 |
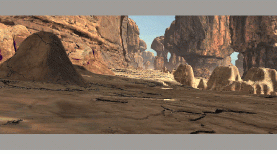 |
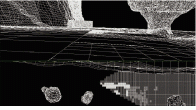 To offer the
pod-race unit an interactive tool that could emulate final renders, ILM
created terrain generation and rendering software. To offer the
pod-race unit an interactive tool that could emulate final renders, ILM
created terrain generation and rendering software. |
 |
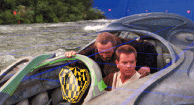 |
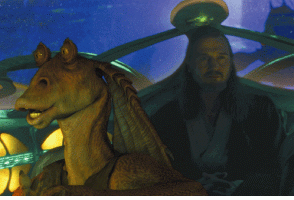 In addition
to capturing the live-action camera move with Loupe, ILM`s tracking software,
software engineers added a 3D model-match feature that automatically gave
animators object-based movement to better help them fit CG characters inside
moving objects. In addition
to capturing the live-action camera move with Loupe, ILM`s tracking software,
software engineers added a 3D model-match feature that automatically gave
animators object-based movement to better help them fit CG characters inside
moving objects. |
|
|
 |
 |
 |
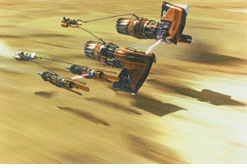
 Painting this
complex engine from Sebulba`s pod became a little easier with the navigational
tools and texture-mapping options added to ILM`s custom Viewpaint software. Painting this
complex engine from Sebulba`s pod became a little easier with the navigational
tools and texture-mapping options added to ILM`s custom Viewpaint software. |
|
|
|
|
|
Computer Graphics World August, 1999
|
 |
Copyright © 2001 - PennWell Corporation and PennNET, Inc. All rights
reserved.
|