 |
|
 |
 |
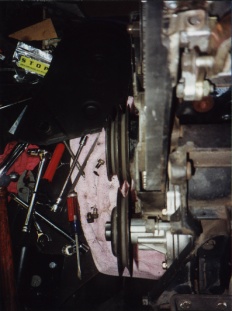
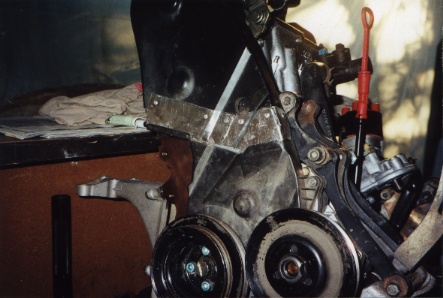
| Putting it all back together is as easy as taking it apart. Reverse of how you took it apart is a good way to go. Your bags of bolts can now be used in reverse of how you placed them. Follow the manual regarding head bolt tightening pattern and check out New Dimensions Tech. Sheets for order of cam bolt tightening if your putting in a new cam(which you should consider. I have a Neuspeed 270 that kicks but) The picture on the right is to show that the two pulleys are not lined up. I had a new water pump and housing inserted about a year ago and it has been not aligned this whole time. This is not my mechanics failt really, but it would have been good if he had noticed it while he was tightening up the belts. The problem lies with the pressed on pulley hub. The distance from the inside of the flange to the obvious casting ends is 22-23 mm. In this picture the pulleys are actually lined up but before I had the flange pressed out it was only 20 mm, causing the belt to track off center. The water pump came from Volkswagen that way, and my Volkswagen parts guys say it is common that they aren't quite right. So, make sure all of your pulleys are aligned at this stage. At this point it becomes obvious that the 2L is 12mm taller than the 1.8L. That means the timing belt cover no longer fits, the alternator mounting arm rubs the pulley fan, and later that the throttle body will rub on the hood and the valve cover breather will rub on the strut bar if you have one. So, regarding the timing belt cover, some guys decide that it is not worth reinstalling and having it off looks cool. I was tempted to go that way, but my mechanic reminded me of one thing. If by some fluke a rock or some debris gets into the pulley, it could throw off the timing, possibly causing LOTS of damage, not to mention wrecking your day. The other problem is increased wear do to dirt and dust that could be kept out more by the cover. With this in mind, I decided to increase the length of my cover so I could retain it. The first thing to do is create another bracket. To the right again you can see the original welded bracket and the one I made and pop-rivetted on. The metal I used was just a piece from a bracket I had lying around. You can see the 12mm distance between the bolt and the hole in the original bracket. Make sure that the rivet is flattened on the back side so as not to rub on the timing belt. After bolting on the inside metal cover, you can turn your attention to the bottom cover. Fortunately, no modifications need to be made to it, so just bolt it on. Then, the removable cover. I bought some thin aluminum sheets from the local hardware store. Using a hammer, anvil, and bench vise, pound and bend the aluminum to match the contours of the cover. Keep in mind that all the angles are now way off and some fudging is necessary. On the bottom back part, you will have to cut a triangle-shape |
 |
| wedge out of the aluminum similar to the wedge shape on the original cover. I used two pieces with the join just below the access hole. Wrap the metal around the front, cut out what you need and keep going. I started at the back and worked my way forward, fitting as I went. When you are comfortable with the position of the aluminum, vise grip the aluminum to the cover, drill your holes, and pop rivet on the piece. Then do the second piece. Check for clearance on the back side, and flatten the rivets after there in to keep a low profile. The shot to the right shows how the angular contour on the cover does not match the bottom piece of the cover. If you have questions about the cover, email me. |