With the engine completely warmed up, grab the dip stick and pull it out. If you can JUST hold it without it burning your fingers, the engine temperature is OK. If it burns your fingers (and the engine will usually smell hot too), then the temperature is too high -- possibly as high as 285F (140C) -- VERY hot!
An oil temperature gauge requires an oil temperature sensor/sender. There are two types of oil temperature sensors -
- Oil Sump Plate Sensor. This sensor will screw into the oil drain plug hole, but the sensor extends upward enough that it impinges on the oil screen assembly. The instructions that come with this sensor say to drill another hole in the plate, to one side of the plug, thread it, and install the sensor there. Some oil sump plates have no drain hole. If yours is one of these, drill and thread a hole to the side of center for the sump plate sender.
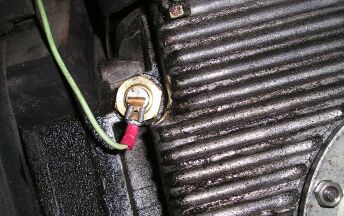
- Oil Pressure Relief Plug Sensor. If your engine is equipped with a dual oil pressure relief system, you can replace one of the plugs (i.e., the front one -- at the flywheel end of the engine) with an oil relief plug sensor and save yourself the hassle of drilling a hole in the oil sump cover plate.
- Install a Temperature-Sensing Dipstick -

Wiring instructions come with the gauge (e.g., VDO). Generally speaking, you run a wire from the sensor up to where you install the gauge in the cabin. You will need to drill a small hole in the floor pan behind the rear seat so you can route the wire into the area under the rear seat, then forward from there). To wire the gauge you simply connect the gauge to power (we used the #11 fuse) and to ground, and you’re all set. In our Superbug we found a nice place in the dash to install the gauge, just to the left of the steering column.

A word of caution from Gene Berg: “Practically all (temperature gauges) read low in the 212 to 260 degree range by 40 to 50 degrees ...” So far we haven’t experienced this, but we’ve installed a Gene Berg temperature-sensing dipstick as a back-up -
This sensor is sold by Gene Berg Enterprises. It installs in the dipstick hole and connects with a wire the oil pressure switch. When the temperature reaches about 225F, the spring inside of the dipstick turns to make electrical contact, and the oil light in the instrument cluster begins to flicker. As the temperature increases, the oil light will flicker more rapidly until it remains on continuously -- which means your oil temperature is dangerously high.


With the temperature-sensing dipstick, you don’t get any indication that the temperature is rising until the oil light flickers, telling you the oil is becoming too hot; but at least you can do something before any damage occurs. The dipstick is very easy to install in the car, since it uses the existing dash oil pressure light as an indicator.


