
Citizen
Elegance
Cal.
AI13XXX - Setting
Instructions
Created 02-22-2002
Refer to the instructions below for directions on how to set this watch
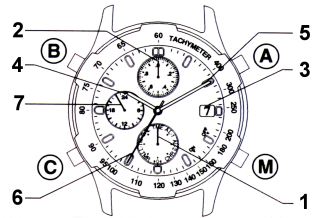 1- Mode Indicator 1- Mode Indicator2 - Timer Minutes Subdial 3 - Date Window 4 - Hour Hand 5 - Minute Hand 6 - Second Hand 7 - 24 Hour Hand |
|
| All Reset | |
| ALL
RESET All reset is used when first setting the watch or when there is unusual or erratic operation. This function can be performed from any mode. 1 - Pull button (M)
out. |
|
| Zeroing the Hands >0< | |
| Zeroing the
hands is used to set a starting position for the watch. 1 - Press button (M)
to move the hand to the zero position check mode ">0<".
The hour hand, minute hand, 24H hand,second hand, date
and function hand will rapidly move to their last
remembered zero position. |
|
| Setting the Time [TME] | |
| 1
- Pull button (M) out while in TME
(Time) mode. 2 - Press button (A) to reset seconds to zero on the time signal. 3 - Press button (B) or (C) to correct hour, minute, and 24H hands. Corrections can be made one minute at a time in the clockwise direction each time button (B) is pressed. Pressing button (C) moves one minute at a time in the counterclockwise direction. 4 - When done press button (M) back in to the normal position. Note: when setting the time make sure that AM and PM are correctly set by referring to the position of the 24H hand. |
|
| Setting the Local Time [L-TM] | |
| The local
time function enables the time in a different zone to be
set separately from the current time. Local time is set
by performing a time difference correction in 1 hour
increments based on the current time (time of the TME
mode). The minute and second hands move in coordination
with the current time. 1 - Press button (M)
to change to local time mode (L-TM). |
|
| Setting the Calendar [CAL] | |
| 1
- Pull button (M) out while in the CAL
(calendar mode). 2 - Press button (A) to Correct the month number. Note: the month number is indicated by the position of the second hand (Example - 1:00 = Jan, 2:00 = Feb, 3:00 = March, etc.). 3 - Press button (B) to correct the date. 4 - When done press button (M) back in to the normal position.. Then press until TME is selected to resume timekeeping. Note: Date correction is performed correctly for all months. The date only has to be reset in February of leap years. |
|
| Using the Alarm [AL1] - [AL2] | |
| This watch
has 2 alarms AL-1 and AL-2.
The alarm function uses the 24H clock. When the alarm
time is reached a tone will sound for 10 seconds.
Pressing button (A), (B),
or (C) will stop the alarm. Alarm 2 is a
daily alarm and will sound once a day for 15 seconds. Alarm Setting Switching the
Alarm ON or OFF. To hear the alarm |
|
| Using the timer [TMR] | |
| The timer can
be set over a range of 1 to 59 minutes in increments of
one minute. When the set time is up the watch beeps for 5
seconds. After the set time has elapsed the timer will
automatically return to the same set time. While in timer mode the hour, minute, 24H hands and date will indicate the correct time. The seconds hand and timer minutes hands will run counterclockwise as the timer counts down. Timer
Setting Using the Timer Note: When button (C) is pressed while the timer is operating the timer returns to the set time and restarts (timer flyback function). |
|
| Using the Chronograph [CHR] | |
| This watch
has a chronograph capable of measuring elapsed time up to
59 minutes, 59 seconds and 19/20th seconds in 1/20th
second intervals. In the chronograph mode the hour,
minute, 24H and date indicate the correct time.
Chronograph measurements are displayed with the second
and timer minutes hands. Using the Chronograph When the count is
proceeding after pressing button (A)
pressing button (C) will display the
elapsed time for 10 seconds (SPLIT). |
![]()