Film Cannister Angels
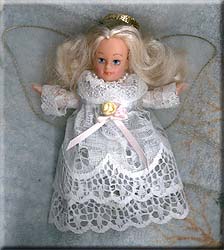
FRONT
Materials
Empty Film Cannister
Scrap Lace (gathered)
Ribbon
Angel Wings
Doll Face and Hands
Small Ribbon Flowers or embellishments of choice
Hot Glue and Sticks
Toothpick
Instructions
Refer the photos for extra help. My cannister was white, but if yours is black, just cover with a piece of white ribbon or fabric or paint white, before adding the lace trims.
Separate your lid from the bottom of your container and begin with the lid. Glue a piece of lace around the inside of the top of the lid to create a collar for the dress. Doll Faces come in a lot of different shapes and sizes, so choose something that fits the size of your cannister well. Some doll heads come with a wire leading from the bottom out. Trim this wire, but do not remove completely. Push the wire through the centre of the lid top and secure the head with glue to the cannister lid. Secure with glue a teeny strand of pearls around the neck area.
To make the halo, snip a toothpick to a length that will reach from the top of the head to the base of the dolls neck. Wrap a piece of gold ribbon around the toothpick, beginning at the bottom, working your way up the toothpick and covering the toothpick with ribbon completely. When you reach the top of the toothpick, form a circle (halo) with the ribbon and wrap back down the toothpick. Push the toothpick through the dolls hair to the neck and secure at the neck with a dot of glue.
To make the dress, wrap a piece of lace around the container allowing about 1/2 inch overlap. Depending on the size of your lace you may need to cut more than 2 pieces. The lace that I used is 2 1/2 inches long and required to pieces to form the dress. Glue your first piece of lace to the centre of the container going around the container. Use a high temp glue gun as the low temp will not work as well. Now glue your second piece of lace to the top of the cannister, leaving a little space at the top if required to replace the lid. Be sure to begin and end your lace at the same place as your first piece of lace that you attached.
Cut 2 small pieces of lace that will fit around the doll arms to form sleeves. Glue the lace to the top of the arm going around the entire arm and making sure the seam of your lace will not be seen when the arms on placed on the angel. Secure the bottom of the lace (near the hand) with a dab of glue to secure the seam and if necessary, roll up the lace at the hand area to shorten the sleeve.
To attach the arms, just secure with a generous amount of hot glue at the top of your cannister, not the lid, but the cannister.
Glue the wings to the back of the angel body (see back of angel below) and on top of the wings attach a small piece of gold ribbon, tied in a bow to the centre of the wings. Leave the tails of this ribbon the length of the dress and secure the ribbon at the bottom of the dress with a little hot glue. This ribbon not only looks pretty but it also hides the seams of your lace.
To add a little extra, glue 2 teeny ribbon roses and a small bow to the top front centre of the dress.
To use this as a hanging decoration, a strand of ribbon or floss can be fed through the top of the head with a large embroidery needle and tied. This strand will act as your hanger. Now put your lid and cannister together and you're all done
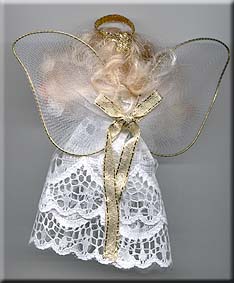 BACK
BACK