Use yellow cover stick combined with a red lipstick. Mix the two colors and blend over the areas with beard shadow. If you get the mixture correct you should see the shadow fade away and blend into the rest of the face. The yellow cover stick counters the dark, bluish, shade of the beard and the red lipstick conceals the beard shadow in photographs.
After covering the beard, the next step is to apply foundation. Use two colors of oil based, paste foundation. A lighter color, matching your complexion, for the areas over the beard cover and a second color, one or two shades darker, over the other areas of the face. This color should closely match the color of your face over the beard shadow areas. Blend the two colors together to avoid harsh lines. You should now have a slightly tanned look. Wait a minute or two to let the foundation set.
Brush translucent powder over the entire face in a thin layer. This will keep the face from looking too oily. Next, brush a pale color of blush over your entire face. This gives the face a natural, radiant look.
Blush comes next. Smile and hold it. Apply a rosy blush in a cresant shape from the center of each cheek to the hairline in an upward direction. Next, apply some to the bridge of your nose, tip of your chin, and temple area. If you use too much apply a second coating of powder to lighten it. Remember, you want a natural look.

Brush your eyebrows in an upward direction from the center of your face to the area above the outside of the cornea of your eye. Past the edge of the cornea brush the eyebrows in a downward direction, thinning the brow as you work to the edge. Use clear mascara for better staying power. Use the adjacent diagram as a guideline for shaping your eyebrows. You may need to pluck brows from the inner or outer edge. To thin your brows pluck hairs from the underside of the brow and use a fine comb and scissors to shorten brow length. Make changes a little at a time then check your work so you don't overdo it.

The application of eyeliner is different depending on the shape of your eyes. If your lid and brow are proportional start with a fine line both above and below your eyes. The line should gradualy thicken to about twice as thick as it extends to the outer edge of your eye. If you have a small lid and short brow line the entire undereye and line the upper eye from the iris outward. If you have a long brow and small lid underline the entire eye and apply eyeliner from the inner edge of the iris to the outer edge above the eye. For a large lid and short brow line the entire upper eye and underline from the iris outward.
Use an eyelash curler to curl your lashes. Use two or three presses to get the best results. Remember to press gently so that you don't pull out any lashes or hurt yourself. Start at the base of your lashes for the first press. Repeat the process, positioning the curler about an eigth inch out for each press. Next, lean your head back slightly with your eyes open wide. Start with the eye opposite your handedness. Apply mascara from the base of the lashes outward to the tips. Next, apply mascara to the lower lashes, use the tip of the wand if your lower lashes are short. Repeat for the other eye. If you want thicker lashes, coat your lashes with powder while the mascara is still wet and add a second layer of mascara.
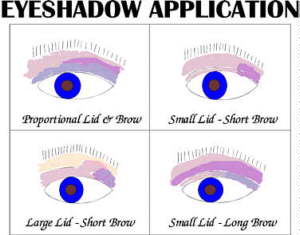
This is difficult to describe and I still have problems. Use this diagram as an example and experiment...

Outline your lips with a lipliner pencil the color of your lipstick or use a lipliner brush. If your lips are thin outline to the outside of your lips or for thick lips outline inside your lipline. The goal is to have your lips look proportional. Fill in the outline with lipstick or a lip brush. Gently press your lips together with a tissue between them to set your lipstick for better staying power.
Use full size nail tips the width of your nails and a Super Glue Pen. Place a drop of superglue in the center of your fingernail and spread it with the tip of the applicator outward. Press the nail into place and hold for about ten seconds, making sure it is straight. Repeat for the other nails, saving the thumbnails for last. Next, cut the nails to a natural length, if necessary, and shape to your liking. Make sure to get all the burrs off, including those under the nail. Next, apply nail color. Use one stroke down the center then an additional stroke down each side. Paint your dominant hand first. Use a spray on or brush on quick dry agent after painting both hands. Don't do anything for about an hour or so. Go watch TV with your hands folded in your lap or something. If you have a fan even better. I usually paint my nails the night before I'm going out about a half hour before bedtime. Then they get dry to the touch before I get in bed and fully dry overnight.