Will's Tin Snail Site
Workshop
![]()
. .
Fitting a new vent flap and wiper spindles.
The metal air vent flap below the windscreen on a 2cv seems particularly prone to rusting through, causing draughts and the ingress of water. This is not a great problem as replacement flaps are readily available through 2cv parts suppliers (see my specialists page for more info.) and I believe galvanised or stainless steel versions are available too. Replacing this is not guaranteed to cure leaks, but a rusty vent certainly doesn't help.
In addition to the vent flap rusting, wiper spindles seem to wear
quickly and as well as reducing the efficiency of the wipers, this can
allow water to leak in. Older spindles could be dismantled and
regreased, but newer ones must be replaced as a unit. Not expensive,
and worth doing at the same time as the vent flap, hence both are
together here. Again, not guaranteed to cure leaks, but will certainly
help. If there is also a lot of slack in the wiper mechanism, it may
be necessary to replace the linkages between motor and wiper spindles
with the spindles. Due to its low cost, this is worth doing while the
unit is removed from the car.
Step 1:In order to access tiny nuts holding the vent flaps in place, it will be necessary to remove the dashboard. Instructions are for a RHD special, with the small speedo, but other variants will be similar. Start by removing the screws holding the instrument panel in place and carefully withdraw it from its position. You may need to feed the speedo cable (passing through the footwell) through a little slack, but take care not to pull out any connections to switches or warning lights. Next, unscrew the screws holding the plastic "dashboard" covering the wiper motor from their captive nuts. Some of these have spacers behind, and the screws are of different lengths, the positions of which will need to be recorded. Carefully ease the panel away fron the windscreen surround taking care not to bend it too much - it is surprisingly brittle. It will now be necessary to remove the demister vent(s). Once the retaining screws have been removed, these should pull free of the bulkhead (firewall) though it may be necessary to pull away the rubber seals (accessed from the under the bonnet) first. Disconnect the electrical supply to the wiper motor, lift the wiper arms and pull them away from the spindles, then unscrew and remove the nuts and seals from the wiper spindles (outside). After removing the bolts holding the wiper motor support plate, the wiper motor, linkages and spindles should all come free as one unit. |
|
Step 2:It should now be possible to access the row of lots of small (6mm, I think) nuts holding the vent flap in place. Apply some oil to help undo them if they are too stiff. The new flap should come complete with them. If not, retain them. You will need to slacken off the vent's opening mechanism and remove a pin to release the vent flap completely. |
|

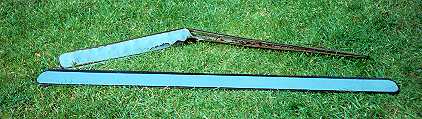 |
Step 3:The new vent flap will probably come unpainted. If so, an aerosol touch up can seems to produce a good result if applied over 3 coats and rubbed down well. Give the back of the new vent a thick coat of black gloss, and squirt a bit of waxoyl into the holes at the back. Pictured (left) are the old (very rusty) and new flap, painted and ready to fit. |
Step 4:While the flap is removed, give the surrounding area a good clean, touching up any rust spots. Check under the windscreen rubber for holes. Any minor rust can be cleaned away and treated with an anti rust paint. Check the area below the winscreen normally concealed by the dashboard and rust-proof from behind. |
 |
Step 5:The metal windscreen wiper motor support plate and the demister vents are likely to have a few spots of rust. Take the opportunity to give them a good wire brushing and paint them in black gloss (or the colour of your choice) and to remove all the notes, maps, tax discs etc. that you have lost down the demisters. |
 |
 |
Step 6:The motor will need to be unbolted from the wiper support plate and the spindles withdrawn from their holes. Replace, as necessary, the linkages and spindles. These are held together with circlips which will need to be carefully loosened before removing the linkage from the motor and spindles. Re-paint as necessary (as above) and re-assemble the linkages. The position in which the wipers park (left or right) can be changed by removing the arm from the wiper motor gearbox and rotating it 180 degrees at this stage. Make sure you really want to though, it'll be a fiddle to change back again, and the wipers on a RHD car are reversed for a reason. |
Step 7:Putting it all back together is pretty well a reverse of taking it all apart, starting with replacing the vent flap. A few hints though: Getting all the captive screws through the holes above the vent flap is a fiddle. Be patient and screw the nut on very slightly to prevent the screw falling out again. When they are all in place, tighten them a little bit at a time working from the middle out. This will ensure a watertight seal. If you are reusing the old metal strip and captive bolts some may be damaged, but a good seal should still be achievable. Grease the joints on the opening mechanism lightly and replace the split pin. Replacing the wiper motor should be straightforward - make sure all mountings are secure and the spindle seals are screwed down well and don't forget to reconnect their electrical supply. Put the wipers back on in their "parked" position, and lift them from the windscreen before turning them back on for the first time - just to make sure. After replacing the demister vent(s), the plastic "dashboard" must be replaced. Take great care when refitting this - make sure all spacers are in the right place and don't force any screws - this panel is prone to cracking. Screw into place very loosely then gently tighten screws one at a time. Finally, replace the instrument panel, making sure all electrical connections are sound and the speedo cable isn't twisted. |
|
Will Rolt
Back to the Workshop