This tip will use MDT 5's new AMBEND and AMTEXTSK commands to accomplish text embossed around a cylinder.
First we will develop our flattened cylinder as a rectangle with the cylinders thickness.
Our cylinder's height is 2 with a radius of 3 in our case. To start things off we make our rectangle 2 x 18.85 18.85 is calculated as a rough approximation of the circumference.
So our rectangle is sketched and dimensioned with the above dimensions and then extruded to a depth of 0.25
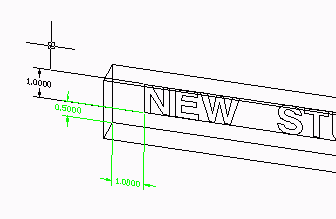
Next we place our text sketch using AMTEXTSK command. First we place our sketch plane on the top of our rectangular block and begin the AMTEXTSK command. In my case I chose Swiss 721 BT (true type Font, Bolded) and entered my text "NEW STUFF IN MDT 5" and placed the text. Afterwards I edited the height to be 1 and added pardims to constrain the text to be 1.0 from the end and 0.5 from the bottom as shown below.
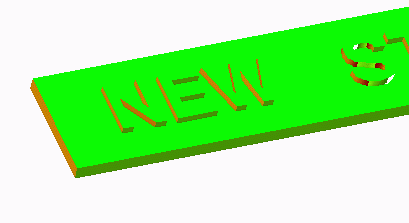
The next step is to extrude "Joining" to my rectangle by 0.125. to end
up with embossed text as shown below. Note: Adding Draft angles can l produce
very slow models or causes the extrusion to not work. My resulting model
is shown below.
Next we will commence the bend operation of our model using the new
AMBEND command. To do this we must first create an "Open 2-point profile".
This is a NEW sketch feature to MDT 5. To do this simply draw a line across
our part and profile it. When the profile command asks if it is an open
profile at the command line, confirm this with a return. Our Open profile
must intersect our model so in my case I drew it clearly over the model
and profiled it. I then added a Pardim and edited the value to be 0.001
so that it is almost on the edge. See image below.

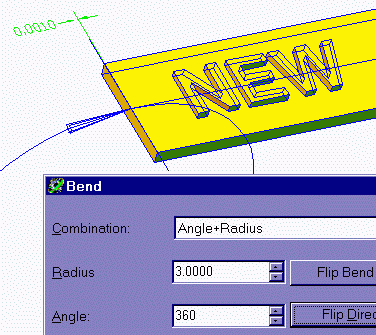
With our open profile almost at the edge, we then run AMBEND and complete
it with the values shown below and toggle the "Flip Bend Side" and "Flip
Direction" buttons until we see the Blue indicator arrows clearly previewing
the correct bend we expect. See image below. Make sure the text extrusion
becomes highlited indicating that it will be bent.
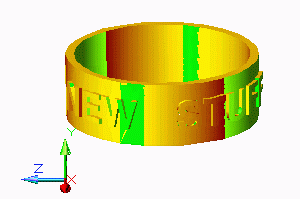
This produces our model with the embossed text bent around our cylinder.
Lastly we apply a unique color to the text extrusion feature to end up
with the image you see below.

A word of warning. This sequence will also work with text cut out of our shape or perhaps even all the way through our shape, however, if your text cuts through your shape, be aware that disjointed solids such as the center of an "O" or a "D" will not follow the bend operation. this is by design. These disjointed solids will remain "flat on the floor". This makes sense since it would not be able to be manufactured. If you must do something along these lines, try using the STENCIL font which leaves no disjointed solids.