This is a frame taken from homepage.dtn.ntl.com/terry.rawkins/acad/solids/index.htm
The frame url is
homepage.dtn.ntl.com/terry.rawkins/acad/solids/scripts/sol-fun.html
Towards a Solid Modelling Language.
Please do not forget the point of my system :-
1. Is is part of a family of parts? 2. Will it require editing within the life of the drawing?
If either is true then you will be better off making a script as it is much easier to edit a script than a drawing.
You may know about my leaning towards script files to do the more mundane AutoCAD jobs
and the use of what I have called PSS, Parametric Solid Scripts. Well here is my latest
version, built as a natural extension to the PSS system.
I have noticed that not many folk have moved towards the PSS system perhaps because of their
lack of LISP knowledge and the pain that scripts can be with the sub commands and their
required spaces.
What I have done is made a lisp file that contains many short Lisp Functions. This file
will help to get rid of the need to know about those damn spaces. Well that is what I had hoped
for but because of various things the system has to have some new CAD commands to be used normally
in AutoCAD and some new LISP functions to be used within a script file. The lisp functions have to
be enclosed in brackets and have parameters separated by spaces, one or more it does not matter.
The File is called sol-fun.lsp and is available to download or you can view it as a text file on-sceen.
The new functions fall into 6 groups:-
- Layer Switching
- Viewing
- UCS Switching
- Standard AutoCAD commands
- New Autocad commands
- AutoCAD Solid commands
1 Layer Switching
When making a single part or component using solids we need two major layers
one is where the bulk material is. I have called this POSITIVE the other is where
we will draw the items that will be subtracted from the bulk material. I have called this
NEGATIVE. Two new commands are now available :-
- LAYER-POS ; Use this command to switch layers before you draw the bulk material.
- LAYER-NEG; Use this command to switch layers just before you draw items that will be
subtracted from the bulk material.
2 Viewing
- ISO Issues the command VPOINT -1,-1,1 which is a true isometric view.
3 UCS Switching
These functions enable you to rotate the UCS about the World Origin and Move the UCS to a
new location. DOT is short for Draw On The so:-
- DOT-F is Draw On The Front
- DOT-B is Draw On The Back
- DOT-L is Draw On The Left
- DOT-R is Draw On The Right
- (UCS-MOVE x y z ) ; (UCS-MOVE 100 50 80) will move the UCS to 100,50,80.
NOTE users of AutoCAD R14 will need to change the lisp of this command, (remove the 'm')
4 Standard AutoCAD commands
The next 4 commands uses the last object drawn so they must be used immediately after a command
that draws something.
- (PAL x y num ) ; Polar Array Last.
EG :- (PAL 0 0 6) will array the Last item drawn, about the origin, 6 times.
- (ROW num dist); will create a row of objects, in the X axis
EG :- (ROW 5 100) will draw a row of 5 objects 100 units apart.
- (COL num dist); will create a column of objects, in the Y axis
EG :- (COL 5 100) will draw a row of 5 objects 100 units apart.
- (SAVE-L "name"); will use the WBLOCK command to save the last object
drawn. The file name will be that quoted by the "name" parameter on the current path.
To save to a different path please use the double back slash.
- (SAVE-L "c:\\windows\\desktop\\terry")
The use of this command would be useful for other script files that use the INSERT
or XREF command. Indeed an interesting result could be made with a series of
script files daisy chained with the last command SCRIPT file_name and with the last
in the chain using only the XREF command to assemble a final assembly. Eg:-
	  ...
          Layer-neg
          cylinder 0,0 10 50
          (ROW 4 25)
          SUB-PN
          (save-l "part-7")
The above example will make a cylinder on the negative layer, then make
a row of 4, subtract all these from the objects on layer positive and
lastly save the solid model to disk with the file name of part-7.dwg
- (INS x y z "name" angle) will insert a drawing file (*.DWG) stored on the path.
The insertion point is x,y,z (z must be included even if zero). The inserted block is exploded
on the way in and so produces no memory overhead. The name must be in quotes!
EG :- (INS 0 0 0 "shape" 90) will insert the drawing file shape.dwg into the current drawing
at 0,0,0 at an angle of 90 degrees.
5 New AutoCAD commands
- (COIL x y z dia pitch num wire_dia "layer") will draw simple coil spring.
Please make sure that the coil will be drawn on-screen ie do a "Zoom E" in the
previous line.
- x the X part of the centre point of the coil.
- y the Y part ditto.
- z the Z part ditto.
- dia the diameter of the coil.
- pitch the distance between each turn of the coil.
- num the number of turns within the coil.
- wire_dia the diameter of the wire use to make the coil.
- "layer" the layer on which the coil will be drawn. Must be in quotes!
Have a look here for an example.
- (FRAME x y x_dist y_dist) will make a "picture frame"
of size x_dist by y_dist. The cross section of which is determined by the last object
drawn. The path along which the cross section is extruded is at right angles to the current
plane. So a square pline drawn in the normal xy plane will produce a simple picture frame.
whereas a cross section of wall, skirting board, dado rail, and coving will need to be drawn
using first the "draw on the left" command DOT-L :-
- (GEAR x y pcd n) not yet totally proved to work in all
cases. This function should draw a simple spur gear as a closed 2D polyline. This can be
extruded using the (EXTL ht ang) function. You may however regret this as the resulting
drawing will be large. Keep the gear in 2D as long as you can. Or have a 2D version and
a 3D version in the drawing as XREF's.
- x the X part of the gear centre.
- y the Y part ditto.
- pcd the Pitch Circle Diameter of the gear
- n the number of teeth on the gear.
- (HOLLOW x y wall height) will produce a hollow "casting" of uniform wall
thickness using the last object, typically a closed pline, as the basic shape. This function
uses the AutoCAD command "OFFSET" which requires to know "which side to offset". The x and
y parameters provide this point. The height parameter is the overall height of the new object.
The wall thickness should not be greater than half the height. There is no error checking for
this nor indeed for any errors that may result from a large offset in the x,y plane.
- (OUTLINE x1 y1 x2 y2) will produce a closed pline from a selection of lines,
arcs and circles enclosed in an imaginary box whose lower left point is x1,y1 and the upper
right point is x2,y2. All the objects that made up the new outline and any others with the
area will be erased. The new pline will be on the same layer as the layer current when the
function was used. This function uses the BOUNDARY command which requires a point to launch
its search for objects. The point used by the (OUTLINE) function is at the centre of the
imaginary box around the objects.
Have a look here for an example.
- (SLOT x y length rad depth angle) will draw a solid box with rounded
ends parallel to the X axis.
- x the X part of the start point of the slot.
- y the Y part ditto.
- length the centre to centre distance of the slot.
- rad the radius of both rounded ends.
- angle the draught angle, 0 is vertical.
In use this command is used to draw the rounded box on the negative layer. This is then
subtracted from the bulk material using the SUB-PN command to make a slot.
Have a look here for an example.
- (THREAD x y dia pitch length) will draw a full 3D solid thread in the
Y axis. The thread may require "trimming" at each end but very often it is absorbed within
the head of the component. If this function is used on the "negative" layer the result
is a threaded hole.
- x the X part of the start point of the thread.
- y the Y part ditto.
- dia the nominal diameter of the thread.
- pitch the pitch of the thread.
- length the length of the thread, (not very accurate) must be positive.
- (WALL x y wall height) will make a solid wall using
the last drawn object as the base object.
- x the X part of a point to indicate the side to offset.
- y the Y part ditto.
- wall the wall thickness (one brick).
- height the height of the wall.
- (WINDOW x y width height wall) will cut out a
rectangular hole in a wall that has been drawn before hand.
- x the X part of the lower left of the window.
- y the Y part ditto.
- width the window width.
- height the window height.
- wall the thickness of the wall or walls to be cut through.
6 AutoCAD Solid commands
The following 3 commands are CAD commands and require no brackets.
- UNI-POS will union all the objects on the layer "Positive".
- UNI-NEG will union all the objects on the layer "Negative".
- UNI-C a more universal command, this will union all the objects on the
Current layer.
- SUB-PN; Subtract ALL the objects on the Negative Layer from ALL the objects on the
Positive layer.
- (EXTL height ang); extrudes the last object drawn.
EG :- (EXTL 20 0) will extrude the last object drawn by 20 units with zero draught angle.
An example file that draws a simple ash tray is shown below:-
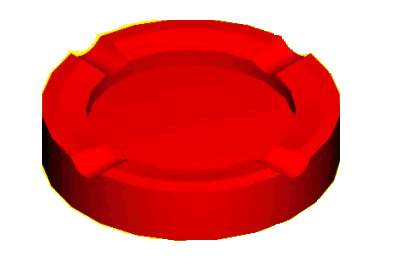
   (load "sol-fun")
   layer-pos
   cylinder 0,0 50 20
   layer-neg
   sphere 0,0,215 200
   cylinder 0,0,12 35 20
   DOT-F
   cylinder 0,24 8 60
   ucs w
   zoom e
   (PAL 0 0 4)
   sub-pn
   iso
The file is ashtray.scr here.
Note the first line that MUST always be there, this loads in the lisp file that has
the function definitions within it. This file "sol-fun.lsp" must be located on the path
or the same folder as your drawing.
Many of these new commands and functions use the "LAST" option to obtain the object on which
to work. This can go very wrong if your script file draws an object off the screen.
The "LAST" option finds the last visible object drawn! The use of "ZOOM E" or ISO is encouraged
after the major part of the drawing has been successfully drawn.
This page was last updated on Tuesday, October 09, 2001 by :- Terry Rawkins