
Ensure mytut03.dwg Is Ready
Get mytut03.dwg up. It should look like the image above.
if you've zoomed and panned everywhere type;
PLAN ż (24 keystokes to get the return arrow using font-family:symbol; in a span class)
or..
Z(OOM) _| (2 keystokes using keyboard entries)
A(LL) _|
or..
Z(OOM) _|
E(XTENTS) _|
Any of the above combinations should fill the screen with your drawing.
then say..
Z(OOM) _|
0.8x _| to give 20% "white space" around the ouside.
Save As mytut03.dwg to carry on with the tutorial
Cut In Doorways
Make a door opening from the large bottom room into the top left room.
O(FFSET) _| (or pick ![]() or Modify>Offset)
or Modify>Offset)
250
Pick the left vertical line of the central internal wall and offset it to the to the left.
_| (..to conclude first offset)
_| (..to re-issue the offset command)
Now you enter 900 and offset the new line 900 units further to the left.

Move the lines down so they can be used to trim both lines of the horizontal interior wall for the door opening.
M(OVE) _|
Pick the two lines just created.
_| (to end selection)
Press F8 a couple of time to toggle Ortho mode leaving it on.
Pick somewhere near the two lines, hold the left button down and and drag the
two lines down so they overlap the horizontal wall (the Ortho On is keeping things honest).
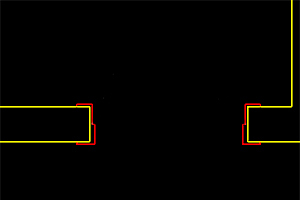
Use the two lines to trim the opening of the doorway.
TR(IM) _| ( or pick ![]()
Pick to the two lines to be the cutting edges.
_| (to end selection of cutting edges)
Pick on the two portions of the wall lines to be trimmed.
_| (to end selection of lines to trim)

Instead of using the trim comand we will introduce the fillet command and use it to do the trimming.
F(ILLET) _| (or pick ![]() or Modify->Fillet)
or Modify->Fillet)
R _| ( ..for Radius)
0 _| ( ..sets the radius to zero units from the default 10 units but the fillet command terminates)
_| (..to re-issue the fillet command)
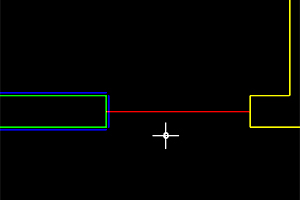
(just pause here and think ..we really should have zoomed in on the door jamb area before we issued any fillet commands but we did'nt ..so we need a transparent command to get in close that won't interfere with the fillet command being actioned '.. there are a couple ..
'Z _| ( ..the aposrophy in front of some commands makes them transparent)
Pick a point just higher and to the right of the doorway.
Pick a second point below and well to the left of the doorway.
(..the fillet command resumes..)
Pick the verticle line at A (below)
Pick horizontal line at B (below).
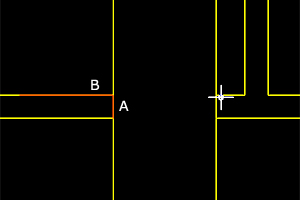
Repeat the process until the doorway is properly trimmed.
Create another door into the other room, again 250 units away from the central wall and 900 units wide.

Draw Door Jambs and Doors
Create a new layer called doors and assign the standard red colour to it, via the Layers Properties Manager.
Before you close down the Layers Properties Manager, make sure that the doors layer is highlighted, then click on the Current button to make the layer current.
Close the Layers Properties Manager.
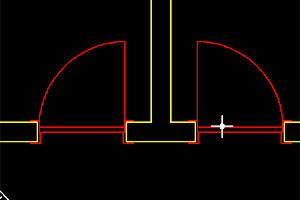
In the left doorway, draw a line between the mid-points of the door jambs.
Zoom the left door jamb to offset the lines highlighted in blue.
Offset the vertical line 15 to the right then pick that line up and offset it 15 to the right again.
Offset the top horizontal 15 up (to A).
Offset the bottom horizontal line 15 down.
Offset the vertical line 70 to the left (to B).
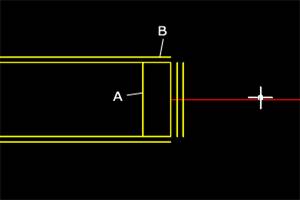
Fillet the two lines A and B (selecting B first).
Repeat fillet and/or trim until the door jam looks like it does below.
Change the new lines to the door layer.

Using a line we draw between them to give us a mirror point we mirror the door jam onto the other side of the door.
Zoom out a little so you see the entire door opening.
Draw a line from one corner of the door opening to the other.
Turn off the layer wallint and wallext. You can do so by expanding the current layer drop down choice box, and clicking on the light bulbs of the layers you wish to turn off.
MI(RROR) _|
Pick red door jamb and not the horizontal construction line you've just drawn.
MID _|
Pick on the mid pint of the horizontal red line we drew.
Toggle F8 or other wise ensure ensure ortho mode is on (otherwise enable it with the F8 key) and define a mirror line by moving the mouse cursor up (or down) parallel to the y-axis.
N _| (No we dont want to delete the original lines.)
E(RASE) _|
Pick the red construction line we drew for the mirror point.
_|
Turn on all the layers and zoom out so we can draw the left door.
Draw a line from point A to point B.

Offset the line 50 units up to create the thickness of the door.

Draw Arcs To Show Swing Of Doors
Now draw the arc to show the swing of the door.
A(RC) _|
END
Pick on point A for the start point of the arc.
C _| (for the center of arc option.)
Pick on point B for center point of the arc.
A _| (for the angle option.)
-90 _| (to draw the arc.)
Now draw a line joining the end of the arc to the hinge of the door.
Mirror the door already drawn or draw a new door.
(Use the center point (with ORTHO on) of the portion
of wall between the two doors as the mirror line.)
Save File
Save the file as mytut04.dwg.
o0o