Refer www.htmlgoodies.com/primers/jsp/jsp_toc.html
*Read this source from a text editor (Notepad or whatever) then go to render (ie browser display) to see the effects of the JavaScript.
Lesson 1.
Lesson 2.
With luck you will get a good old fashioned Error message box.
If you are using MSIE, the error message (may/possibly) will first appear as a triangular sign in the lower left hand corner. There will be an exclamation point in the triangle. There will also be some text proclaiming there are errors on the page. Click on that triangle to get the error message we'll discuss in this tutorial. OR! If you want to get the error message box each time without clicking, go to the Tools menu, choose Internet Options. In Internet Options, click on the Advanced tab and make sure the line that reads: "Display a notification about every script error" is checked.
Then again, depending on how your system was configured when you got it, you may already be getting the box. You'll also note on the error box that you'll have to click the "Details" button to see the text describing the error.
There are basically two types of errors you can produce: Syntax errors and Run-Time errors. A Syntax error means that you've misspelled something or the JavaScript is not configured correctly. A Run-Time error means that you have used an incorrect command.
Fix the errors one at a time, from top to bottom. Each time you fix an error, run the script again. You might get 20 error messages, but only have to fix one or two.
Lesson 3.
one way of dealing with JavaScript counting from 0 is to create a variable that has the value Month Plus One (mpo).
Lesson 4.
Objects and methods have been discussed.
Events and Event Handlers are JavaScript, but they are "built-in" (embedded) in HTML code so they don't require the commands. They themselves are not scripts, but rather small interfaces allowing for interaction between the page and the reader.
Click Here Has return true. Status bar message stays on.
Note the ; semicolon ends the command line and..
removing the return true means the status bar echo of the URL goes off when you move the cursor away
otherwise the status bar message remains on after the cursor first rolls over it until the page is refreashed.
Below we add the bgColor (note: in html the bgcolor is in the document) so bgColor is a Document Property) Click Here To have two onMouseOver events occur simutaneously the second is just comma separeated with the first occurrence of a onMouseOver event. New Rule: Use a comma when separating multiple JavaScript events.
There are many events. Here is an alert box:
alert('text that appears on the alert box')
Lesson 5.
The onClick event and the window dropped off in front of the alert
Click Here Click HereNote: Passing the cursor over to cause onMouseOver seems to be described a Event
Actually cliking seems to be associated with Event Handler
(or I am just groping around trying to differentiate two terms which are the same thing.)
Anyway, following the same pattern as the onMouseOver but using onClick, we get this:
Click Here Using onClick (event handler)
The onFocus Command
This is a great Event Handler that allows you to create action when your reader focuses on one item on the page. This will work for FORM "select" boxes, "text" boxes, and "textarea" boxes. (See here if you don't know what these things are.)
Here's an example of a text box with onFocus putting a message (instuctions to the user?) in the status bar:
The onBlur Event
If you can focus on an item, then you can "blur" or lose focus on an item. The onBlur Event Handler allows you to alert a user to the fact that they have changed their answer. Its usage doesn't seem to come up a great deal, but here's an example. Change the text, then click off the box, as if you were going to the next item in the list.
You can pretty much guess at the code, but here it is anyway (note we have put a preliminaryvalue in the text box ...a default entry so to speak or an instruction?):
The onChange Command
Much the same as the onBlur. It's main function is to work as a "check" mechanism. When we get into forms, this will make more sense. Think of this as an event that makes sure the user fills in what you are asking for. Looks similar to onBlur, but its function is different.
The fact entry has been made is noted and echoed at the status bar. This demonstrates that (with some more code) a form could be checked to see if entries a have been made and an instruction sent to the user.
The onSelect Event
This works the same way as the three above, denoting that something has been done to a "text" or "textarea" form element. Except this one reacts when something inside the box has been highlighted.
No Example of use provided
The onSubmit Command
This is the one everyone seems to want to lay their hands on. This command allows you to make something occur when you click on the submit button. The reason people want this is because they want that wonderful effect of the user clicking on the submit button and then the page changing to say Thanks for writing.
Here's the format:
Now, there are a few new commands up in there, so let's look at what we have. The format looks similar, but it's a little backwards.
parent.location is the basic format for setting up a link to another page. It would seem that parent would be the object and location the method. But it's not. In this case, parent is a property of the browser window and location is the object that is to appear in that window. The URL is representative of the method. That said, I always keep it straight by simply remembering that the format "parent.location=" means a link.
The onLoad and onUnLoad Commands
There is not an example for these two as they will each have their own primer later on, but they are Event Handlers so they need to at least be mentioned here.
Both of these will appear in the HTML document's <BODY> command. They act as a trigger to make something happen when the page loads or unloads (user leaves the page). These two Event Handlers will become important when we start talking about functions.
*Recapping ...What you should have learnt so far..
Commands
Lesson 6.
Prompting the user for information and creating variables.
Lesson 7.
Properties and hierarchy of JavaScript
Properties are a portion or a quality of an object. eg in #3, we worked with the bgColor (property) of the document (object).
there are 56 odd properties, we discuss some more used ones.
Properties of the Object "navigator"
Properties of the Object "document"
This code is a little wide. Click here to open it in a new window.
Properties of the Object "history"
These Two are Properties of the Object "location"
Properties of the Object "document"
This code is a big large. Click to open it in a new window.
Properties "length of the Object "history"
This is a very popular one. Many readers want to be able to make links that take people back or forward one or more pages.
These Two are Properties (host and hostname) of the Object "location"
Both return the URL in either IP number of text format depending on what the server is using. But...
location.host returns the URL plus the "port" the user is attached to.
location.hostname returns only the URL.
If you are getting the same result with both commands, then that means your server has not routed you to a specific port. In technical terms, the "port" property is null.
By the way, these two commands will not work if you are running the page from your hard drive. You need to be running this from a server for there to be a URL for the script to grab.
Lesson 8.
Objects have properties that describe how objects look, just as adjectives describe nouns. We refer to properties as object.property.
Objects also have methods, or actions that can be performed to the object. All methods have (parentheses) and are referred to as object.method().
Different objects have access to different properties and methods.
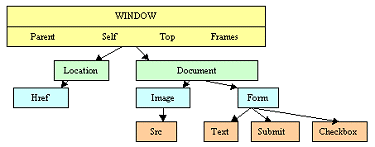
Now we'll learn the secret to understanding JavaScript, the hierarchy of Objects.
Notice they follow the hierarchy above, from top to bottom.
window.document.mypic.src = "pic1.gif"
Window is not needed at the very beginning. It is assumed that all this is inside of the window so you would probably just have..
document.mypic.src = "pic1.gif"
for forms you must have a value...
document.myform.mytext.value
Realise that its a bit parent to child ..that is for any object to property, that property in turn becomes the object to it's own property and so just as a child becomes parent to it's own child.
For all that, note that Value and SRC are just Properties!
Lesson 9.
Creating a Function
The script is in two parts: There is the script itself that contains the function, then the "onLoad" event handler that triggers the function to work.
Here are both parts:
...and the onLoad command in the <BODY>
Lesson 10.
After-Effect Commands: onUnload and onMouseOut
This produces the mouseOver effects:
Place your mouse on and off of this
This produces the effect when you leave the page:
Lesson 11.
Opening New Windows
This is the first of two primers on opening a new window. This first primer will deal with the JavaScript commands you would use to open a new window. The new window will display a second HTML document.
The second primer will offer you the same effect of the new window, but will show you how to open the window as a function so that the same page contains both windows. You won't have to rely on two HTML pages. One HTML page and a JavaScript will do it all.
('opened.html', 'joe', config='height=300,width=300')
opened.html is the URL of the page that will appear in the new window. If the page is off of your server you'll need to add the http:// stuff.
joe is the name of the new window. This will be important in a moment.
config= denotes that what follows will configure the window.
Here are the commands and what they do. Remember, even if you use every one of these, be sure to run them all together just like the height and width. A space equals an error.
|
In case you're wondering whether you can lose the title bar or not, the answer is no. That's a given. You get it, like it or not.
You may be wondering if these commands are properties. No, they're not. If thinking of them as properties helps you remember them, great, think of it that way. But in reality, these little gems are called features. A feature is something that acts as a parameter of a JavaScript event. These little pups are features of the new window that the script opened up.
Lesson 11.
The Concept
This is the first of two primers on opening a new window. This first primer will deal with the JavaScript commands you would use to open a new window. The new window will display a second HTML document.
The second primer will offer you the same effect of the new window, but will show you how to open the window as a function so that the same page contains both windows. You won't have to rely on two HTML pages. One HTML page and a JavaScript will do it all.
Let's get started with the basics.
The Script
Deconstructing the Script
Placement Let's start by talking about the placement of this script. Until now I have always said it's good to place scripts up high in the document so they can run first. When you're dealing with a function, the script goes up in the HEAD commands. Here, I'd like to make a different suggestion.
If you're going to open a second window, put the commands that do it down pretty low in the HTML document. In fact, make them last. The reasoning is simple: the page loads then the new window pops up. If you have the commands first, then the new window pops up before the viewer gets to see what's there. There's a greater chance of the window being closed before it can be used.
That's just my opinion. You can actually place this anywhere in the document. It'll run from anywhere. I think that if the window pops up last, it's more beneficial to your viewers.
window.openIt couldn't be more blatant than that: "window" is the object and "open" is the method that acts upon it. That's the easy part. Now we get to configuring the window.
Configuring the WindowThis is all that good stuff in the instance of the command (that's the parentheses, remember?) Here's the format you need to follow:
('URL of document in window', 'New Window Name', config='New Window Parameters')
Now, here's the command, from above, with the correct elements:
('opened.html', 'joe', config='height=300,width=300')
opened.html is the URL of the page that will appear in the new window. If the page is off of your server you'll need to add the http:// stuff.
joe is the name of the new window. This will be important in a moment.
config= denotes that what follows will configure the window.
Note that the "height" and "width" commands above are separated by a comma with no space in between. See how the single quotes surround both the height and width commands? The reason is that those two items are actually subcommands of config, so it all has to run together. If there is a space, the browsers thinks the command has ended. Error.
There are numerous subcommands that work under the config command. "Height" and "width" you already know. They work by adding the number wide by number high in pixels. The remainder of these commands all work by using a "yes" or a "no" to denote whether you want them or not. (You can also use "1" for yes and "0" for no, if you want to write in true JavaScript form, but it's not necessary.)
Here are the commands and what they do. Remember, even if you use every one of these, be sure to run them all together just like the height and width. A space equals an error.
|
In case you're wondering whether you can lose the title bar or not, the answer is no. That's a given. You get it, like it or not.
You may be wondering if these commands are properties. No, they're not. If thinking of them as properties helps you remember them, great, think of it that way. But in reality, these little gems are called features. A feature is something that acts as a parameter of a JavaScript event. These little pups are features of the new window that the script opened up.
Tags In The New Window The new window that pops up is little more than a frame for the HTML document that is posted inside. As you can see from the new window on this page, I made the background a nice greenish blue. Then there were two links.
The first link opened the HTML Goodies page in the main window. This is the code that made it happen:
Whether you knew it or not, the big window has a name, "main". That's why I've been calling main all the way through this primer. There's no need for you to name it main, it's already done from the start for you. It's the default name.
All I did was add the command TARGET="--" to the HREF command and enter "main" for where the page should load.
But what if I wanted the page to load in the small window? Well, what is the name of the small window? In this primer, it's called "joe." Remember that from above? You would simply write the HREF link command so that target pointed to "joe."
You can actually have multiple windows by adding multiple "window.open" commands. Just make sure to give each window a different name. You can have links from window to window as long as you continue to target the links correctly.
Closing The WindowThe second link on the new window closed it. Here's the format to do that: Click To Close
It's a basic HREF link that points to nothing. See the empty quotes above? Setting it so that the link points to nothing prevents another page from loading. The command that actually closes the window is the onClick="self.close."
"self" is a property of whatever it happens to be sitting on. In this case, it's the new window. The command "close" is a property that does the dirty work.
One More Thing Let's say you wanted to open a window on command rather than having it occur when the person logs in. You can do it and here's the command:
Click To Open 'joe'
Lesson 12.
Opening A Window With A Function (ie Lesson 11 done differently)
We have opened a new window using the "window.open" command. That window was then filled with another HTML document we named in the instance.
Here, we're going to create a new window function where the new window and all of its contents will be carried along in the same HTML document. It is literally the equivalent of two pages in one.
...and in the BODY command:
onLoad="openindex()"
Lesson 13.
JavaScript Primer #13 "Confirm" Method (Intro to IF and ELSE)
The Concept
The command "Confirm" acts very much like the alert method except it adds a cancel button to the dialogue box. They're both methods.
Now, if you use the command by its lonesome, it doesn't do much except post the OK and Cancel buttons and no matter which one you choose, you go in. But, add the IF and ELSE functions and you start to get some neat effects.
First off, we'll look at the basic format.
Look familiar? It should. It's the same as an alert, except the word "confirm" is used.
Here's the same command with some new additions:
Lesson 14.
JavaScript Primer #14
Math Variables
The Concept
This page will not only show you how to use numeric values to perform computations with JavaScript, but it will also test your basic math skills. There may be a test later.... Its purpose is to introduce you to variables, something you'll use often. If you've done any programming, you should be experiencing deja vu! If not, don't panic. This is an easy introduction!
Just have it in the body somewhere.
Lesson 15.
JavaScript Primer #15
Image Flip Using OnMouseOver
The Concept
This example introduces you to advanced uses of onMouseOver and onMouseOut events. Remember that with object-oriented or object-based programming, an event triggers a function or JavaScript statement to run. Remember the onLoad command in the body that called for the JavaScript in the HEAD commands?
The two events demonstrated here occur when you move your mouse over a link or move it away from the link. This is pretty much the same thing you did when you used these Event Handlers to get text to appear in the status bar. Remember that from Primer #4?
Notice again that there is no need for the SCRIPT tags. The JavaScript onMouseOver and onMouseOut events are built into the HTML Anchor tag. Also notice that by including BORDER="0" in the IMG tag, no link box appears around the image.
** and also notice none of the examoples below give me a roll over effect like in the 'menu' examples that was copied in!**

Try this (note target="resource window" cf target="blank")..
menu.html Uses resource window.
menu.html Uses blank.

Lesson 16.
**Start next time**
Lesson 17.
Lesson 18.
Lesson 19.
Lesson 20.
Lesson 21.
Lesson 22.
Lesson 23.
Lesson 24.
Lesson 25.
Lesson 26.
Lesson 27.
Lesson 28.
Lesson 29.
Lesson 30.