Lynn Allen
Lost in Paper Space—Again!
So who needs Paper Space? Anyone who creates drawings containing multiple scale factors; anyone who creates 3D drawings and wants to plot multiple views; anyone who wants to draw one-to-one and plot one-to-one; anyone who is tired of multiplying text and dimensions to outrageous sizes so they are scaled correctly for models; anyone who wants to remain a cool AutoCAD operator. Get the picture? To succeed as an AutoCAD guru you really need to have a good grasp of Paper Space under your belt. So, lets get started! For this column I'll be focusing on the AutoCAD 2000 release and up.
Paper Space Revisted
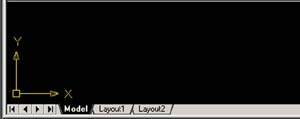 Figure 1. The tabs in the lower left-hand corner of the drawing editor control whether or not you're in Paper Space.
Down in the lower left-hand corner of the drawing editor are the Model Space
and Layout tabs, as shown in Figure 1. If the Model tab is selected, youre in
Model Space; the Layout tabs indicate youre in Paper Space. By default, the
Paper Space tabs are called Layout1 and Layout2, but you can rename them anything
youd like by simply right clicking on them. You can also add and delete layouts.
Clicking on a layout puts you into a different view, as shown in Figure 2.
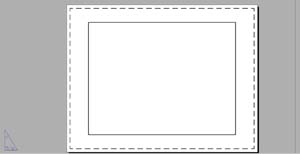 Figure 2. Selecting a Layout tab will put you in Paper Space.
The USCISON turns into a triangle (indicating youre no longer in Kansasor Model Space) and the drawing area now resembles a piece of paper. Your background color is now white and the dashed rectangle indicates the printable area of the drawing. Drawing outside of the dashed rectangle would create objects that will not display on the final plot.
Figure 2. Selecting a Layout tab will put you in Paper Space.
The USCISON turns into a triangle (indicating youre no longer in Kansasor Model Space) and the drawing area now resembles a piece of paper. Your background color is now white and the dashed rectangle indicates the printable area of the drawing. Drawing outside of the dashed rectangle would create objects that will not display on the final plot.
The first time you enter a layout tab youll probably get the Page Setup dialog box, as shown in Figure 3.
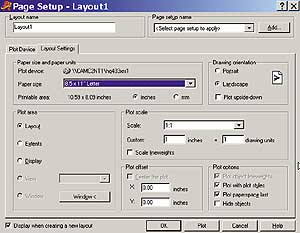 Figure 3. Use the Page Layout Setup to indicate the printer and paper size you intend on using.
This provides instructions to AutoCAD related to your plotting needs. Page setups are really
just plot settings saved with each layout. Rather than launch into a completely different topic
(plotting), Im going to focus primarily on the Paper Space world. Were going to postpone any in-depth discussion on the Page Setup dialog for now. Though I don't necessarily recommend it, you can turn off this dialog in the Options dialog or by unchecking the Display when creating a new layout option in the lower left-hand corner of the Page Setup dialog.
Figure 3. Use the Page Layout Setup to indicate the printer and paper size you intend on using.
This provides instructions to AutoCAD related to your plotting needs. Page setups are really
just plot settings saved with each layout. Rather than launch into a completely different topic
(plotting), Im going to focus primarily on the Paper Space world. Were going to postpone any in-depth discussion on the Page Setup dialog for now. Though I don't necessarily recommend it, you can turn off this dialog in the Options dialog or by unchecking the Display when creating a new layout option in the lower left-hand corner of the Page Setup dialog.
Most of your drawing time will be spent in Model Space. Here youll create the geometry for your model (1-to-1). If youre drawing a floorplan that is 50-feet-by-40-feet, youll draw it exactly that size. If youre drawing a sensor that is 4mm-by-2mm, then youll draw it exactly that size as well. You'll set up your limits, grid, and snap to accommodate your model. Youll focus on creating the actual model and save the title block, dimensioning, and annotations until later.
Viewports
Now for a word about Viewports. There are two distinctly different types of Viewports in AutoCAD: the viewports you can create in Model Space and the viewports you create in Paper Space. Theyre both very different animals. Both types of viewports are used to view your model from different views. The viewports you create in Model Space must be tiled, like the tiles on a floor. They lie side by side and must fill up the entire display area. When in Model Space, you can only plot one viewport at a time. The viewports you create in Paper Space dont follow the same rules, instead they can lie on top of each other, within each other, overlap each other, and so forth. Viewports can be copied, moved, stretched, erased, and so on. In Paper Space you can plot as many viewports as you like. In Paper Space, a viewport is actually considered an object.
To create viewports in Model Space, youll use the VPORTS or VIEWPORTS command (View pulldown menu = Viewports). This will display the Viewports dialog box, as shown in Figure 4. Here you can pick a viewport configuration to suit your needs. For you 3D users, theres a great 3D-viewport option that automatically displays three different viewpoints of your modeljust change the Setup option from 2D to 3D. There are also several different view options, as shown in Figure 4, so you can choose to display the views from Northeast, Southeast, and so on.
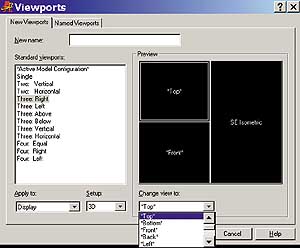 Figure 4. The Viewports dialog box is used for creating tiled viewports in Model Space.
Within this same dialog you can save a specific viewport configuration to easily recall later (note the Named Viewports tab).
Figure 4. The Viewports dialog box is used for creating tiled viewports in Model Space.
Within this same dialog you can save a specific viewport configuration to easily recall later (note the Named Viewports tab).
So youve drawn your model 1-to-1, and now youre ready to move on to the final stages of AutoCAD draftingannotation, dimensioning, and plotting.
Select the Layout1 tab to go to Paper Space. You should be looking at a blank piece of paper. If the Create viewport in new layouts option is checked in the OPTIONS dialog, youll see a default viewport appearing with your model showing through. Well assume you fall under the former category, those of you who have a viewport already appearing on the screen can simply erase it if you choose to follow along.
For those of you pre-AutoCAD 2000 users (with no model or layout tabs), pick the Tile tab on the status bar to go back and forth from Model Space to Paper Space. When Tilemode is ON, you can only have tiled viewports, and, hence, youre in Model Space. When Tilemode is OFF, you arent restricted to tiled viewports anymore, and, hence, youre in Paper Space.
The first thing you want to do is make sure the piece of paper youre looking at is the size to which you ultimately plan on plotting. The easiest way to do this is to select a paper size in the Page Setup Layout under the Layout Settings tab (make sure you have the correct printer or plotter selected). If not, simply go into the LIMITS command and set up the piece of paper manually (this would primarily apply to R14 users). Setting the limits in AutoCAD 2000+ is not as easy as it looks. Youll notice that AutoCAD now allots for the unprintable area in the drawing, which requires some math, so youre much better off setting them in the Page Setup dialog. If you ran past the Page Setup dialog and would like to make some changes, you can always call it back with the PAGESETUP command. After setting up your page size, you might want to set up an appropriate grid and snap setting as well.
So your paper is set up, and youre ready to insert a full-sized border along with your title block. This is easily done by inserting it within the dashed rectangular area (Im assuming you have already created a border with a title block). Now all you need is your model!
The Model
Where is it? Its back in the model world where it belongs. To import a view of your model youll create a Paper Space viewport using the MVIEW command. This month well stick to creating a simple viewport, and next month well dive into the many options within the MVIEW command.
Command: MVIEW
Specify corner of viewport or
[ON/OFF/Fit/Hideplot/Lock/Object/Polygonal/Restore/2/3/4] Fit: (pick one corner where youd like the viewport to go)
Specify opposite corner: (pick the opposite corner)
Regenerating model.
Youve now created a Paper Space viewport for your model to shine through.
What is the scale factor for your model? I havent got a clue. Before I finish this months column (to be continued in much more detail next month), lets take a quick and simple look at setting the correct scale factor for the viewport.
The Correct Scale Factor
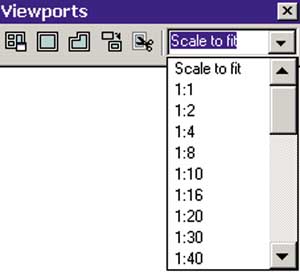 Figure 5. The Viewports drop-down list is an easy method of setting Paper Space viewport scale factors.
My personal preference is the new drop-down list on the Viewports toolbar (AutoCAD 2000+ only). Simply drop the list down and select the scale factor youre interested in, as shown in Figure 5.
Unfortunately, there are several scale factors not listed in the drop down. If you need a scale factor not listed, youll have to resort to other means (to be discussed next month as well).
OK, so I realize this was just a lightweight intro to the world of Paper Space that took us through a few of the basics. Next month, well take it much further as we dig deeper into MVIEW, scaling our viewports, and more.