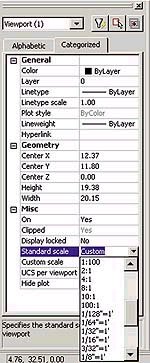
Fig.1 The Properties dialog makes it easy to set viewport scale factors.
|
|
Fig.1 The Properties dialog makes it easy to set viewport scale factors. |
We've worked through two parts of the Paper Space tutorial. In this 3rd part of the tutorial we will look at scale factors for viewports within Paper Space.
You've created your model 1 to 1; exactly the size it is in real life. You've gone into the Paper World (TILEMODE is now set to 1) and have set up your paper the size you plan on plotting your drawing to. You've inserted a border and title block and one or more viewports so your model is showing through. We know how to move from viewport to viewport by double-clicking in the intended viewport. And if you are having problems getting into a specific viewport (perhaps it's a viewport within a viewport) you can use the magical Ctrl+R to toggle from one viewport to another.
Note: Toggling from viewport to viewport used to be done by using Ctrl+V before Windows stepped in, reserving Ctrl+V for Paste. AutoCAD now uses Ctrl+R in its place.
So what scale factors are our viewports using? Good question! AutoCAD simply fits the model into the viewport, and it's up to you to scale it properly. You may feel the need to use the standard SCALE and MOVE commands to get the correct display of your model, but that would be a big no-no; it will change the integrity of that model you've worked so hard to create. This would also affect any other viewports you've created. All our scaling in the Paper World will be done via our standard ZOOM and PAN commands. Zoom to control the scale factor and pan to move the model into its appropriate position within the viewport. This part gets a tad tricky so be sure to hold on! We'll discuss the age-old official means of controlling the viewport scale factor, and then we'll take a look at a few of the new features that came out in AutoCAD 2000.
Table 1.
|
|
Scale Factors |
XP Value |
|
1/8-inch = 1 foot |
1/96XP |
|
1/4-inch = 1 foot |
1/48XP |
|
1/2-inch = 1 foot |
1/24XP |
|
1-inch = 1 foot |
1/12XP |
|
1 = 2 |
1/2XP |
|
1 = 4 |
1/4XP |
|
2 = 1 |
2XP |
|
10 = 1 |
10XP |
|
50 = 1 |
50XP |
The XP option in the ZOOM command will become our best friend when setting our viewport scale factors. XP stands for Times Paper Space. You are essentially indicating to AutoCAD the ratio between Model Space units and Paper Space units. This is much easier to explain with some solid examples.
Let's say you want your scale factor within the viewport to be 14-inch = 1-foot. If you were doing standard drafting, you would be dividing everything by 48 to get it to fit on your paper. While 1-inch=1-foot would mean you'd be dividing by 12, and 12-inch=1-foot would cause you to divide by 24, and so forth. Or, perhaps, you're going the other direction and need to enlarge your model to get it to fit on your paper. Your scale factor might be 2X or 4X. And for the rest of us, who use the much more sensible units to the base 10 (metric) and not base 12 (imperial), you might have scale factors such as 1-centimeter=20-meters, or 1-centimeter=50-meters.
After you've determined the scale factor you'd like to apply to your viewport, simply make the viewport active (double click inside) and enter the ZOOM command. We'll assume your model needs to have a final scale factor of 14-inch=1-foot.
Command: ZOOM
Specify corner of window, enter a scale factor (nX or nXP), or [All/Center/Dynamic/Extents/Previous/Scale/Window] real time: 1/48XP
Regenerating model.
And in case you're curious, a simple X (vs. XP) will scale times the current view. So 4X would zoom you in four times the current display scale factor towards the display center. It's not uncommon to need to pull back your zoom just a tad, and many veteran users know to key in .7X to take a giant step backwards.
Table 2.
|
|
Scale Factors |
XP Value |
|
1/8-inch = 1 foot |
.01XP |
|
1/4-inch = 1 foot |
.02XP |
|
1/2-inch = 1 foot |
.04XP |
|
1-inch = 1 foot |
.08XP |
|
1 = 2 |
.5XP |
|
1 = 4 |
.25XP |
|
2 = 1 |
2XP |
|
10 = 1 |
10XP |
|
50 = 1 |
50XP |
Table 1 shows a sampling of some standard scale factors and their final XP value.
You can also enter the actual scale factor values in decimal; for example, the list in Table 1 would appear as the factors shown in Table 2. You get the idea. Simply jump into each viewport and set your scale factor using the ZOOM command.
AutoCAD 2000 introduced two new ways of setting the scale factors for your viewport. Though both of these methods are easier to use because you simply select the scale factor from a list, you may still find that you will have to enter some custom scale factor values.
The first method uses the new PROPERTIES dialog that came out in AutoCAD 2000. While in Paper Space, highlight the intended viewport by picking on its frame and then right click and pick Properties from the shortcut menu. This is even easier in AutoCAD 2000i or 2002; simply double click on the viewport frame and that will pull up the Properties dialog automatically.
Figure 1 shows you the Properties dialog as it relates to viewports. The key section to check out is the Misc. section, which contains many great options to help you set up your viewport to your specifications. The Standard scale section contains a great drop-down list that you can use to select your scale factor (no thought process required here!). You can also key in a custom scale factor if the one you need is not included in the drop-down list. This can be done in the Custom scale section. You can enter the scale factor in fractional format just as you did with the XP value or use the decimal equivalent.
 |
|
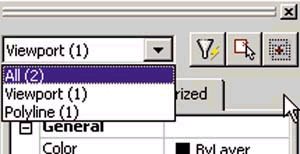
Fig.2 Use the Properties dialog drop-down list to isolate a non-rectangular viewport. |
Now let me warn you: if you've created a non-rectangular viewport, it will be frustrating for you when you select the viewport and it highlights the boundary object along with the viewport (more than likely a polyline). You'll notice that the Properties dialog indicates that you have two objects selected even though you only picked one. Simply drop down the list, as shown in Figure 2, and select Viewport. Then you'll be able to select a scale factor using the above method.
While were visiting the Misc. section of the Properties dialog, Id like to point out the other cool options you can find here.
 |
|
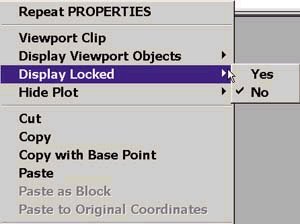
Fig.3 The right-click shortcut menu can also be used to lock viewport displays. |
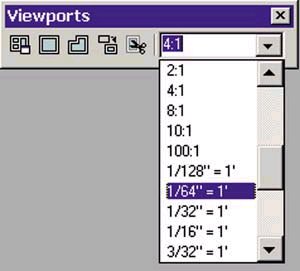
Last but not least, if you're into toolbars, the Viewports toolbar is one of my favorites. I actually leave this docked up by my Standard toolbar when working in Paper Space. Figure 4 shows you the new Viewports toolbar that contains a drop-down list for easily assigning viewport scale factors.
It should be noted that scaling or stretching the layout viewport border does not change the scale factor of the viewport. It's really the ZOOM command that could potentially modify the scale factor unexpectedly.
After you've set up the appropriate scale factor for your viewports, you may need to pan around within the viewport to get the desired final view.
So this month we tackled the display scale factors, but there are plenty more scale factors to worry about. What about linetypes? What about dimensioning?
I'd say that dimensioning is the most difficult and controversial aspect of Paper Space, and it will no doubt take another whole part of this paper space tutorial to cover all the ramifications of each possible dimensioning scenario. This will need to be done next month. A special thanks (again) to dave espinosa-aguilar of Toxic Frog Multimedia and Dan Abbott of Southern Maine Technical College for their paper space expertise and tips.
 |
|
Figure 4. The Viewport toolbar contains a drop-down list of viewport scale factors. |