Excel Tutor - Cyprus

Protecting Data

This lesson explains how to use the protection tool. The following areas are covered:
1. Protecting worksheets. The new features of Excel 2002 relating to Worksheet Protection are also explained.

2.  Using password and what we can do when you forgot our password.
3. Explaining ways to avoid selecting specific cells. The following methods are explained:
3.1 Restricting cursor movement only to unprotected cells using a new feature of Excel 2002.
3.2 Limiting the Scroll Area using a VBA procedure
3.3 Hiding Rows and Columns
3.4 Hiding Sheets. How to make them "Very Hidden".
4.  Protecting Workbooks
.

Protecting Data - Examples

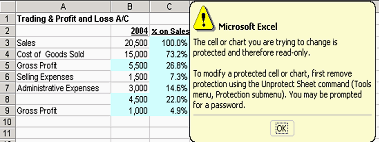
Protection can be used to avoid accidental changes of cells. To enable protection select Tools / Protection / Protect Sheet. Note that the protection is applied only to the cells that are formatted as locked (default format). If you want to leave some cells unprotected (eg those that you want to enter data in them) you have to format them as unlocked before protecting the sheet. To do that you have to select Format / Cells / Protection tab and remove the tick from the Locked box.

In the illustration below, the coloured cells contain formulas and are formatted as Locked. If the sheet is protected, any attempt to modify their contents will not be accepted and you will receive a message.

A significant improvement of the protection tool was made in Excel 2002 where you have various options when you select Tools / Protection / Protect sheet.  For example you can remove the tick on the "Select locked cells". If the entry cells are formatted as unlocked and the sheet is protected, only the entry cells will be able to be selected.  In this case, you will use the arrow keys so that the cursor will jump only to those cells. Thus you will navigate easily to the entry cells and you will not be "lost" in the worksheet.

Home | Who Am I? | My Training Program and Examples

| Downloads | Links | Contact