(If I can borrow a decent camera)
Fitting a Bonnet Vent:
Firstly - if you're going to fit a large bonnet vent you need to bear the following things in mind.
Below are the steps I took to fit my Subaru vent (which is a Genuine WRX one, so there !).
Step1: Sanding and
Prepping the vent.
The first job is to sand the glossy surface off the existing
paint on the vent and prime and spray it with the colour of your
choice. Ideally if I had loads of money I'd fit it and blend it
into the bonnet first and then get it all sprayed but I don't so
I didn't!
See my 'Removing Side Mouldings' section for painting tips.
Remember to use lots of Plastic Primer otherwise the top coat
won't have anything to stick to. Also plastic primer is more
flexible than standard primer.
Step 2: Creating a
Template
Place the vent bottom side down on a large piece of paper. Some
wallpaper or a piece of A3 would do.
Now draw around the vent with a pen/pencil. A thick marker is the
easiest tool.
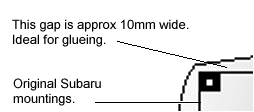
Once you have a traced outline prepared you now want to reduce
the whole outline by about 10mm this is the distance of flat
'glueable' edge around the vent.
NOTE: This glueable area may be diferent depending on what sort
of vent you fit.
Now cut out the template.
Step 3: Marking Up.
Measure your bonnet's width, find the centre and mark it with a
pen (on top of a piece of masking tape). Now measure the vent and
find the centre of that too.
Now you want to measure the distance between the centre of the
vent and one end of it. Now do the same with the bonnet and mark
it.
This will allow you to mark up where to put the vent and get it
perfectly centered. Getting the vent centered is CRUCIAL.
A quick way of centering the vent is to fold the stencil/template
exactly in half to find its centre then lay it over your bonnet
so that the fold sits over the bonnet centre line.
Now you have to cover the bonnet in paper to avoid scratching
it with the platter on the bottom of the jigsaw cutter. Another
way would be to cover the metal platter in masking tape.
Affix the template to the bonnet with masking tape SO IT WON'T
MOVE. The template edge should still be visible through/under the
tape.
Step 4: Preparing the
bonnet
Ideally you'd remove the bonnet from the vehicle. Only involves
undoing four hinge bolts and a 'bonnet stay' bolt.
If you can't be arsed or you're too thick simply raise the bonnet
up a little using wooden blocks along your wing tops.
Step 5: Cutting !!
Fit an electric jigsaw with a METAL CUTTING BLADE. If you can't
even do this, remove all the sticky stuff and give up now before
its too late.
Drill a hole at one of the corners of the new vent hole (probably
about 10-12mm).
Stick the blade of the jigsaw through the drilled hole and make
sure that it isn't long enough to cut through all your looms and
cooling hoses!
The blade does need to be long enough to cut through a bonnet
strengthening crossmember. You only need to cut one of these and
because it's of angular contruction this does not affect your
bonnet shape or rigidity.
Now that you have read all the bullshit... Start Cutting.
Remember the safety goggles (yeah right) because this operation
does involve lots of flying metal swarf and sharp splinters.
You'll need some way of keeping the cut-out section stable,
either by attaching a sticky hook to it and then holding it up or
by putting something underneath it. This stops it flapping about
when you get to the final stages of cutting.
Step 6: Big F**king Hole.
Now that you have disgarded a large chunk of your bonnet you'll
see a large hole (in your air box with coolant hoses pissing out
water everywhere..heehee).
You need to lightly file around the hole to take off the sharp
edges.
Sand about 10mm paint off the bonnet all around the hole
(remember that glueable area).
Once all the sanding is finished use a vac to hoover up all the
metal debris so it wont collect and rust your Fiesta. Clean off
the sanded area.
Step 7: Glueing/Attaching.
Use some two-part glue like Araldite, Mastik or Halfords high
strength glue (comes in 1000psi packs etc..) smear this around
the hole and on the area of vent to be glued. Follow the
instructions on the glue tube for the sticking instructions.
Once you have placed the vent into the hole wipe off any excess
glue BEFORE IT DRIES and weight it down with a book or something.
You could hold it if it's really quick drying and you've got
nothing better to do.
Some vents like the Subaru job may be a little to large for glue
alone. Some sort of fixing job may need to be done to clamp it
down mechanically.
See pictures below: (sorry no photo's - work's digital camera not
available today!)
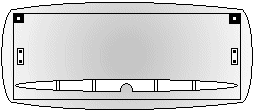
| This is the view of the underside of the vent
|
Close-up of one corner, shows where to put adhesive.
|
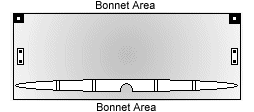
| This shows the underside of the bonnet with the vent
in position:
|
For the Subaru vent these clips need to be used to
mechanically attach the vent to the bonnet.
|
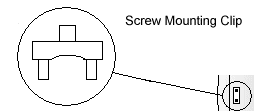
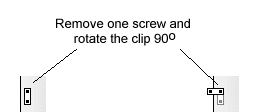
| To use the clip you must remove one screw, loosen the
other and then rotate the clip 90 degrees. When you
re-tighten the single remaining screw the clip will act
as a clamp against the underside of the bonnet to hold
down the vent. |
Photo's coming soon !! (If I can borrow a decent camera) |
Step 8: Finishing.
If you've got some sponduliks and you want to blend it all in and
get it sprayed then now's the time.
Buy some ELASTIC bodyfiller and use it to blend away the edge
between the vent and bonnet.
Go through all the general crap of sanding & filling, sanding
& filling, sanding & filling, and yes, more sanding &
filling, prepping and painting.
If you're broke like me use some silicon sealant (yes, that shite
you use for bathrooms) and squirt and shape this around the vent.
I've got a white car so I used white sealant and it looks really
professional, surprisingly.
Step 9: Testing.
If you've got a direct intake filter like a K&N or Pipercross
KK3000 take the car out for a blast. You'll notice the benefits
of all that cold air getting to the element straight away.
The faster you go the more cold air you'll get and the faster
you'll go (a vicious circle of speed!!)
Now find some Vauxhall Nova's and...err... burn them off !!!