
One of the more interesting features of the GBA hardware is its ability to apply scaling and rotation to both BGs and objects. As far as BGs are concerned, the GBA can display either 2 text BGs and 1 rotation BG, or 2 rotation BGs. Rotation BGs can be displayed as an array of 8bit values. Each tile is represented by one 8bit value, and by a an 8x8 256-colour character on screen. Unlike text BG screen elements, the 8bit value for a rotation BG screen element only holds the index into character memory that identifies which character to display. That means that you can have a maximum of 256 different characters per BG, those characters must be 256-colour, and cannot be flipped horizontally or vertically.
The first hurdle comes when loading your map into a screen data block. VRAM on the GBA can only be accessed as 16bit memory, not 8bit. This means that you cant simply write tile-for-tile as we did previously. Here is a revised LoadRoom() function that will correctly load text BGs and rotation BGs. It has been overhauled and will load any sort of text BG (all tile sizes and 4 and 8bit characters are supported). There is one minor issue with rotation BGs that I did not address, but will mention at the end. Also note that I've chosen to note use a temporary array this time, instead just writing directly to VRAM.
#define LOAD_AS_TEXTBG	0
#define LOAD_AS_ROTBG	1
#define LOAD_AS_4BIT	0
#define LOAD_AS_8BIT	2

void LoadRoom(const struct TUMERIC_ROOT *pRoot, u32 Room, unsigned char BGCharBlock, unsigned char ScreenDataBlock, unsigned char PalettePos, unsigned char LoadFlags)
{
	unsigned char	x, y, x2, y2, Layer;
	unsigned char	RoomCharWidth;

	if (LoadFlags & LOAD_AS_8BIT)
	{
		WAIT_VBLANK();
		LoadBGPal(pRoot->pRoomTable[Room].pRoom->pPalette);
		WAIT_VBLANK();
		LoadBGChars((unsigned short*)pRoot->pRoomTable[Room].pRoom->pCharSet, pRoot->pRoomTable[Room].pRoom->nCharacterCount * 64, BGCharBlock);
	}
	else
	{
		WAIT_VBLANK();
		LoadBGSubPal(pRoot->pRoomTable[Room].pRoom->pPalette, PalettePos);
		WAIT_VBLANK();
		LoadBGChars((unsigned short*)pRoot->pRoomTable[Room].pRoom->pCharSet, pRoot->pRoomTable[Room].pRoom->nCharacterCount * 32, BGCharBlock);
	}
The above should be self explanitory, 4bit characters are 32 bytes, 8bit characters are 64. Since the Tumeric root doesn't have any info about the bit depth of the character set, we can only let the caller of the function provide that info. The WAIT_VBLANK() macro above simply checks to see if we are in the vblank period, and if not, then waits until then. If we are it will just return, so in the above, 2 WAIT_VBLANK() calls won't wait for 2 seperate blanks, but if the first load finishes within the vblank the second will commence during that same blank.
	if (LoadFlags & LOAD_AS_ROTBG)
	{
		RoomCharWidth = (pRoot->nTileWidth * pRoot->pRoomTable[Room].pRoom->nWidth) / 2;

		for (Layer = 0; Layer < pRoot->pRoomTable[Room].pRoom->nLayerCount; ++Layer)
		{
			WAIT_VBLANK();
			for (y = 0; y < pRoot->pRoomTable[Room].pRoom->nHeight; ++y)
			{
				for (x = 0; x < pRoot->pRoomTable[Room].pRoom->nWidth; ++x)
				{
					for (y2 = 0; y2 < pRoot->nTileHeight; ++y2)
					{
						for (x2 = 0; x2 < pRoot->nTileWidth; x2 += 2)
							*(TILEMAP_BLOCK_ADDR((ScreenDataBlock + Layer)) + (((y * pRoot->nTileHeight) + y2) * RoomCharWidth) + (((x * pRoot->nTileWidth) + x2) / 2))
							= pRoot->pRoomTable[Room].pRoom->pTileTable[pRoot->pRoomTable[Room].pRoom->pLayerTable[Layer].pLayer[(y * pRoot->pRoomTable[Room].pRoom->nWidth) + x].nTile].pTileSet[(y2 * pRoot->nTileWidth) + x2] |
							(pRoot->pRoomTable[Room].pRoom->pTileTable[pRoot->pRoomTable[Room].pRoom->pLayerTable[Layer].pLayer[(y * pRoot->pRoomTable[Room].pRoom->nWidth) + x].nTile].pTileSet[(y2 * pRoot->nTileWidth) + (x2 + 1)] << 8);
					}
				}
			}
		}
	}
The LoadRoom() function has two code paths--one for rotation BGs, the other for text BGs. Below is the code path for text BGs, above we have the rotation BG branch. The main difficulty in writing directly to VRAM with screen data is that data sizes don't match. With text BGs, each screen element is 16bit, and VRAM is accessed in 16bits as well, so there is no problem. With rotation data however we must make some modifications. First, the pitch of the memory area is halved, and second, we must write two characters per tile at a time. If you are unfamiliar with the concept of the "pitch" of a linear array of memory I suggest you look that up.
	else
	{
		unsigned char	Flag;

		RoomCharWidth = pRoot->nTileWidth * pRoot->pRoomTable[Room].pRoom->nWidth;

		for (Layer = 0; Layer < pRoot->pRoomTable[Room].pRoom->nLayerCount; ++Layer)
		{
			WAIT_VBLANK();
			for (y = 0; y < pRoot->pRoomTable[Room].pRoom->nHeight; ++y)
			{
				for (x = 0; x < pRoot->pRoomTable[Room].pRoom->nWidth; ++x)
				{
					Flag = pRoot->pRoomTable[Room].pRoom->pLayerTable[Layer].pLayer[(y * (pRoot->nTileWidth * 8)) + x].nFlag;
					Flag = (((Flag & 32) << 1) | ((Flag & 64) >> 1) | (Flag & 159));

					if (!(Flag & 32) && !(Flag & 64))
					{
						for (y2 = 0; y2 < pRoot->nTileHeight; ++y2)
						{
							for (x2 = 0; x2 < pRoot->nTileWidth; ++x2)
								*(TILEMAP_BLOCK_ADDR((ScreenDataBlock + Layer)) + (((y * pRoot->nTileHeight) + y2) * RoomCharWidth) + (x * pRoot->nTileWidth) + x2)
								= pRoot->pRoomTable[Room].pRoom->pTileTable[pRoot->pRoomTable[Room].pRoom->pLayerTable[Layer].pLayer[(y * pRoot->pRoomTable[Room].pRoom->nWidth) + x].nTile].pTileSet[(y2 * pRoot->nTileWidth) + x2] | Flag << 5;
						}
					}
					else
					{
						if ((Flag & 32) && !(Flag & 64))
						{
							for (y2 = 0; y2 < pRoot->nTileHeight; ++y2)
							{
								for (x2 = 0; x2 < pRoot->nTileWidth; ++x2)
									*(TILEMAP_BLOCK_ADDR((ScreenDataBlock + Layer)) + (((y * pRoot->nTileHeight) + y2) * RoomCharWidth) + (x * pRoot->nTileWidth) + x2)
									= pRoot->pRoomTable[Room].pRoom->pTileTable[pRoot->pRoomTable[Room].pRoom->pLayerTable[Layer].pLayer[(y * pRoot->pRoomTable[Room].pRoom->nWidth) + x].nTile].pTileSet[(y2 * pRoot->nTileWidth) + ((pRoot->nTileWidth - 1) - x2)] | Flag << 5;
							}
						}
						else
						{
							if (!(Flag & 32) && (Flag & 64))
							{
								for (y2 = 0; y2 < pRoot->nTileHeight; ++y2)
								{
									for (x2 = 0; x2 < pRoot->nTileWidth; ++x2)
										*(TILEMAP_BLOCK_ADDR((ScreenDataBlock + Layer)) + (((y * pRoot->nTileHeight) + y2) * RoomCharWidth) + (x * pRoot->nTileWidth) + x2)
										= pRoot->pRoomTable[Room].pRoom->pTileTable[pRoot->pRoomTable[Room].pRoom->pLayerTable[Layer].pLayer[(y * pRoot->pRoomTable[Room].pRoom->nWidth) + x].nTile].pTileSet[(((pRoot->nTileHeight - 1) - y2) * pRoot->nTileWidth) + x2] | Flag << 5;
								}
							}
							else
							{
								for (y2 = 0; y2 < pRoot->nTileHeight; ++y2)
								{
									for (x2 = 0; x2 < pRoot->nTileWidth; ++x2)
										*(TILEMAP_BLOCK_ADDR((ScreenDataBlock + Layer)) + (((y * pRoot->nTileHeight) + y2) * RoomCharWidth) + (x * pRoot->nTileWidth) + x2)
										= pRoot->pRoomTable[Room].pRoom->pTileTable[pRoot->pRoomTable[Room].pRoom->pLayerTable[Layer].pLayer[(y * pRoot->pRoomTable[Room].pRoom->nWidth) + x].nTile].pTileSet[(((pRoot->nTileHeight - 1) - y2) * pRoot->nTileWidth) + ((pRoot->nTileWidth - 1) - x2)] | Flag << 5;
								}
							}
						}
					}
				}
			}
		}
	}

	return;
}
As you can see, most of the issues I mentioned previously with the text BG code path have been addressed. The only surprise should be that istead of a temp array I'm writing directly to the screen data block. If you're familiar with pointer arithmetic and array subscripts then you can figure out how this is done. If not however, let me explain.
int	MyArray[300];

MyArray[35] = 0;
MyArray is an int pointer, pointing to a linear block of 300 ints. The line MyArray[35] = 0 really translates to *(MyArray + 35) = 0. As such, when you work with arrays all you are doing is incrementing a base pointer by n*sizeof(int) bytes, dereferencing it, then setting a value at that address. If you want to set the first int to 0, MyArray[0] = 0 really just means *(MyArray + 0) = 0, which can be simplified to *MyArray = 0, which should look instantly familiar if you know your pointers. The reason why in the above we HAVE TO use the *(MyArray + n) = x convention is that array subscripts are only allowed with pointer variables. TILEMAP_BLOCK_ADDR isn't a variable, it's a literal address, something like (unsigned short*)(0xFE0D35), so we must add an offset to that address ourselves, then dereference, then set the value at the new address. If it's still not clear, http://vergil.chemistry.gatech.edu/resources/programming/c-tutorial/pointers.html and http://murrayc.com/learning/cpointers.shtml deal with the subject in greater detail.
Now we come to actually rotating the BG. Rotations for each BG are handled through 6 registers--X, Y, PA, PB, PC, and PD. PA, PB, PC, and PD are really just a 2x2 transformation matrix. If you know your matrices then you know you can represent a rotation, a uniform or non-uniform scale, and shear in 2D space with this 2x2 transformation matrix.
     BG Matrix			Rotation		      Scale			      Shear
[   pa   ][   pb   ]	[  cos(a)  ][ -sin(a)  ]	[  1/x  ][   0   ]		[   1   ][  1/x  ]
[   pc   ][   pd   ]	[  sin(a)  ][  cos(a)  ]	[   0   ][  1/y  ]		[  1/y  ][   1   ]
If y = x in the case of the scale and shear matrices, the transformation is uniform (i.e. equal on both the x and y axes), otherwise it is non-uniform. An example of a non-uniform scale would be scaling the x coordinate, but leaving the y coordinate unchanged, which would just be a horizontal stretch of the BG. For a refresher on transformations this URL might help. http://www.cs.uregina.ca/~yang/CS405/ch5/ch5.htm. Next come the X and Y registers. These hold the results of the transformation on the corner of the screen. If you have no idea what that means then fear not, it took a lot of trial and error for me to understand exactly what I was supposed to do with these two registers. The end result is that what you put into these registers determines where the center of the rotation or scale or shear is, or in other words, where you want the origin to be when you apply these transformations. If you leave X and Y as (0,0) and set PA/PB/PC/PD to be a 90 degree rotation matrix, the center of the rotation will be the point (0,0) on the map (not on the screen).
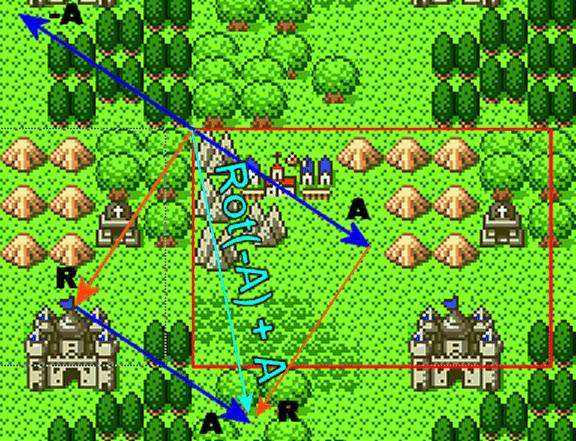
Below is an example where we want the origin to be at the center of the screen, meaning as the screen moves, the origin moves. It's important to note that all coordinates are defined in the map's coordinate system, as such, if you instead want to work with points on the screen then you must find out what point on the map the point on the screen you're interested in is hovering over. In plain english, X and Y represents what happen to the map pixel at (0,0) of the GBA screen after your rotation takes place. If you rotate your BG 90 degrees, then the point on the map that used to be at (0,0) on the screen will have rotated 90 degrees as well. What you have to do is find the vector to that point, rotate it 90 degrees, and put the result in X and Y.
The above image represents the GBA screen at 240x160. The map is 256x256 and the screen is currently over the top left corner of the map. That means that (0,0) on the map is at (0,0) on the GBA screen. Since the top left corner (0,0) is the origin itself, we can't really rotate it to find where it would end up if the origin was the center of the screen. The best we can do however is find the vector to the center of the screen, which is (119, 79). Here is where a little understanding of the geometric interpretations of vector behaviour can be helpful. If (119, 79) points to the middle of the screen, then (-119, -79) points in the exact opposite direction. In the image below, these two vectors are A and -A. The vector R that originates at the middle of the screen points to where (0,0) would end up if we rotated the BG 90 degrees with the center being the origin of rotation. This is our goal, we have to get -A to eventually point there. This can be accomplished by rotating -A by the same 90 rotation matrix, which will make it look like the second R. Now, simply adding R and the original A will give you the correct point, which is represented by the vector labelled "Rot(-A) + A". If you're observant you might say that it would be easier to rotate the original A in the opposite direction, by 360 - 90 = 270, which would also give you R, then add A. Consider however what happens when there is no rotation, Rot270(A) + A would take you to the opposite corner of the screen. With this scheme, you get the correct position for X and Y regardless of the type of angle you're dealing with.
I mentioned an issue with the rotation loading code path, and that has to do with writing two characters at a time. For now, loading tiles made up of even numbered characters is supported (e.g. 2x2, 6x4) because of the loop involved in writing each character. If you need to use other tile sizes then you will have to modify the inner loop to handle the final (odd) character and the first character of the next tile together. As a final note remember that the GBA has no dedicated FPU, so floats are emulated, and thus excruciatingly slow. Enter fixed point numbers. PA, PB, PC, PD, X, and Y are all fixed point numbers, with the lower 8 bits representing the fractional portion, and the upper 8 (or 19 in the case of X and Y) bits representing the integer portion. This demonstration would be far too long-winded if I explained them here, so instead I direct you to http://members.aol.com/form1/fixed.htm for an explanation of how they work courtesy of David Berube. Thanks to David for the handy macros I used in the demo code as well.

rotdemo.zip - 47KB