How to Draw Ashitaka of Princess Mononoke
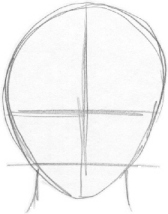 Deja vu...haven't we seen this before? Well, sort of. It's the basic head outline, alright, but this time it's not a 3/4 view! Wow, we're gettin' some variety in this thing. This is a full frontal view, so the vertical centerline does, indeed, go down the center of the oval. The eye and mouth lines are as usual, except they're straight since there's no perspective difficulties to deal with.
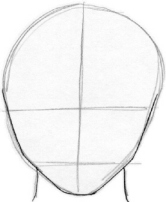 The face line is a bit different, and a little bit more difficult, in the front view. It's not so bad with Miyazaki, though, because if you look carefully, the face line is actually two sets of angles. The first set, the top one, starts a little above the eye line and follows the guideline down to a little above the mouth line. THESE LINES ARE RELATIVELY STRAIGHT. Now the second set starts there and follows the guideline down. Here you'll want to draw the chin separately, as one little section. This is the only part of the face line that is actually curved, and it's not much so, at that.
For a change of pace, let's not do the ears yet. In a front view, I guess you could draw them here, but I like to wait until I get all the other facial features in to make sure they're in proportion.
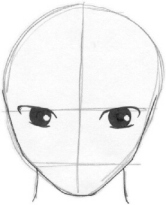 Whoa, is that Ashitaka or some kind of alien?!? Hmm. Anyway, eyes next. With Miyazaki, you'll want the eyes to be a bit more slanted than usual, due to the more natural style. So...start the upper line of the eye a little below the eye guideline, about halfway between the centerline and the oval. It goes up pretty steeply at first, then smooths out when it reaches the eye guideline. Keep going until you're just above the eye guideline, pretty close to the oval guideline. Now, curve it back in a little. That's it. The main eye part is, well, a circle. The bottom line is just a line, nothing fancy. Make sure it's angled so it's parallel to the upper line. Add one little tiny round hilite, and you're done. Now, you can either add a pupil and color in the iris part (which is used only on main/love interest characters, and not even always then), or you can just fill in the whole thing. Either way. I've chosen to fill it in here.
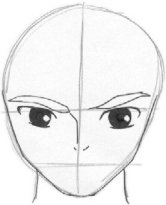 Let's give our little outcast some eyebrows. Oh, yeah, in Miyazaki there is no crease above the top line of the eye. Go fig. Anyway, eyebrows are pretty big in Miyazaki world. I'm not really sure how to tell you to draw them, they just kind of draw themselves. Make sure it's kind of a half-scowl. Ashitaka is one serious guy.
The nose is easy to do here, too. In a front view, depending on style, you can have a lot of nose, or not much at all. Fortunately, Ashitaka doesn't have much of a nose, period. Draw the main line first, from the eyebrow there and down. It's an angle at first, then just a straight vertical line pretty much following the centerline. Stop a little more than halfway between the eye and mouth guidelines. Now add those two little lines to indicate nostrils. And voila, what might pass for a nose.
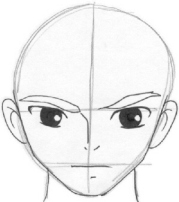 Draw the mouth next. It's, well, a line. That's it. And one little line for the lower lip. Gotta love this minimalist style, man!
Ears time, boys and girls! Don't make them too wide in a front view, and remember that they start at the eyebrow and go no lower than the end of the nose. Ears in Miyazaki Land are...IN REAL PROPORTION! WOW!
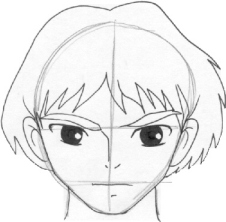 Jeez, he STILL looks like an alien. Let's fix that, ne? Start with the bangs. They go in two directions, starting a little off-center to the left. They're pretty simple, not too long, just zig-zags. They kind of turn into sideburns there, but not really. For the rest of the hair, start at the top, right above where you began the bangs and a little above the guideline. Do the left side first, making a little hump at the top there and going down. At the ear, do a little zig-zag, then continue down and around until you meet the face line at the jaw. For the right side, make the same hump, only a little taller, then start zig-zagging about where the bangs begin. Keep zig-zagging down to the jaw.
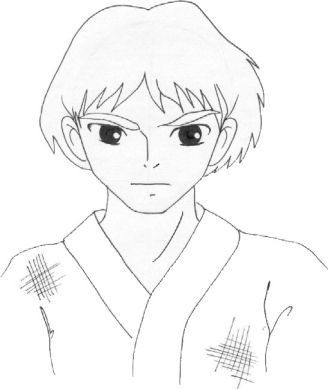 Let's finish this baby up. Throw Ashitaka's favorite shirt on him, I think you can get the gist of it without my explaining every little step. Oh, those little cross-hatches? I don't know. They're just always there. It's either the texture of the shirt, or worn places, or dirt patches. Who knows. The guy lives in the woods and fights samurai. Something is bound to mess up his clothes.
And just like magic, you have Ashitaka staring at you. Hope he doesn't think you're staring back...he can get a little violent with that arm of his.
Mastered it already? Head back to the Miyazaki Tutorials page.
 The face line is a bit different, and a little bit more difficult, in the front view. It's not so bad with Miyazaki, though, because if you look carefully, the face line is actually two sets of angles. The first set, the top one, starts a little above the eye line and follows the guideline down to a little above the mouth line. THESE LINES ARE RELATIVELY STRAIGHT. Now the second set starts there and follows the guideline down. Here you'll want to draw the chin separately, as one little section. This is the only part of the face line that is actually curved, and it's not much so, at that.
 Deja vu...haven't we seen this before? Well, sort of. It's the basic head outline, alright, but this time it's not a 3/4 view! Wow, we're gettin' some variety in this thing. This is a full frontal view, so the vertical centerline does, indeed, go down the center of the oval. The eye and mouth lines are as usual, except they're straight since there's no perspective difficulties to deal with.
 Whoa, is that Ashitaka or some kind of alien?!? Hmm. Anyway, eyes next. With Miyazaki, you'll want the eyes to be a bit more slanted than usual, due to the more natural style. So...start the upper line of the eye a little below the eye guideline, about halfway between the centerline and the oval. It goes up pretty steeply at first, then smooths out when it reaches the eye guideline. Keep going until you're just above the eye guideline, pretty close to the oval guideline. Now, curve it back in a little. That's it. The main eye part is, well, a circle. The bottom line is just a line, nothing fancy. Make sure it's angled so it's parallel to the upper line. Add one little tiny round hilite, and you're done. Now, you can either add a pupil and color in the iris part (which is used only on main/love interest characters, and not even always then), or you can just fill in the whole thing. Either way. I've chosen to fill it in here.
 Let's give our little outcast some eyebrows. Oh, yeah, in Miyazaki there is no crease above the top line of the eye. Go fig. Anyway, eyebrows are pretty big in Miyazaki world. I'm not really sure how to tell you to draw them, they just kind of draw themselves. Make sure it's kind of a half-scowl. Ashitaka is one serious guy.
 Draw the mouth next. It's, well, a line. That's it. And one little line for the lower lip. Gotta love this minimalist style, man!
 Jeez, he STILL looks like an alien. Let's fix that, ne? Start with the bangs. They go in two directions, starting a little off-center to the left. They're pretty simple, not too long, just zig-zags. They kind of turn into sideburns there, but not really. For the rest of the hair, start at the top, right above where you began the bangs and a little above the guideline. Do the left side first, making a little hump at the top there and going down. At the ear, do a little zig-zag, then continue down and around until you meet the face line at the jaw. For the right side, make the same hump, only a little taller, then start zig-zagging about where the bangs begin. Keep zig-zagging down to the jaw.
 Let's finish this baby up. Throw Ashitaka's favorite shirt on him, I think you can get the gist of it without my explaining every little step. Oh, those little cross-hatches? I don't know. They're just always there. It's either the texture of the shirt, or worn places, or dirt patches. Who knows. The guy lives in the woods and fights samurai. Something is bound to mess up his clothes.