
Basic Body Form
You will need Paint Shop Pro and Eye Candy Fur
For those who don't have eye candy, you can skip
the hair section of the tutorial and draw in freehand your
own hair :-)
UPDATE - Thank you Arizona Kate! Kate has informed me
there is a brush shaped into an eye in PSP, I have tried it and its great!
I have revised these tutorials so everyone can make these.
For those who really don't like vectors at all you can download
the selections HERE and follow these tutorials, skipping the vector
sections. ( I find it easier to click on the selection folder and adding
a new folder named for the tutorial I am working on. This keeps
all the different selections separated. )
The rest will be the same for everyone.
I will do this in sections, starting with the shape of the
face and hair.
Again here, the hair can be done any way you would like, I will
show you how playing with fur creates hair almost realistic looking.
Created April 9, 2001
I found it easiest to work on each part separately then
putting the
pieces together resized.
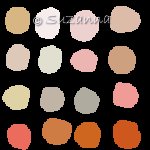
Here is the color palette that I use, you are welcome to right click
and save to your hard drive, please don't link directly to it.
For this tutorial I am using the top left colors.
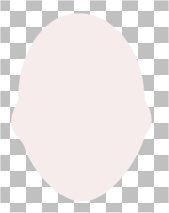
Open a new image 500 x 500 transparent
( Selection users open image 300 x 300
load from disk femaleface.sel )
close you're foreground color
set your background color to #F6ECEC
Preset shape on ellipse, both antialias and vector checked
Draw an oval in the center leaving room for hair, hat, etc...
click node edit and add the following points:

Pull the circled points out just a bit, then the arrows up and
down a bit to form ears.
good time to save this to your preset shape folder
right click layer, convert to raster.
Select all, float and add the following cutout
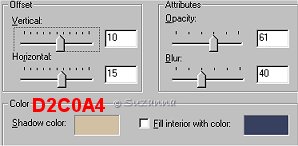
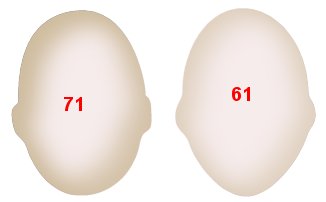
You can play a bit with the opacity for lighter or darker
shadow on the face.
As you can see the 61 is more natural looking...
Stay selected and add a new layer and again apply the cutout except
change the vertical and horizontal to minus 10 and 15.
merge these layers visible.
You may want to tube here to change facial features later on.
Here you can either continue, or with freehand draw in the hair.
Add a new layer
flood fill with red (won't match hair) so you can see your work and drag this
layer
to the bottom.
click on your face layer again and add a new layer
hit the arrow key to make your background color your foreground color
keep the background color shut off...
Choose a color for the hair, I am going to use #D2C0A4, the same
color I used for the cutout, for sandy blonde hair...
click on your air brush, (paint brush made this look real phony!)
and use the following settings

click around the face as below, don't hold the can down or add
too much
as in sample below
Open up eye candy fur ( I'm using version 4 )
( I kept changing their colors to my hair color )
This is going to take many repeats, but changing the direction of the flow each
time
and playing with some of the other details
to add hair and give it a more natural look
I started off with the preset thin blonde hair, ok
again fur, this time changing the direction to 131
You can see more and more hair is growing on her head
again eye candy fur, bleached kinks, direction 270
again the same preset to grow more hair, same direction
Long and wavy, lighting brightness changed to 48 with hair color and direction
295
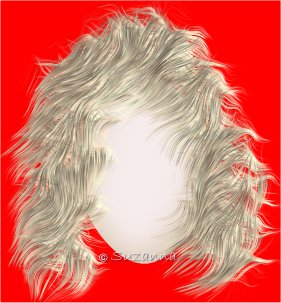
By now she should have bangs and thin hair as below

We are now going to thicken the hair and get rid of the top
ends sticking up
apply the same as before changing the direction to 196
again but direction 340
drag the hair up until the bangs are positioned where you want them and
you should have something like below:
You can take your eraser tool and trim some of the excess if
you'd like..
these never come out the same and playing with the different presets,
directions, curliness,
and length will give you all kinds of different looks
you can also take your freehand selection tool and select certain sections and
change
the direction and look of those hairs as in logo pic. ( I had selected only the
right side and
played with it a bit )
Don't be afraid to erase hair, you can always work some back
in more to your liking.
Just do those sections by themselves and always stay on the same layer.
When you are satisfied with the hair, merge layers visible.
Tube if you'd like.
UPDATE:
Peggy of "The Tilly Garden" created a wonderful
tutorial for Face Painting!
Peggy thank you so much! Visit Peggy HERE and click on Make a Pretty face :-)
The arms and hands tutorial HERE
Tutorial and graphics © Copyright Suzanna 2001
Please do not link to or take any of the graphics or tutorial.
Do not place on any CD for sale or in any book. Thank You
Created 4/4/01