Upper Geyser Basin
Major Geysers
|
Upper Geyser Basin Major Geysers |
There are many geysers in the Upper Geyser Basin besides those that are predicted by the Park Rangers. Some of these are among the largest in the world. Of the major geysers not predicted by the Rangers, the easiest to see throughout most of the 1990s has been Beehive Geyser and Fan and Mortar Geysers. In 1997 Giant Geyser and Splendid Geyser could also be added to this list. The frequency of these geysers could change at any moment. You will want to inquire when you get to the park to find out what their current behavior is.
[ Map ]
[ Beehive Geyser ] [ Castle Geyser ] [ Daisy
Geyser ]
[ Fan and Mortar Geysers ] [ Giant Geyser ] [ Giantess Geyser ]
[ Grand Geyser ] [ Link Geyser ] [ Old
Faithful Geyser ]
[ Riverside Geyser ] [ Splendid Geyser ]
Beehive geyser is a cone-type geyser. Its summer-time intervals during the past few years have ranged from a little over 8 hour to a few days with most intervals around a day or less. In the winter the intervals have often become longer and more erratic.
Activity Update (October 30, 1998):
Beehive appears to be coming back after a dormancy and subsequent erratic behavior which started in early July 1998.
Beehive's Indicator started having frequent, regular, "false indicator" eruptions the week of July 6, 1998, rendering Beehive nearly dormant until July 28, 1998. During August, September and much of October it played irregularly with false indicators still being seen. A False Indicator tends to play with an extraordinary long duration, sometimes greater than 60 minutes, and does not result in an eruption of Beehive. The frequent and regular false indicators were seen about every four to six hours. They seemed to have taken enough energy from Beehive to render that geyser dormant
This type of activity has occurred twice before, once in the summer of 1992 and again in the summer and fall of 1994. The 1992 activity lasted for about one month. As in the 1998 activity, Beehive seems to have been able to pull itself out of the dormancy. The 1994 activity lasted longer, four months, during which time, Beehive erupted almost exclusively in response to eruptions of nearby Giantess Geyser. That time it was a Giantess eruption that eventually spurred Beehive back into regular eruptions. In all three cases though, the false indicator eruptions ended abruptly and Beehive resumed erupting at nearly the same interval it was erupting at prior to the dormancy.
Beehive's duration is about 5 minutes. For most of its duration, it maintains its maximum height of as much as 200 feet. Because of the fine spray-like nature of the eruption, the top of the water column is often chopped off by strong winds but the eruption is still impressive.
Beehive geyser was named by the first organized expedition into what is now Yellowstone National Park, the Washburn expedition of 1870. The name was derived from the shape of Beehive's 4 foot tall cone which the members of the expedition thought looked like an old-fashioned straw beehive.
Beehive is one of my favorite geysers. It is possible to stand closer to this geyser than any other major, frequent geyser. Up close you notice its power as the steam is forced out of its nozzle-like vent at nearly super-sonic speed. It sounds like a jet engine. At a distance you notice the beauty of its soaring veil-like plume. It is truly one of the best shows in Yellowstone.
What to look for:
Beehive is closely related to a much smaller geyser located near Beehive's cone. This smaller geyser is called Beehive's Indicator. Beehive's Indicator will often, but not always, start erupting prior an eruption of Beehive Geyser. Usually, Beehive's Indicator gives enough warning so that anyone that sees it can make it to Beehive in time to see Beehive's eruption.
Beehive's Indicator is a cone-type geyser. It erupts from a small jagged hole about ten feet from Beehive's cone. The eruption is characterized by nearly steady jetting to 10-15 feet. If Beehive erupts, Beehive's Indicator will stop during Beehive's eruption. Beehive's Indicator often precedes Beehive by 15 to 20 minutes but can rarely precede it by as little as seconds to as much as 30 minutes.
Eruptions of Beehive's indicator do not always preceded an eruption of Beehive. Rarely in the past few years but more frequently at times in the past, Beehive has been known to erupt without being preceded by the indicator. Prior to all eruptions of Beehive, Beehive splashes. In a no-Indicator eruption, the eruption of Beehive is triggered by an exceptionally large splash from its cone.
Another type of Indicator eruption is called a "False Indicator". False indicators look similar to a normal indicator eruptions (they may be somewhat weaker) but they last longer, as much as 60 minutes, instead of the normal maximum of about 25-30 minutes. False Indicators occur at about the time Beehive is expected to erupt but they do not not result in an eruption of Beehive. During most of the last 20 years, False Indicators have been followed a few hours later by a normal Indicator eruption that results in an eruption of Beehive. Twice in recent years, 1992 and 1994, Beehive's Indicator had frequent False Indicator eruptions, occurring about every 4-6 hours. At these times Beehive went dormant for a few months.
A last type of Indicator eruption is rarely seen. It is called a "Mid-cycle Indicator". These eruptions occur midway between two eruptions of Beehive. They are usually short, weak and only last a few minutes. They are easily missed.
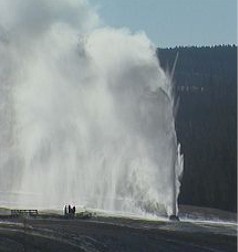
The start of an eruption by Fan and Mortar Geysers is truly spectacular. Both geysers, involving about a dozen vents in total, start with nearly explosive power. The main vent of Fan is the largest, often shooting its strongly angled jet clear across the trail. Those that are so inclined can receive a warm shower during the eruption (the water cools as it travels through the air.) The other vents of Fan geyser are arranged along a nearly straight fracture in the sinter formation. These vents erupt at various angles and strengths, forming a fan shaped wall of water. Nearby Mortar also joins in. While it is rare to see both the lower and upper vents of Mortar erupting at full force together, play usually switches back and forth between the two during the eruption, Mortar often reaches 60 feet or more in a wide vertical jet. The start of Fan and Mortar is one of the most spectacular sights in Yellowstone.
Fan and Mortar Geysers are known to have acted separately during the early years of the park. Even though this is known, the concerted behavior has been so prominent during the last few years that some were surprised when the lower vent of Mortar Geyser started having small, 10-25 feet, eruptions on its own late in 1997. These small eruptions have been termed, "Lower Mortar Minors".
Fan and Mortar Geysers' intervals are quite erratic from month to month but in the short term they are often stable enough so that people are willing to sit and wait for an eruption. Intervals range from about 3 days to weeks. The geyser is known to go dormant for months at a time. Some years pass without any eruptions. Fan and Mortar often slow down or stop in the Spring and early summer leading some to theorize that high river levels may cause water to find its way into the geyser, which abuts the Firehole river. It is thought that this influx of water, assuming that there is such and influx, may quench the geysers and keep them from erupting.
Durations of an eruption last about one hour. During this time, the geysers will pause and restart a number of times. The initial part of the eruption, about the first ten minutes, is usually the strongest. Heights for Fan Geyser can reach 125 feet with a horizontal throw of over 200 feet. Mortar Geyser can reach over 80 feet.
What to look for:
The signs to look for at Fan and Mortar are constantly changing. Prior to an eruption of Fan and Mortar, the entire complex goes through a series of "cycles". These cycles involve minor play from the vents of Fan and Mortar's Lower vent. The cycle is taken to start with the "river vent", the vent of Fan closest to the river. The cycle then proceeds in a somewhat clockwise direction through the first three or four vents of Fan and then over to lower Mortar. What to look for during these cycles changes from year to year and it is best to ask someone in Yellowstone for more information. Cycle lengths can vary from 15 minutes to an hour or more.
The first thing to know about Fan and Mortar is that to the untrained eye, and sometimes to the trained eye, it often seems that Fan and Mortar can erupt anytime it wants to. It doesn't seem to want to follow the rules. Before many, but by no means all, eruptions, the first strong signs that the eruption is imminent is strong steady play from all of the river end vents of Fan, splashing from Fan's main vent and splashing and high water in Lower Mortar. In these cases, Fan usually starts the eruption with Mortar quickly joining in. Sometimes, Lower Mortar starts the eruptions. More rarely, Upper Mortar starts the eruption. In any case, those present are in for a treat.
Giant Geyser truly lives up to its name. It is currently the second tallest geyser in the world, only Steamboat Geyser located in Yellowstone's Norris Geyser Basin is taller. An eruption of Giant can reach 250 feet, last over an hour and put out an estimated one million gallons of water. For comparison, a large Old Faithful eruption reaches about 150 feet, lasts less than 5 minutes (the biggest part lasts less than one minute) and puts out around 10,000 gallons of water.
Giant is a cone-type geyser. Once it starts, it puts out a steady and massive jet of water that lasts until almost the end on the eruption. The start of Giant is very impressive. The water column quickly rises, in one steady motion, to its maximum height. The maximum height is only held for a few minutes before it slowly begins to shorten but even so, the water column is often still near 100 feet tall 30 minutes into the eruption. The maximum height of the eruption can vary greatly, form 150 feet to over 250 feet. No matter what the height though, the eruption lasts an hour or more and puts out an impressive amount of water. Thus, even a "short" height eruption is very spectacular.
Types of eruptions:
In the early 1950's, the last time Giant had major activity, Naturalist George Marler categorized two types of eruptions, Normal Function and Mastiff Function. While some of the eruptions seen in the 1980s, early 1990s and during the increased activity in 1996 and 1997 did not fall neatly into Marler's two categories, but instead fell somewhat in-between, it is still worthwhile to know the general characteristics of the two functions.
- Normal Function:
- In a normal function eruption, only Giant erupts. Marler noted that these eruptions were usually shorter, approximately 150 feet. (It should be noted that one of the tallest eruptions during 1997, about 230 feet, was a normal function eruption.) Marler also noted that the hot period prior to Giants eruption was dominated by the platform vents on the southwest side (the Giant side) of Giant's Platform.
- Mastiff Function:
- In a Mastiff function eruption, Mastiff Geyser and sometimes Catfish and Bijou Geysers also join the eruption. Mastiff Function eruptions are usually among the tallest Giant eruptions, sometimes reaching over 250 feet. Marler noted that the hot periods prior to these eruptions were dominated by the platform vents in front of Giant and by surging from Mastiff. A Mastiff Function eruptions starts with an eruption of Mastiff Geyser. Mastiff can reportedly reach 100 feet in one of these eruptions but in 1996 and 1997 the maximum was closer to 50 feet. Giant's eruption can start during Mastiff's eruption or just as Mastiff is dying down. Marler reported that if Giant started during Mastiff, then Giant would reach about the same height as Mastiff and hold for a short time before taking over the eruption. If Giant starts while Mastiff is dying down, then Giant will rocket to its full height in one uninterrupted motion. Either way, it is very impressive to see two large geysers erupting simultaneously so close together. During a Mastiff Function eruption, Catfish Geyser can also join the eruption and erupt to an abnormal height. Catfish can send up a slender plume to 75 feet. Even a 40 foot tall eruption is spectacular. Catfish's eruption occurs near the time of the start of Giant. Thus, in a full blown Mastiff Function eruption, Giant, Mastiff and Catfish are all erupting simultaneously. During all of this, Bijou may be roaring in a loud steam phase. The only problem with this spectacular scene is that all three geysers are so close together, less than 75 feet apart, that the smaller two, Catfish and Mastiff often become lost in the huge water column of Giant.
Connections to other geysers:
Giant geyser is connected to most of the geysers and pools in its area. It is obviously connected to the geysers on its platform: Bijou Geyser, Catfish Geyser, Mastiff Geyser, the Platform Vents and Turtle Geyser. It is also connected to the Grotto Group, Oblong Geyser and the Purple Pools. It is possibly connected to Daisy Geyser.
Ultimately, what you are looking for is a hot period. All Giant eruptions start with a hot period but not all hot periods result in an eruption of Giant. A hot period is characterized by the eruption of at least one of the platform vents and high water in Mastiff's front vent. Hot periods can range in strength from one that only involves one platform vent to one that includes eruptions from most of the eleven or so platform vents along with heavy overflow from Mastiff and surging from Mastiff to as much as 10 feet. These strong hot periods really get your heart pumping but unfortunately, even these have been known to sometimes end without an eruption of Giant.
The hot period is caused by the rising of water in the system. Because of the necessity to stay on the boardwalk, the first manifestation of this rise in water that can be seen is that Bijou Geyser stops its almost incessant play. If a hot period follows this Bijou pause then after a minute or so, a rising pool of water should become visible in Mastiff's front vent. As this approaches overflow, water may also start to overflow from some of the platform vents. Eventually, some of the platform vents will start erupting. this is the start of the hot period. The hot period can stop at any time. If the water in Mastiff drops and Bijou restarts then the hot period is probably dying and Giant will not erupt. As long as Mastiff stays up, or only drops and rebounds, then, even if Bijou restarts, there is still a chance that Giant could erupt.
If the hot period continues, it usually will get stronger. Mastiff can have heavy overflow and strong surging. More of the platform vents can start erupting. Eventually, Giant will start surging. These surges will become straighter and taller and can fill the entire cone and spill water out the front of the cone. Even at this point, the hot period can stop and Giant not erupt but this is fairly rare. If the activity continues, at this point one of two things can happen. If it is a Mastiff Function, Mastiff Geyser will start erupting in a massive two pronged eruption to 50 feet or more. Then a few minutes later Giant will join in. If this is a Normal Function eruption then, Giant will rocket skyward and the eruption is on.
When to expect a HOT PERIOD
While Hot Periods can occur at almost any time, they are often closely tied to what Grotto Geyser is doing. Hot Periods that lead to an eruption of Giant often occur near the start of any Grotto eruption or 4-5 hours after the start or 4-6 hours after the end of a long mode eruption of Grotto (a Grotto Marathon eruption).
Giantess Geyser is one of the largest geysers in Yellowstone and the largest geyser on Geyser Hill. As might be expected from its size and close proximity to other geysers, Giantess is connected to most of the geysers and pools on Geyser Hill.
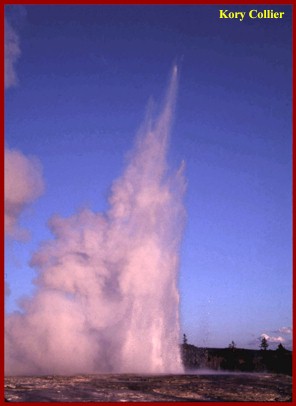
In recent years, Giantess has only erupted a handful of times per year, making it a relatively rare geyser. Giantess is a fountain-type geyser. It erupts from a large pool at the summit of Geyser Hill. The strength of the eruptions can vary greatly. Because most reports only discuss the strong eruption, people are often disappointed when they see one of the weaker eruptions. Giantess is known for its great height, over 200 feet and loud steam phase, reportedly loud enough to waken guests in the Old Faithful Inn. Unfortunately, not all eruptions are that tall nor do all eruptions have a steam phase. That said, even a weaker eruption is exciting. For one thing, you never know when it might pick up and become stronger. For another, because of its connections to so many other geysers, when Giantess does erupt, many other geysers on Geyser Hill increase their activity. Some geysers, such as Vault Geyser, rarely erupt except when Giantess erupts.
Once Giantess starts, it erupts in phases over a period of three hours to two days. The most exciting parts, other than perhaps actually seeing the start, occur from about 30 minutes to 6 hours into the eruption. The nice thing about this is that once the geyser starts, it is possible for people in the area to get to Giantess in time to see the most spectacular part of the eruption.
Eruptions can fall into three types: water, steam phase and mixed. The water type consists of bursting play that lasts about 5-10 minutes and is repeated every 30-60 minutes. As the eruption progresses, the size and duration of the water bursts decreases until the eruption finally ends. The steam phase type starts as water but changes over to a loud steam phase that can easily be heard over a mile away. The steam phase slowly diminishes and ends about 6 hours after it starts. The mixed type, which seems to be the most common in recent years, starts with water, changes to steam and then changes back to water.
Influence on some of the other geysers:
- Beehive Geyser:
- During periods when Beehive has been dormant or rare, it has usually erupted soon after Giantess started. In these cases, it can erupt just once or start a period of activity. Sometimes, a Giantess eruption has brought Beehive out of dormancy. When Beehive is not dormant, a Giantess eruption can cause it to shorten its interval.
- Vault Geyser:
- Vault usually only erupts during a Giantess eruption. It can have a series of one or more eruptions that start from 3 to 12 hours after Giantess. These eruptions while not tall are notable for the powerful thumping and pounding that they cause. These are easily felt from the boardwalk.
- Infant Geyser:
- Infant is rarely seen. At one time it was known to erupt with Giantess but now about all it does is fill towards overflow and bubble.
- Plume Geyser:
- Plume often changes its interval soon after Giantess.
What to look for:
Giantess is a hard geyser to see from the start. First, it is quite rare. Second, it shows a strong preference for erupting at night. This may be due to what seem like ever present afternoon winds that blow across Giantess' pool. These winds may cool the pool enough to prevent an eruption. At night the winds usually stop. Third, Giantess doesn't show many signs that it is going to erupt. One commonly held opinion is that numerous periods of large boiling in the northern part of Giantess' pool (i.e. frequent and large, north face boils) that send water streaming down the north side of Giantess is a good sign. In at least one case, around forty of these boils per hour have been counted prior to an eruption. Even if this is not the precursor to an eruption, they are still fun to watch at close range because they cause a thumping that can be felt from the boardwalk. This thumping is caused by the collapse of steam bubbles in Giantess' plumbing system.
Usually an eruption of Dome Geyser is considered a bad omen. Common opinion is that Giantess can't erupt when Dome Geyser is erupting. While can't may be too strong of a word, is appears unlikely that Giantess will erupt when Dome is erupting.
Link Geyser is very rare but when it it has a major eruption, it lets everyone know. Major eruptions are brief, about 90 seconds but they produce a huge outflow of water. The major eruption begins with a large doming of water over the crater which sends out a flood of water. Then the geyser explodes sending water 60 to 100 feet into the air. The flow of water is so large that it can't be contained in the runoff channels and floods out onto the trail leaving chunks of sinter and rock behind.
Link can have major eruptions in series with eruptions occurring as little as 70 minutes apart. In one spectacular burst of activity over a 6 day period in October 1983, Link had 40 major eruptions distributed over six series. Unfortunately, Link rarely has more than a couple major eruptions per year. To make matters worse, it is often dormant.
Link also has minor eruptions. When active, these minor eruptions usually come on intervals of a few hours, have durations of more than 30 minutes and reach about 2 feet. They do put out a fairly large amount of water though.
Link is directly connected to the other members of the Chain Lakes Complex. The energy can shift to the other members from time to time, causing Link to go dormant. Link last went dormant in 1995 but it made a remarkable turnaround in late May, 1998. Link was below overflow prior to May 20, 1998 and had been that way for over a year. Temperatures were low to the point that algae was able to grow. Then, suddenly, Link started to overflow and boil. By Thursday, two days after the first overflow was noticed, overflows were extremely heavy and continuous and there was nearly constant heavy boiling. On Friday, May 23, 1998 at 1055, Link had a major eruption. There is no record of Link emerging from complete dormancy to a full major eruption in such a short period of time.
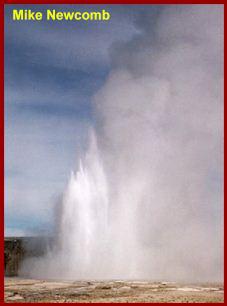
Splendid Geyser is a splendid geyser (sorry, I couldn't resist.) Unfortunately, Splendid has been dormant for most of the park's history.
Splendid reaches between 50-218 feet. Durations last from 1 to 9 or more minutes. Large eruptions are reminiscent of Grand Geyser except the height and power is maintained throughout most of the eruption. Long eruptions of Splendid can change over to a wet steam phase that up close is somewhat reminiscent of Beehive Geyser in its power. Splendid is closely related to Daisy Geyser.
Splendid eruptions seem to come in three categories:
- Infrequent eruptions when Daisy is active. These are quite rare, often with at most one or two being seen in a given year. These eruptions often start shortly, ten minutes or so, after an eruption of Daisy. They rarely reach a spectacular height. Daisy is affected by these eruptions, often taking an extra hour or so to build to its next eruptions. It is also shortly after an eruption of Daisy that Splendid will sometimes have a "false start". These false starts are actually short, usually less than 15 feet and less than 30 second, eruptions.
- Active periods when Daisy is dormant. Often when Daisy has been dormant, Splendid has taken over the activity. It has been decades since this last happened. At these times Splendid has often been quite regular with intervals during a series of about 3 hours.
- Perhaps the most intriguing type of play occurs when both Splendid and Daisy are active as happened a few times in the 1980s and for most of 1997. At these times, Daisy plays regularly until Splendid starts a series of eruptions. As both geysers continue to play on a somewhat erratic schedule, the water levels in the entire area are drawn down. Eventually, both geysers will start almost simultaneously. These "Dual" eruptions are spectacular. Some Duals are truly huge. In these cases the two geysers seem to try to out do each other. Daisy can reach 125 feet and Splendid can reach 180 feet or more and both can last 5-10 minutes. Two large geysers erupting so close together makes for quite a show.
What to look for:
Most years, when Splendid is very rare, the best bet is to watch and see what happens during the few minutes after Daisy erupts. You might get lucky and see Splendid do something. During years of Splendid Daisy Duals, look for crowds.
[ Return to Yellowstone's Geysers ] [ Return to GOSA Home Page ]
Comments and Questions are Welcome