BANZAI WALL and DIAMONDHEAD

photo of banzai wall (right side) Wall with big Japanese plaque. Access during dry season only when foot bridges span the river, otherwise bushwack from El Kanto. Gets a lot sun past noon.   The entrance to Pamitinan Cave of at the base of the cliff.  At the turn of the century, Filipino revolutionaries used to hide in this cave.

The wall is split in two - east and west faces.  Each are described here.

Be careful with the tricky slab that has caused a number of rope-burnt legs! Remember to pack some sun-tan lotion.

Picture on the left is Banzai Wall (east side) routes. Photo: Roel Tan-Torres.


Banzai Wall - East Face

Drawn topo map of Banzai Wall routes on the right 
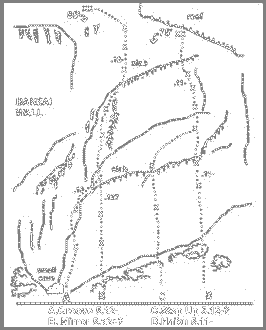
A hand-drawn topo map is shown on the left.

A. Groove * (5.12- / 7a, 85 feet, 8 bolts plus 2 hanger anchors, medium nuts; FA Ilanan, 1/98 ) Tricky transition to a slab; funky moves in the groove, then things get harder.

B. Mirror * (project, 5.12+ / 7b+?, 80 feet, 8 bolts plus 2 hanger anchors, med. nuts) Impossible looking start

C. Step Up * (5.11+ / 6c+, FA Marvin Ilanan, Simon Sandoval; 4/98 65 feet, 6 bolts plus 2 chain anchors, med. nuts) Carefully move up the slab and traverse left to join Haiku.

D. Haiku* (5.11- / 6b+, 65 feet, 6 bolts plus 2 chain anchors, small to medium nuts; FA Marvin Ilanan, Simon Sandoval, Ruben Flores; month?/1997) Thin holds at the start; power finish.


Gax on arigato

Marvin Ilanan on the crux traverse of Arigato (5.10+). Photo: Tan-Torres


Banzai Wall - West Face

to_d_ba2.gif (12612 bytes) A. Tofu (5.9 / 5+, 85 feet, 9 bolts, slings; FA Roel Tan-Torres, Marvin Ilanan, 2/98) Starts from the left edge before entering the Katipunan cave. Go direct up the roof for a 5.10+ variation.

B.  Arigato* (5.10+/6a+ , 85 feet, 9 bolts, slings; FA Marvin Ilanan, 2/98) Traverses right from Tofu then rejoins it.


Nana Araneta enjoying Tofu (5.9), Banzai Wall.

Nana Araneta enjoying Tofu (5.9), Banzai Wall  Photo: Tan-Torres


DIAMONDHEAD

to_d_dia.gif (7584 bytes) Approach from the right side of Banzai Wall (facing the wall) via a long, steep scramble. The higher and tougher lines still await development. In the sun most of the day, so much better during overcast weather .

A. La Loma Route (5.4 / 2, 70 feet; FA de los Santos, 1987)

B. Pangarap * (5.6 / 3, 80 feet; FA Elmer Robles 12/95)

C. Unnamed (5.4 / 2, 70 feet; FA de los Santos, 1987)

D. La Nina** (5.11+ , FA Dennis Diaz, May 1999) 3 pitch bolted route to the top. Pitch 1 at 5.10+, 22m, 9 bolts + rap anchors. Pitch 2 at 5.11+, 23m, 9 bolts + rap anchors. Airy crux. Pitch 3 eases off at 5.10-, 15m, 7 bolts + rap anchors. Careful with lose rock at start of 3rd pitch. All ledges are equiped with 2 bolt belay anchors.


Last Modified : 20 May 1999