Shorthair's
Swedish Mauser Conversion
WARNING!!! NEVER ATTEMPT TO MODIFY ANY FIREARM IF YOU DON'T HAVE THE SKILLS OR THE EXPERIENCE TO DO SO. SEND YOUR WORK TO A QUALIFIED GUNSMITH! THIS ARTICLE IS INTENDED NOT AS AN INSTRUCTION MANUAL, BUT FOR INFORMATIVE PURPOSES TO INTERESTED COLLECTORS AND SHOOTERS ONLY! THE AUTHOR ASSUMES NO RESPONSIBILITY FOR READER'S EFFORTS TO DO THEIR OWN 'SMITHING!

This rifle started out a 1921 Carl Gustaf M96. I found it at a gun show, it had all matching numbers and looked to be in good mechanical, if not pretty condition. I gave the man $89 and walked out with a project rifle. It had the usual M96 details - straight bolt handle, 29.5 inch barrel, iron sights. Weighed in at about 9.5 lbs. I took it to the range and with Winchester factory 140 grn loads it shot one-hole groups at 50 yds with iron sights. At one hundred yards the groups opened up to about 2", but I figure that can be blamed on the sights and my rapidly departing eyesight. It looks like I have a shooter!
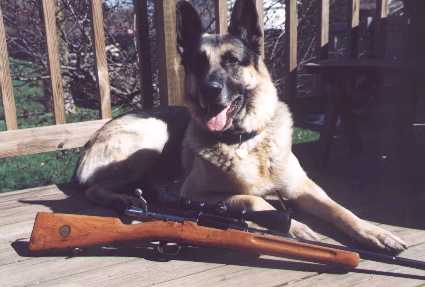
Mauser,Guardian of the Compound, gives his approval.
(I placed the firearm next to a living entity and nothing happened. No drive-bys, no schoolyard shootups, no 7-11 hold-up. Maybe it's not the gun?)
OBJECTIVES My objective for this rifle is to create an aesthetically appealing and mechanically superior rifle to use on whitetails and coyotes. The cartridge is a great dual purpose round, with 140 grn bullets I can feel confident hunting our large bodied bucks, and 100 grn projectiles will shoot flat enough for Michigan farm country coyotes. Having used a 7mm Remington Magnum for the last ten deer seasons, I wanted to explore the concept of proportionality. I'll still use the Big 7 when in open prairie conditions, but I figure that little 6.5 will be great for still hunting and tree stand hunting. I want to get the weight down to around 7.5 lbs with a scope, but that may not occur without retapering the barrel, and I don't want to get involved in that exercise. I don't want to spend a lot of cash, being in law school not only costs in terms of tuition but also in the amount of money making time I can devote to my paying job. Plus, I have to hang out with lawyers, not a lot of fun on the best day. With those limitations and goals in mind, I decided to do the work myself, having experience in gunsmithing and firearm repair since my much younger days. (No BATF Rules were broken in the modification of this weapon - basically, you can work on your own firearm as long as the standard minimum length, function and possession regulations are not violated) Read the above warning and follow all applicable firearms regulations.
|
|
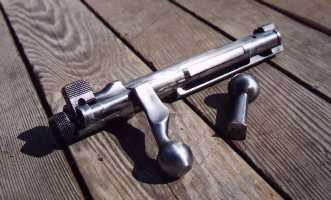
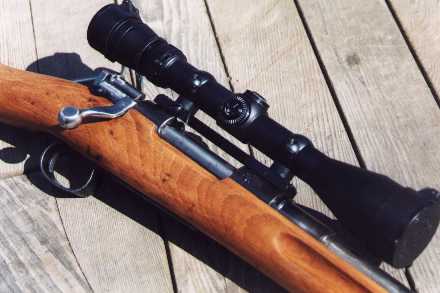
BOLT HANDLE: The bolt handle was the first to go. I selected a Ruger/Brownell style from Brownell's(515)623-3896. They are a great company to do business with. Cut-off of the handle is quite easy with a Dremel type cutoff wheel, but care must be taken not to remove too much. Better to leave some handle stub on the cut, then grind the bolt stub and handle to fit. Bevel the edges around the stub and bolt to provide room for weld penetration. The machined recess in the bolt handle should be the extreme minimum to which all cutting and grinding is done. That recess provides clearance for the bolt shroud, and you don't want to try to grind excess weld away from such a tight area. Welding should also be done with care. The lugs must not be subjected to too much heat, otherwise you'll lose the heat treating in that part and firing the weapon could be injurious to the shooter. Let a competent welder apply the weld to the bolt, make frequent light passes to avoid heat build up, and use a heat sink to prevent heat from travelling down the bolt body to the lugs. Once the handle is welded, excess weld is ground from the bolt, and the bolt body and handle are polished to taste.
|
|

|
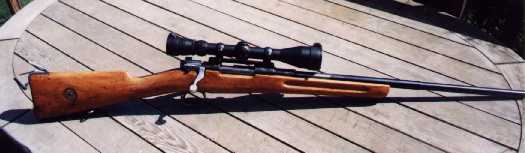
BARREL: Next up was the issue of barrel length. 291/2 inches is way too long to be portable in the deer woods, and with such a mild round loss of velocity was of no major concern. I figure I'll lose about 75 fps with the barrel cut to 22 inches, and that length eliminates about 1/2 pound of extra weight.
|
|
|
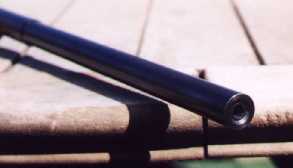
The barrel was cut down to 22.5 inches with a hacksaw, and finished in a lathe with a recessed crown. The recessed end helps protect the muzzle from damage, should one decide to act the Bonehead and bump the muzzle against a hard object, like a rock. If the crown is not correctly finished, square to the bore and burr free, it won't shoot. Take the time and have your smith do it right!
|
|
|
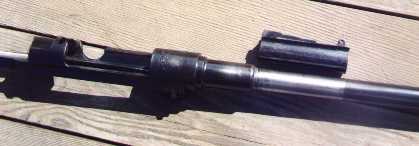
REAR SIGHT: As this rifle will employ a scope, and the front sight has already been cut off, the rear sight is a least unnecessary, and possibly will interfere with the scope. This rifle's rear sight is mounted on a band that is soldered to the barrel. One must remove the set screw and heat the band enough to melt the solder, but not enough to affect the critical heat treat of the receiver. As can be seen here, not a difficult process.
|
|

|
If ya wanna make an omelet...... Here, some of the assorted parts, needed or not, are displayed in a kind of "half way there" picture. All metal work except the bolt assembly will be bead blasted and black oxide finished. This includes the sling swivels, bottom metal and butt plate. This rifle has numerous wear marks and handling dings, and I don't want to spend the money on this rifle to have it polished and reblued. Besides, it's going to be a working rifle. I have used black oxide on other rifles and find it uniformly black and amazingly weather resistant. I'll go for the pretty blue highly polished version when I build the M98 in 7x57 someday.
|
|
|
SCOPE MOUNT: I chose Redfield one-piece base and rings for this rifle. A one-piece base helps ensure proper scope alignment to the bore. If the mounts aren't indexed to the centerline of the receiver, you'll never get acceptable accuracy. These rifles were built by various manufacturers over several decades, and you have to account for variance in the dimensions between the receiver ring and rear bridge. The best way to do this is to index the base from the bottom of the receiver, drill and tap the front holes, then drill, tap and shim the rear accordingly. This base required .030" in shims to accomplish correct alignment. Your gunsmith is best suited to accomplish this task, the receiver is usually too hard for standard drill bits and taps, and he probably has accomplished this on more rifles than a non-smith will ever shoot. This rifle will use a nice, low profile set of Burris Safari finish rings. Current scope plans call for the Redfield Tracker now employed by the 7 Mag.
|
|

|
TRIGGER: NEVER ALTER ANY TRIGGER YOURSELF. SEE THE WARNING AT THE TOP OF THE PAGE! The military two stage trigger, while good as they get, was not what I consider acceptable. Too, I had the scope to worry about - the original safety won't function with a scope installed. I ordered a Timney Featherweight Deluxe from Brownell's. It comes with a Remington type safety, so I could have my scope and safety too. The installation of any trigger is too complicated to explain here, follow the instructions that come with the trigger. I had to call Timney, in fact, to help with a problem particular to this rifle. Once installed however, it works beautifully, set at two pounds, it's crisp enough for precision work, yet heavy enough for the field. Here one can see the scope clearance for the bolt, as well as the Butler Creek scope caps, a required piece for any scope.
|
|
|
STOCK: This rifle is a classic Mauser. I might never put a synthetic stock on it if only because they aren't pretty enough. Until I can scrape up enough for a nice piece of Fajen walnut, the military stock will have to do. After the rifle was completely disassembled, the stock was thoroughly degreased and sanded to bare wood. The ejection port area and thumb notch were beveled, and the forearm cut to acceptable length. I decided to bed the front recoil lug area and rear tang - stock stability is a paramount concern for accuracy. I used JB weld for the bedding, It's rock hard and very stable, but care must be taken to ensure you apply all your bedding skills, release agents, and prayers to the bedding gods to prevent gluing your pretty Mauser to your rifle stock. A great wailing and gnashing of teeth will occur in such an event, and that's just in the first minute after you discover your error. The stock was stained a dark honey color, and finished with a polyurethane floor finish, tough, waterproof and sanded to a light satin finish. (Besides, it's what I had on the shelf) The original rear sling swivel will be used, a single swivel post works nicely in the front. The brass disc, indicating the bore condition, will be reinstalled, in keeping with the military heritage of this rifle. The original steel butt plate will also be used. |

The Swede's first trip to the range after surgery, I had only a few rounds. The circled hit top center on the 1" orange Target Dot is from the 25 yard sighter, the two on the left were fired at 100 yards. It looks like I have a shooter!


FINAL STOCK WORK:
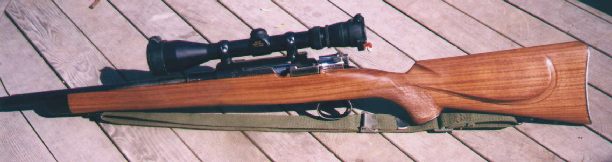
Well, I broke down and spent the cash for new wood. Fajen exists no longer as a business, it's inventory all sold to Midway. I called Midway and purchased this nice piece of Fajen-made American black walnut, semi-inletted, with Neidner butt plate and grip cap. Nice contrasting grain, if not heavily figured. Other features include recessed dual screw sling swivel attachments, shadow-line cheek piece and ebony fore-end tip. All the steel was fitted, and the action was semi-inletted. This means that about .05" - .15" of wood had to come off the outside of the stock to remove the rough milling marks, and the barreled action needed inletting. Off to Brownell's again, this time for a checkering kit (20 lines per inch) and barrel channel inletting tool (.75"). After several fits and starts, the action was finally inletted and bedded, though not perfectly. Well, lessons learned... As for the checkering, while I never checkered before, I'm anxious to try it again. The first grip panel executed shows a couple of crossed lines, but the remainder turned out quite well. Finish? Birchwood-Casey Tru-Oil, several hand-rubbed coats, satin finished with 0000 steel wool so as not to spook Bambi. (That's right Janet and Hillary and all you other liberal whiners, this former military firearm will now put meat in my freezer. Horror of horrors, I can feed my family with a battle rifle.)
Lessons: It didn't make weight. The rifle weighs in at 8.5 lbs, about a pound heavier than the goal. Oh, you can do it, but you'd have to rebarrel, or heavily retaper the barrel, use a synthetic stock with a blind magazine to obviate the need for the bottom metal, and use a compact scope. You'd probably be right under 7.5 lbs, but you wouldn't have that chunk of wood to hold onto.
I had to rebed the action after the first trip to the range with the new wood. What had been a 1" shooter now sprayed a 2.5" group with the preferred load. Load development on this rifle, with four different powders, in five increments of .5 grain each, never shot over 1" with the military stock in place. I (well, actually the rifle) settled on an appropriate charge of IMR4350, Winchester cases and CCI 200 primers. A Speer 140 grain flat based bullet should be plenty tough for this mild little cartridge. Most velocities ran 2400 - 2550 fps, with the preferred load going into .75" at 2550 fps.
In subsequent resighting and handload development, the Speer bullet goes about 1.2", and the 140 grain Nosler Partition, using the same charge of powder, goes into an inch. This will be the favored hunting load.
And no, it doesn't need a buttpad. It hardly kicks at all, and besides, if you can't handle recoil, get a smaller gun.
The Proof

140 lb Michigan Whitetail buck taken with this Swedish Mauser, November 15, 1999.
For more on the hunt click here.
I hit this young 6 point buck in the left shoulder with a 140 grain Nosler Partition going about 2600 fps out of the muzzle. The bullet smashed through the shoulder, angled up along the spine through the neck, exited halfway to the head and put a ragged hole in his off ear. That Partition is probably still going..... He went down at the shot, paralyzed by the bullet. I walked the 100 yards to him, and put a .44 hardcast wadcutter through his heart to finish the job. He expired very quickly.
This rifle handled and shoots wonderfully, it's Number One Deer Rifle for Shorthair from now on.
Handloaded ammo, custom-built rifle, bloody hands. Venison tenderloins sautéed in garlic and butter. An exercise in fulfillment and self-expression no fuzzy little ARF at a self-esteem seminar could ever imagine.
Links...
 National Rifle Association of America
 Canadian National Firearms Association
Mauser Central - A great site for Mauser info!
Per's Reloading Page - Lots of 6.5x55 info.
Mike's Mauser Page
Deadeye Pete's Place
Varmint Hunters Association
Wildlife Legislative Fund of America
Winchester Ammunition
More Links to Come....
Return to

Return to 
Send mail to the Shorthair Compound at:

shrthair@sprynet.com
(c) 1999 - 2002 shrthair@sprynet.com
ALL RIGHTS RESERVED