| |

|
Step 2: Open your web browser and type in http://192.168.1.1/. Log in to the Linksys router configuration system with your password. You will see the initial setup page as seen below. Your entries on this page may be different, but we're not going to change any of them anyway. Note this is only the top half of the setup page. Click on the Advanced tab, shown in the red box. 
|
|
Step 3: This is the Filters Page of the Advanced Setup section. Note that only the top half of the page is shown here. Click on the Forwarding tab shown in the red box. 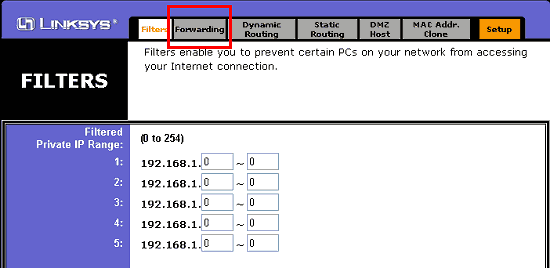
|
|
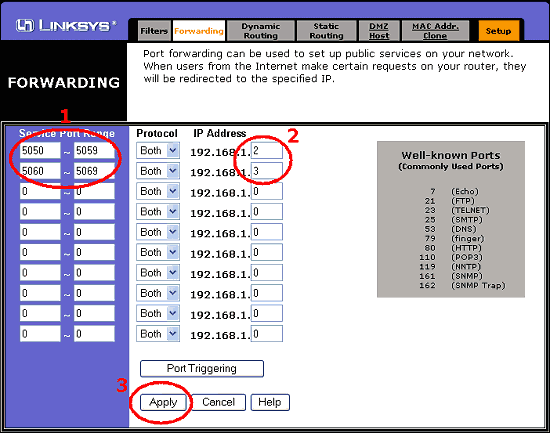
Step 4: This is the Forwarding page of the Advanced Setup section. Here we will setup ports for DCC. Again, I strongly recommend you set the local IP addresses of your computers manually. Otherwise port forwarding will most likely not work. I don't have a tutorial on how to manually configure LAN machines yet, but may do so if I get sufficient requests. This demonstration will set up DCC ports for two computers on a LAN. The red arrows show the places where we will make entries. 
|
Step 4a:
|
|
Step 4b: After clicking on Continue you will be back at the Forwarding page with all the DCC info filled in. Now we need to go to the Port Triggering page to setup Identd. Click on the Port Triggering button circled in red. 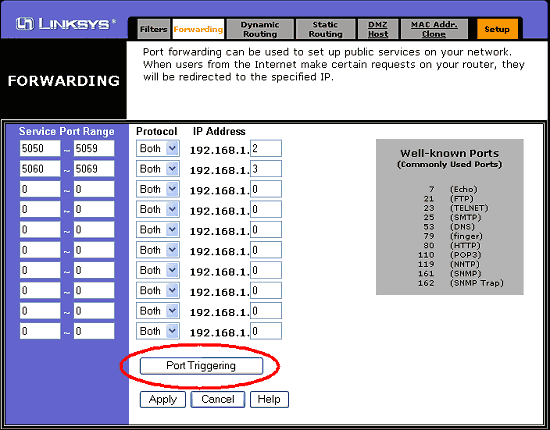
|
|
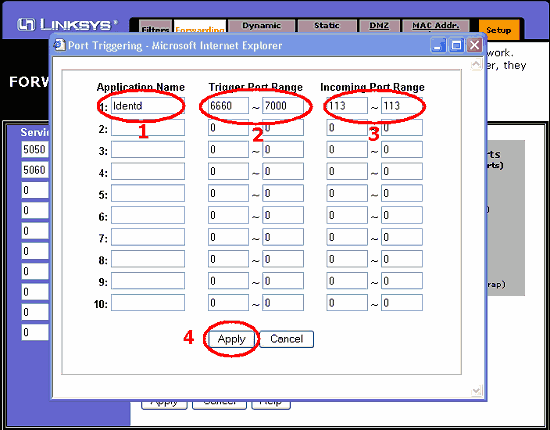
Step 5: This is the Port Triggering window that will popup after you click on the Port Triggering button. You need to fill in the information in the red circles.
|
|
Step 6: The image below shows the Settings Successful Window that pops up after clicking on Apply. You can now click on the Continue button shown in the red circle. This will return to the Port Triggering window. Click on the "X" in the top right corner of the Port Triggering window to close it. At this point you can close your browser and you are finished configuring the router. The last thing you now need to do is configure a couple of things in your IRC program. 
|
|
Step 7: This information is specifically for mIRC. If you use a different IRC client, the process will be similar. Launch mIRC and click on File, Options to open the Options dialog window. In the Category Menu, click on Local Info under Connect. You should see the image below. You need to clear any entries in "Local Host" and "IP Address" boxes. Next, under "On connect, always get", check the "Local Host" box. The "IP Address" box will automatically be checked. Under "Lookup Method", click the "Server" button. This will force mIRC to get your real IP address, not your LAN address. 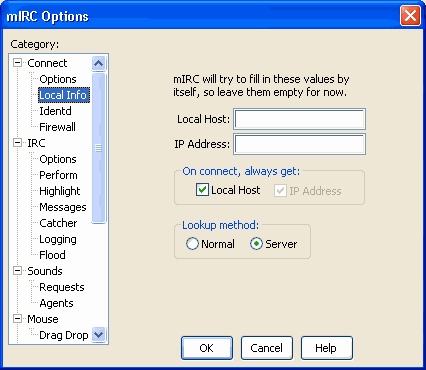
|
|
Step 8a: Scroll through the Catagories menu and click on IdentD. Make sure the box next to Enable Identd server is checked. Where it says User ID, fill in your username. Check "Show Identd requests" and "Enable only when connecting". 
|
|
Step 8b: Scroll through the Category Menu and click on Options under DCC. You should see the image below. In the red box under DCC Ports, you will need to clear the entries in First and Last. In these boxes, enter the port numbers you entered in the Port Triggers section of the Router setup (refer back to Step 4b). Next look at the number shown in the green box that says "Max. remotely requested DCC Sends". This number should be equal to or less than the number of ports you have setup for DCC. In this case it is 10, equal to the number of ports I have setup in the DCC Ports section. That' it. Click on OK and you're ready to rock n' roll with DCC. 
|