Crss Stitch for Beginners
Instructions by Katherine Ashewode

What you will find herein
- Materials (period and modern, and approximate costs)
- Things to do before you start stitching
- Two methods for making the cross-stitch
- How to start the thread
- How to finish the thread
- What to do when rows are uneven or slightly separate from the rest of the pattern
- How to outline using a double-running stitch
- Ways to finish your piece
- How do deal with knots
- Other helpful hints
Materials
both period and modern equivalents (what you'll need and how much it will cost)Fabric:
period: even weave linen or wool
modern: cotton aida cloth (counts range from 8 to 32 squares per inch -- I usually work between 12 and 18). Aida cloth is much easier to work with, because the holes are well-marked.
cost: about $3.25 for a piece 12" x 18"
Thread:
period: silk or linen thread
modern: silk or cotton thread, I like DMC
cost: a skein of cotton DMC thread is about 60 cents. Silk, though nicer to use, costs more.
Needles:
period: metal, bone, ivory
modern: a variety of sizes, almost always metal
cost: 6-20 embroidery needles for about $1 (depending on the company)
Scissors:
period: small metal scissors
modern: any scissors you have work fine, though you might want to set one aside specifically for thread and fabric, so it doesn't dull as fast
cost: normal scissors from an arts and crafts store cost a few dollars, but you probably have some around the house that work just as well
Hoop or scroll:
period: wood hoops or scrolls
modern: wood or plastic hoops, wood scrolls
cost: a cheap hoop can be as little as 65 cents, but expect to pay more for better quality
Useful extras:
Marking pen (about $2)
Card for threads (two dozen for about 70 cents)
Before you start stitching
How to read a pattern
Commercial patterns usually come marked on specially marked grid paper. They will often list the size of the pattern, the midpoint, and how much fabric it will use depending on the count of the aida cloth. Each design in the square represents a certain color fabric, and can sometimes look the same. Make sure you're using the right color!
Prepare your fabric
- Wash your fabric if it is dark-colored or shrinkable.
- Mark the center of your fabric with your marking pen. You need to be more exact when you have less allowance on the sides of the pattern. If you have a larger canvas and a smaller pattern, you don't need to be as exact.
- Secure the edges to prevent fraying. The easiest way is probably to put masking tape around the unfinished edges, though you can also do a fast sew around them. This step can be omitted if you want.
- Apply your hoop or scroll. This will keep the fabric at the right tension for sewing. I usually omit this for small projects, but it is very useful for large ones.
Prepare your thread
DMC cotton thread comes in six strands. It is very rare to embroider with all six. Usually you will use two or three, depending on the count of the aida, and probably one for outlining. To prepare your thread:
- Wash your thread if you are using dark colors or planning on washing it. You don't want to finish a piece and have the colors run! DMC usually doesn't run, but it never hurts to be safe. If you buy cheaper threads, always wash them before using them.
- Pull out a length of thread to use. I usually use about the length of my arm, but it might be easier to start smaller. Longer thread tends to knot more.
- Separate the amount of thread you want to use. This will usually be between one and three strands.
- Pull apart the individual strands that you will be using and let them completely untwist, and then put them back together. This helps prevent knots.
- Thread your needle. It is often easier if the end of the thread is wet (lick your fingers, and pull them along the end of the thread). If you have problems, you can buy threaders that make things easier for you. (You can get several for under a dollar.) Thread the needle so that you have a good length that is not doubled over.
Know where you're starting and where you're going
Some patterns can be tricky. Know where on the pattern the color you are using is found. Plan if you are going to jump over certain parts, or not. In general, know what you're planning to do beforehand so you don't find yourself halfway through a thread not knowing where to go.
How to make the cross stitch, two methods
1. Individual stitches, also called "English Cross-Stitch"
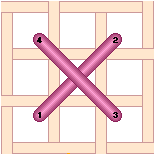
Most useful for sections with a few, isolated crosses, or where you will not be going back to the beginning of a line
Do each cross individually
2. Cross-stitch by line
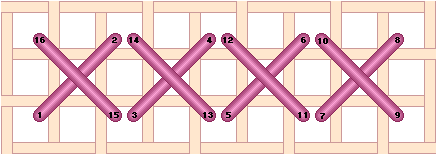
Cross-stitch is usually worked in lines. Complete an entire row going along one diagonal, and then go back along the other diagonal.
IMPORTANT: Make sure that you always begin with the same diagonal, so that the same diagonal is always on top. If you don't, your finished piece will look awkward.
How to start the thread
Never knot your thread! The knots will both pull on the fabric and pucker the backing on a finished piece. So how do you start a thread without knotting?:
- When doing your first stitch, go from the back of the fabric to the front, leaving an inch or so on the wrong side of the fabric. Hold the extra inch with your finger as you do the next few steps.
- Draw the thread from front to back normally.
- When starting your next stitch, from back to front, capture the extra inch under the stitch so that it is snug.
- For the next few stitches, continue to capture the extra bit of thread. After two or three stitches, you will not need to hold it.
- Continue until you feel it is secure, or until you have completely covered the extra thread.
How to finish the thread
- Make sure to leave yourself an extra few inches. It will save you a lot of grief and a little sanity if you have enough to finish normally.
- Finish your stitch with the extra thread on the wrong side of the fabric.
- Pull your needle under a few stitches on the wrong side of the fabric, and pull the thread through. It will look the same as your starting thread.
- Cut the excess thread.
If you don't have enough thread
Let's face it: sometimes we're stubborn, there's just a little more left, and we come to the very end of the thread while still sewing. How do you finish the thread when you can barely move the needle?
- Take the needle off the thread.
- Place the needle for the next stitch, or under the last stitches (as before) as though there were thread on it, but leave the end of the needle sticking out.
- Thread the needle with the little thread you have left, keeping it in place.
- Pull the needle through normally.
- You will need to repeat this until you finish. Yes, it's long, but it does get the job done when you're just too stubborn to admit you need a new thread.
When rows are not equal lengths
There are two possibilities: the rows can be unequal on the side you start from, or the side you finish on. ie: If you work from left to right, and return from right to left, you are starting from the left and finishing on the right.
- If the side you finish on, stitch as normal. It won't affect you.
- If the side you start from, you might need to reverse your last stitch of the previous line or the first stitch of the next line. That is, instead of working bottom-left to top-right, you might need to stitch top-right to bottom-left. Just do it as best it works out and don't worry about it too much. Remember: no one sees (or cares about) the back of the fabric unless you're in an A&S competition.
When a section is slightly detached from the rest
In some cases, going normally in rows will leave a section incomplete. For example, if you are working from left to right, there might be a few stitches on the right a few rows lower that you would not normally reach. There are two ways of dealing with this:- Do it normally, cut the thread, go back to where you left off. This method can be slightly longer, but for complicated patterns it can save a headache.
- Do the extra area completely in half-stitches, working your way down (or up) the rows. When you get to the end, retrace your stitches, going the other way. You should get back to the row you began from. Continue normally. This is the method I usually use.
How to outline: double-running stitch
When you're done, you might want to outline some sections of the piece. This gives it a nice contrast and a sharper definition. The stitch to use for outlining is called a double-running stitch. Usually, outlining will be done with a single strand of thread. Start and finish the outline thread by passing it under a few stitches of the completed pattern on the back of the fabric.

How to finish the piece
Congratulations! You've finished your piece. But what are you going to do with it now? There are lots of options, and I'll list just a few of them.
- With a backing: Place the backing and the piece right-sides together and sew them with a running or a double-running stitch. Leave a little free, and flip it inside out (so the rights sides are on the outside). Finish stitching it up, and you're done.
- Fold over the edge and stitch along it, either a line or as part of your pattern.
- Whip-stitch the outside edge.
- Applique it onto another piece, such as garb.
What to do about knots
Let's face it, knots are a fact of life when it comes to any kind of sewing. We can try to minimize them as much as we want, but there will always be some. So what do you do when your thread knots?
- The most common knot is a slip knot, which looks like a loop. To fix a slip knot, put your needle in the loop and pull gently: the loop should become smaller until it just fits around your needle. Remove your needle and pull gently on the thread. Voila! No more knot. This method works for about 95% of knots you will get.
- When the above method doesn't work, you have two choices.
- You can try to work at the knot with your needle to loosen it. I find this very time-consuming and usually not worth the effort.
- Cut the thread as close to the knot as possible. If you need more thread, pull out the last few stitches and finish the thread normally. Admittedly this is not the most elegant of solutions, but it saves both time and sanity.
Other Helpful Hints
- Never leave your needle lying around -- it will get lost and possibly stepped on or eaten by pets. Always place it in your fabric or a piece of clothing when not using it.
- Thread twists when you sew, which causes knots. To prevent knots, occasionally let go of your needle and let it dangle on the thread. The thread will untwist itself and you can continue sewing normally. You will need to do this more as the thread gets shorter.
Have comments on these instructions? Email the webmistress at julie.golick@gmail.com.
Back to Cheap Projects
Back to Something to Keep Your Hands Busy
Back to the homepage