Abstract
This document intends to explain how to create a video-wall using the combined power of Gstreamer, a multimedia framework library and Xinerama, an X extension that allows one to extend his/her desktop across multiple displays.
Table of Contents
As mentioned, Xinerama is an X extension that allow you to extend your desktop across multiple displays. This is quite easy to setup. There is a good howto available on it so we will not explain it here. The howto can be found at: http://www.linuxdocs.org/HOWTOs/Xinerama-HOWTO.html. It is highly recommended to read this howto before reading this document any further.
There is no limitations on the number of displays imposed by the Xinerama itself, but there are limitations on how many display cards one standard type personal computer can accommodate: 4,5, 6? However, there are display cards available that behave like 4 video-cards but there are problems with them too:
Most of them do not support video-overlay on all the displays at the same time.
Even if they do support Xv, their Linux drivers doesn't seem to do so.
Most of them are very expensive.
Gstreamer is a multimedia framework which aims to be the future back-bone of GNOME and Unix/Linux Multimedia. While still in early stages, its development over the past few years have positively surprised many. This document assumes that you are at least familiar with the basic concepts of Gstreamer. You are not assumed to be a programmer and/or familiar with C language but programmers would be very comfortable with this document and Gstreamer. For programmers, The Gstreamer Development Manual, which can be found at http://gstreamer.freedesktop.org/documentation/ is a good place to get started with using Gstreamer to make multimedia Applications. Non-programmers should have a look at the homepage of Gstreamer and FAQs for a nice introduction.
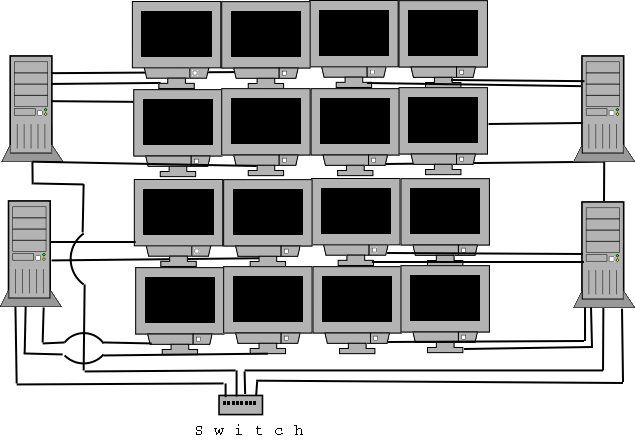
The basic configuration would be a server and a client, which are named as vwall_server and vwall_client respectively here. Assume that the configuration consist of four computers, which are connected together by a Ethernet LAN and their monitors are kept in a 2x2 array ,as shown:

The network and broadcast addresses of the network are assumed to be 192.168.1.0 and 192.168.1.255 respectively. One of the computers is both a client and server, while the rest of the three are clients only. One of the magics of Gstreamer is its ability to create pipelines by a single command-line. So here are the command-line for the clients (it comes first because you'll always run the client first):
The top-left client would go like this:
gst-launch udpsrc ! mpegdemux video_%02d! { queue ! mpeg2dec ! videocrop x=0 y=0 width=160 height=120 ! videoscale width=640 height=480 ! colorspace ! xvideo_sink }
The top-right client:
gst-launch udpsrc ! mpegdemux video_%02d! { queue ! mpeg2dec ! videocrop x=160 y=0 width=160 height=120 ! videoscale width=640 height=480 ! colorspace ! xvideo_sink }
The bottom-left client:
gst-launch udpsrc ! mpegdemux video_%02d! { queue ! mpeg2dec ! videocrop x=0 y=120 width=160 height=120 ! videoscale width=640 height=480 ! colorspace ! xvideo_sink }
The bottom-right client:
gst-launch udpsrc ! mpegdemux video_%02d! { queue ! mpeg2dec ! videocrop x=160 y=120 width=160 height=120 ! videoscale width=640 height=480 ! colorspace ! xvideo_sink }
Here is a sample command-line for the server:
gst-launch filesrc location=anympegfile.mpeg ! mpegparse ! udpsink host=192.168.1.255
While this approach will work for infinitely many displays (at least in theory but it not only increases your budget a lot but also adds a lot to the over-all headache, e.g a video-wall of 64 monitors shall also require 64 computers with them. While discussing about this configuration, one of my friend said it should then be called a "Video-LAN" instead :)
The most practical solution that one can think of is to use both Xinerama and Gstreamer at the same time. Such a configuration would typically consist of computers that shall have maximum number of displays it can afford. E.g There are many boards available in the market that have 4-6 PCI slots, which can accommodate 4-6 PCI display cards. We shall re-use the same assumptions as above to keep things simple, the only modification being the addition of three more displays with each monitor, as shown:
A sample XFree86 file for such a configuration is as follows:
# XFree86 4 configuration
# A sample Xinerama configuration for four displays
# Display Cards: S3 virge/DX

Section "ServerLayout"
Identifier     "Default Layout"
Screen        "Screen0" 0 0
Screen        "Screen1" Relative "Screen0" 640 0
Screen        "Screen2" Relative "Screen0" 0 480
Screen        "Screen3" Relative "Screen0" 640 480
InputDevice    "Mouse0" "CorePointer"
InputDevice    "Keyboard0" "CoreKeyboard"
InputDevice    "DevInputMice" "AlwaysCore"
EndSection

Section "Files"
# RgbPath is the location of the RGB database.  Note, this is the name of the
# file minus the extension (like ".txt" or ".db").  There is normally
# no need to change the default.
# Multiple FontPath entries are allowed (they are concatenated together)
# By default, Red Hat 6.0 and later now use a font server independent of
# the X server to render fonts.
RgbPath      "/usr/X11R6/lib/X11/rgb"
FontPath     "unix/:7100"
EndSection

Section "Module"
Load  "dbe"
Load  "extmod"
Load  "fbdevhw"
Load  "glx"
Load  "record"
Load  "freetype"
Load  "type1"
Load  "v4l"
EndSection

Section "InputDevice"
# Specify which keyboard LEDs can be user-controlled (eg, with xset(1))
# Option "Xleds"  "1 2 3"
# To disable the XKEYBOARD extension, uncomment XkbDisable.
# Option "XkbDisable"
# To customise the XKB settings to suit your keyboard, modify the
# lines below (which are the defaults).  For example, for a non-U.S.
# keyboard, you will probably want to use:
# Option "XkbModel" "pc102"
# If you have a US Microsoft Natural keyboard, you can use:
# Option "XkbModel" "microsoft"
#
# Then to change the language, change the Layout setting.
# For example, a german layout can be obtained with:
# Option "XkbLayout" "de"
# or:
# Option "XkbLayout" "de"
# Option "XkbVariant" "nodeadkeys"
#
# If you'd like to switch the positions of your capslock and
# control keys, use:
# Option "XkbOptions" "ctrl:swapcaps"
# Or if you just want both to be control, use:
# Option "XkbOptions" "ctrl:nocaps"
#
Identifier  "Keyboard0"
Driver      "keyboard"
Option     "XkbRules" "xfree86"
Option     "XkbModel" "pc105"
Option     "XkbLayout" "us"
EndSection

Section "InputDevice"
# Modified by mouseconfig
Identifier  "Mouse0"
Driver      "mouse"
Option     "Device" "/dev/mouse"
Option     "Protocol" "IMPS/2"
Option     "Emulate3Buttons" "no"
Option     "ZAxisMapping" "4 5"
EndSection

Section "InputDevice"
# If the normal CorePointer mouse is not a USB mouse then
# this input device can be used in AlwaysCore mode to let you
# also use USB mice at the same time.
Identifier  "DevInputMice"
Driver      "mouse"
Option     "Protocol" "IMPS/2"
Option     "Device" "/dev/input/mice"
Option     "ZAxisMapping" "4 5"
Option     "Emulate3Buttons" "no"
EndSection

Section "Monitor"
Identifier   "Monitor0"
VendorName   "Monitor Vendor"
ModelName    "MAG DX1495"
DisplaySize  320 240
HorizSync    30.0 - 50.0
VertRefresh  50.0 - 120.0
ModeLine     "1400x1050" 129.0 1400 1464 1656 1960 1050 1051 1054 1100 +hsync +vsync
ModeLine     "1400x1050" 151.0 1400 1464 1656 1960 1050 1051 1054 1100 +hsync +vsync
ModeLine     "1400x1050" 162.0 1400 1464 1656 1960 1050 1051 1054 1100 +hsync +vsync
ModeLine     "1400x1050" 184.0 1400 1464 1656 1960 1050 1051 1054 1100 +hsync +vsync
Option     "dpms"
EndSection

Section "Device"
Identifier  "vga0"
Driver      "s3virge"
BoardName   "Unkown"
BusID       "PCI:0:9:0"
EndSection

Section "Device"
Identifier  "vga1"
Driver      "s3virge"
BoardName   "Unkown"
BusID       "PCI:0:10:0"
EndSection

Section "Device"
Identifier  "vga2"
Driver      "s3virge"
BoardName   "Unkown"
BusID       "PCI:1:13:0"
EndSection

Section "Device"
Identifier  "vga3"
Driver      "s3virge"
BoardName   "Unkown"
BusID       "PCI:1:14:0"
EndSection

Section "Screen"
Identifier "Screen0"
Device     "vga0"
Monitor    "Monitor0"
DefaultDepth     16
SubSection "Display"
  Modes    "640x480"
EndSubSection
SubSection "Display"
  Depth     16
  Modes    "640x480"
EndSubSection
EndSection

Section "Screen"
Identifier "Screen1"
Device     "vga1"
Monitor    "Monitor0"
DefaultDepth     16
SubSection "Display"
  Modes    "640x480"
EndSubSection
SubSection "Display"
  Depth     16
  Modes    "640x480"
EndSubSection
EndSection

Section "Screen"
Identifier "Screen2"
Device     "vga2"
Monitor    "Monitor0"
DefaultDepth     16
SubSection "Display"
  Modes    "640x480"
EndSubSection
SubSection "Display"
  Depth     16
  Modes    "640x480"
EndSubSection
EndSection

Section "Screen"
Identifier "Screen3"
Device     "vga3"
Monitor    "Monitor0"
DefaultDepth     16
SubSection "Display"
  Modes    "640x480"
EndSubSection
SubSection "Display"
  Depth     16
  Modes    "640x480"
EndSubSection
EndSection

Section "DRI"
Group 0
Mode 0666

EndSection
The same Gstreamer pipelines could be re-used here.
As the videoscale plug-in of Gstreamer scales the video in software, it would require too much computation power and memory to scale a very small (160x120) image (it gets to this size after being cropped) to the size of the big screen of 4 displays (1280x960 in our . Here again we would use a hybrid approach. As the videoscale seems to work smoothly for scaling our 160x120 video to 640x480, so we would use videoscale for that. The next step is dependent on the skill-level of the audience:
If you are a programmer and you are writing your own client and server applications, an easy solution would be to size your application window according to the screen's width and height. The sample Client application included with the document demonstrates how to do this the GDK way.
If you are not a programmer and you are using the gst-launch for making the clients for you, then it seems that you are left with no choice but to expand the video window using the mouse. If you can manage to compile and use the source-code included with this document, then you could be in a very good position.
As Gstreamer have a nice support for V4L(video4linux) and the newer V4L2 too, its not hard to put live video streams on the video-wall we just made, in fact its much simpler. The only problem is that either the server machine should be fast enough, e.g a P-III with 512MB RAM would be just enough. The sample gst-launch command-line for the top-left client in this case would look something like this:
gst-launch udpsrc ! mpeg2dec ! videocrop x=0 y=0 width=160 height=120 ! videoscale width=640 height=480 ! colorspace ! xvideo_sink
The command-line for the server would be something like:
gst-launch v4lsrc device=/dev/video0 width=320 height=240 ! fameenc quality=90 ! udpsink host=192.168.1.255
A. Sample Source Codes
The source code of the server application that streams live video is as follows:
/* live_server.c
* A sample server application for a Gstreamer + Xinerama
* powered video-wall. It grabs live video from a v4lsrc
* device and streams it on the broadcast address of the network.
*/

#include <gst/gst.h>
GstElement *main_pipe;

/* The primary srcs & sinks: */
GstElement *v4lsrc, *udp_sink;

/* filters: */
GstElement *mpg_encoder;

int
main (int argc, char *argv[])
{
  gst_init (&argc, &argv);

  main_pipe = gst_pipeline_new ("main_pipe");

  /* Get the main Srcs & sinks */
  v4lsrc = gst_element_factory_make ("v4lsrc", "movie_src");

  g_object_set (G_OBJECT (v4lsrc), "device", "/dev/video0", NULL);
  g_object_set (G_OBJECT (v4lsrc), "width", 320, NULL);
  g_object_set (G_OBJECT (v4lsrc), "height", 240, NULL);

  mpg_encoder = gst_element_factory_make ("fameenc", "mpg_encoder");
  g_object_set (G_OBJECT (mpg_encoder), "quality", 90, NULL);

  udp_sink = gst_element_factory_make ("udpsink", "udp_sink");
  g_object_set (G_OBJECT (udp_sink[i]), "host", "192.168.1.255, NULL);

  // Asserttions:
  g_assert (main_pipe != NULL);
  g_assert (v4lsrc != NULL);
  g_assert (mpg_encoder != NULL);
  g_assert (udp_sink != NULL);

  // Connect the appropritate elements
  gst_pad_connect (gst_element_get_pad (v4lsrc, "src"),
    gst_element_get_pad (mpg_encoder, "sink"));
  gst_pad_connect (gst_element_get_pad (mpg_encoder, "src"),
    gst_element_get_pad (udp_sink, "sink"));

  // Add all element to their appropriate bins
  gst_bin_add (GST_BIN (main_pipe), v4lsrc);
  gst_bin_add (GST_BIN (main_pipe), mpg_encoder);
  gst_bin_add (GST_BIN (main_pipe), udp_sink);

  gst_element_set_state (GST_ELEMENT (main_pipe), GST_STATE_PLAYING);

  while (gst_bin_iterate (GST_BIN (main_pipe)));

  gst_element_set_state (GST_ELEMENT (main_pipe), GST_STATE_NULL);

  g_print ("Normal Program Termination\n");

  exit (0);
}
The source code of the client application that receives and plays the video fed by the server application is as follows:
/* live_client.c
 * A sample client application for a Gstreamer + Xinerama
 * powered video-wall. It receive mpeg 1 video from the networks
 * broadcast address and then plays with it.
 */

#include <gst/gst.h>
#include <gnome.h>
#include <unistd.h>
#include <stdlib.h>

#define CROP_X 0
#define CROP_Y 0
#define CROP_WIDTH 160
#define CROP_HEIGHT 120
#define SCALE_WIDTH 640
#define SCALE_HEIGHT 480

GstElement *main_pipe;
GstElement *udp_src, *video_sink;
GstElement *mpg_decoder;
GstElement *colorspace1, *colorspace2;
GstElement *videocrop, *videoscale;

gboolean size_have;

/* We surelly need a window for the video to play into */
GtkWidget *vw_window;
GtkWidget *vw_socket;

void
videosink_have_size (GstElement * video_sink, gint width, gint height)
{
  size_have = TRUE;
}


void
init_all ()
{
  g_print ("initializing...\n");

  /* Get the Boss: */
  main_pipe = gst_pipeline_new ("main_pipe");

  /* Get the main Srcs & sinks */
  udp_src = gst_element_factory_make ("udpsrc", "movie_src");

  video_sink = gst_element_factory_make ("xvideo_sink", "video_sink");
  g_object_set (G_OBJECT (video_sink), "toplevel", FALSE, NULL);

  /* The mpeg decoder & the filters */
  mpg_decoder = gst_element_factory_make ("mpeg2dec", "mpegdecoder");

  videocrop = gst_element_factory_make ("videocrop", "video_crop");
  g_object_set (G_OBJECT (videocrop), "x", CROP_X, NULL);
  g_object_set (G_OBJECT (videocrop), "y", CROP_Y, NULL);
  g_object_set (G_OBJECT (videocrop), "width", CROP_WIDTH, NULL);
  g_object_set (G_OBJECT (videocrop), "height", CROP_HEIGHT, NULL);


  videoscale = gst_element_factory_make ("videoscale", "video_scale");
  g_object_set (G_OBJECT (videoscale), "width", SCALE_WIDTH, NULL);
  g_object_set (G_OBJECT (videoscale), "height", SCALE_HEIGHT, NULL);

  colorspace1 = gst_element_factory_make ("colorspace", "color_space1");
  colorspace2 = gst_element_factory_make ("colorspace", "color_space2");
  mpg_decoder = gst_element_factory_make ("mpeg2dec", "mpegdecoder");

  /* Asserttions: */
  g_assert (main_pipe != NULL);
  g_assert (video_sink != NULL);
  g_assert (udp_src != NULL);
  g_assert (videocrop != NULL);
  g_assert (videoscale != NULL);
  g_assert (colorspace1 != NULL);
  g_assert (colorspace2 != NULL);
  g_assert (mpg_decoder != NULL);

  /* Our Application Window */
  vw_window = gnome_app_new ("Video-Wall Client", "Video-Wall Client");

  /* we need no borders */
  gtk_window_set_decorated (GTK_WINDOW (vw_window), FALSE);

  vw_socket = gtk_socket_new ();
  gtk_widget_show (vw_socket);

  gnome_app_set_contents (GNOME_APP (vw_window), GTK_WIDGET (vw_socket));

  g_signal_connect (G_OBJECT (video_sink), "have_size",
     G_CALLBACK (videosink_have_size),
     main_pipe);

  /* Connect the appropritate elements */
  gst_pad_connect (gst_element_get_pad (udp_src, "src"), gst_element_get_pad (mpg_decoder, "sink"));
  gst_pad_connect (gst_element_get_pad (mpg_decoder, "src"), gst_element_get_pad (videocrop, "sink"));
  gst_pad_connect (gst_element_get_pad (videocrop, "src"), gst_element_get_pad (colorspace1, "sink"));
  gst_pad_connect (gst_element_get_pad (colorspace1, "src"), gst_element_get_pad (videoscale, "sink"));
  gst_pad_connect (gst_element_get_pad (videoscale, "src"), gst_element_get_pad (colorspace2, "sink"));
  gst_pad_connect (gst_element_get_pad (colorspace2, "src"), gst_element_get_pad (video_sink, "sink"));

  /* Add all element to their appropriate bins */
  gst_bin_add (GST_BIN (main_pipe), udp_src);
  gst_bin_add (GST_BIN (main_pipe), mpg_decoder);
  gst_bin_add (GST_BIN (main_pipe), videocrop);
  gst_bin_add (GST_BIN (main_pipe), colorspace1);
  gst_bin_add (GST_BIN (main_pipe), colorspace2);
  gst_bin_add (GST_BIN (main_pipe), videoscale);
  gst_bin_add (GST_BIN (main_pipe), video_sink);

  size_have = FALSE;
}

gboolean
idle_func (gpointer data)
{
  gboolean static first_time = TRUE;

  if (first_time && size_have) {
    gtk_widget_realize (vw_socket);
    gtk_socket_steal (GTK_SOCKET (vw_socket), gst_util_get_int_arg (G_OBJECT (video_sink), "xid"));
    gtk_widget_set_uposition (vw_window, 0, 0);
    gtk_widget_set_usize (vw_window, gdk_screen_width (), gdk_screen_height ());
    gtk_widget_show_all (vw_window);
    first_time = FALSE;
  }

  if (!gst_bin_iterate (GST_BIN (main_pipe))) {
    gtk_main_quit ();
    return FALSE;
  }

  else {
    return TRUE;
  }
}

gint
main (gint argc, char *argv[])
{
  gnome_init ("Video-Wall Client", "0.0.1", argc, argv);
  gst_init (&argc, &argv);

  init_all ();
  gtk_idle_add (idle_func, NULL);

  /* Lets get started */
  gst_element_set_state (GST_ELEMENT (main_pipe), GST_STATE_PLAYING);

  gtk_main ();

  gst_element_set_state (GST_ELEMENT (main_pipe), GST_STATE_NULL);

  gst_object_destroy (GST_OBJECT (main_pipe));

  g_print ("Normal Program Termination\n");

  return 0;
}