RMC Web Site Application
User’s Manual and
Documentation
Prepared by:
James Zucchi & Jonathan Malanche
May 23, 2002
Table of Contents
Using the Application Interface
Navigating To
the Management Console (Internal Web)
Changing the Data in the Database
Adding and
Deleting Vendor Data
How to Change
Vendor Information
Adding and
Deleting Product Data
How to Change Product
Group Information
How to Change
Individual Product Information (Product List Page)
How to Use the
Product Editing Page
Adding and
Deleting Employee and Department Data
How to Change
Department Information
How to Use the
Department Editing Page
How to Change
Employee Information
Adding and
Deleting News Articles
Adding Photos
and Links to News Articles
Appendix A: Installation and Configuration
Web Site
Directory Configuration
Internet
Information Services Configuration
Appendix B: Database and Code Documentation
Revision History
|
Date |
Author |
Revision |
Description |
|
|
James Zucchi |
1.0 |
Initial Draft |
|
|
|
|
|
|
|
|
|
|
|
|
|
|
|
Introduction
Overview
To better serve RM Controls Inc. growing customer base, it has become necessary to provide them an easy to use, content driven website. Customers must be able to seek out documentation for particular products as well as request additional information from an automated system. For marketing purposes RM Controls must be able to monitor web statistics and relate these statistics to individual customers. Due to the changing nature of distributor relationships, as well as employee turnover, it has become necessary to create a database to store all related information for easy management through a web interface.
The objective of this project is to develop a secure, high-performance web-based system that will allow customers to get the latest information about RM Controls, including products, vendors, salespersons, and request more info from appropriate personnel.
This system will allow customers to browse the product database and select a product for which they can obtain specification documents. They will then be able to request further information for the appropriate salesperson for their region.
Management with security clearance will be given permission to modify database data, effectively altering the site content instantly through an easy-to-use custom graphical interface utilizing an intuitive layout.
This system will also allow for rudimentary web traffic forecasting and decision-level data based on historical traffic metrics. The reporting capabilities will be determined later by management depending on utility of the data retrieval system.
Principals Involved
Client Contacts
RMControls, Inc.
Mario Malanche
Work: (805) 499-4499 x202
Contractors
Jonathan
Malanche
Mustang
Drive
Home: (805)
542-9333
Email: jmalanch@calpoly.edu
James
Zucchi
1304 Palm
Home: (805)
544-3791
Email: zuke71@hotmail.com
Minimum System Requirements
This section describes the minimum software requirements needed to support the web site. Please see appendix entitled “Installation and Configuration” for configuration of server and software.
System Requirements
Using the Application Interface
The interface is web-based for both the client site (external user) and the administrator (internal user). Both sites can be reached by navigating to the corporate web site, www.rmcontrols.com. The layout of pages was specifically designed to enhance clarity and increase ease of use. The internal web Management Console (MC) was designed with the “What You See Is What You Get” (WYSIWYG) principle in mind, with page layouts intended to mimic the external web. Hyperlinks are used to navigate both the internal and external sites and simple web-based forms are used throughout, presenting a point-and-click approach to data manipulation. Nearly all pages contain dynamic content which can be altered by the administrator.
Navigating To the Management Console (Internal Web)
Selecting “MC” from the upper navigation bar will allow the administrator (and only the admin) access to the Management Console.
Returning to the External Web
Navigating to the “Home” page should return the administrator to the external site.
Changing the Data in the Database
All data is stored in a Microsoft Access 2000 database file. However, Access software or knowledge of Access is not required to alter the important data contained therein. A Microsoft Internet Explorer web browser and permission to enter the Management Console is all that is needed. It is assumed that any changes will be made while in MC mode, so references to pages (i.e. Vendor Page) should be regarded as the corresponding page in the Management Console. Be advised that any changes made to the data will be immediately visible on the external web site.
Adding and Deleting Vendor Data
Vendor Data is data
describing or related to a particular supplier (ex: Yokogawa Corporation of
How to Change Vendor Information
To add a new vendor:
- Navigate to the Manufacturers Page.
- Click “AddNewVendor” Button
- A pop-up box appears. Enter the vendor’s name in it, and click “OK”
- The new vendor is created, and will be added to the list.
REMEMBER: You must edit the vendor’s description and logo in order to display their description and logo on the web.
To edit a vendor’s name:
- Select the vendor by clicking the corresponding radio button
- Click “EditVendorName”
- A pop-up box appears. Enter the vendor’s name in it, and click “OK”
- The new vendor name is updated.
To edit a vendor’s web address (i.e. www.companyname.com):
- Select the vendor by clicking the corresponding radio button
- Click “EditVendorURL”
- A pop-up box appears. Enter the vendor’s URL in it, and click “OK”
- The new vendor URL is updated, and will be added to the vendor.
To edit a vendor’s description (any general information about the vendor):
- Select the vendor by clicking the corresponding radio button
- Click “EditVendorDetail”
- A pop-up box appears. Enter the vendor’s detail in it, and click “OK”
- The new vendor detail is updated.
To DELETE a vendor:
<<WARNING>> This operation will delete a vendor, and all the corresponding records will be deleted, including all products associated with that vendor, and any other related information.
- Select the vendor by clicking the corresponding radio button
- Click “DeleteVendor”
- The vendor name is deleted, and will be removed from the list.
How to Change Vendor Logo
Vendor logos are not only present when on the Manufacturers page. In the absence of a specific product image, the vendor logo will be substituted.
To change a vendor’s logo (or add one for a new vendor):
- Select the vendor by clicking the corresponding radio button
- Click “UpdateLogo”
- A new page appears. Follow the instructions on the upload form conscientiously.
- The new vendor logo is now updated, and will be added to the vendor.
To DELETE a vendor logo:
<<WARNING>> This operation must be executed before uploading a new logo if a logo already exists for a particular vendor.
- Select the vendor by clicking the corresponding radio button
- Click “DeleteLogo”
- The vendor logo is deleted, and will be removed from the vendor list and all default product images (see above, “How to Change Vendor Logo”).
Adding and Deleting Product Data
Product data is that
which describes a particular product and/or its specific categories and
groups. Products are organized first
into Main Groups (or categories) and then Sub Groups. The process to change Sub Group Data is
nearly identical to that of Main Group Data, except that a Main Group must be
selected first in order to signify the Sub Group’s proper affiliation. This can be done on the Main Group page (the
first page navigated to when selecting “Products” from either top or side
navigation bar) by clicking on the desired Main Group name (not its radio
button). After a Sub Group is selected,
you may add or edit individual products on the “third” product page. Finally, on the Product Editing page, you
will be able to upload images and documents related to that product, provide a
brief description for the product (no greater than 255 characters) and specify
model numbers to be listed under that product name.
How to Change Product Group Information
To add a new
Main/Sub Group:
- Navigate to the Products Page.
- Click “AddGroup” Button
- A pop-up box appears. Enter the group’s name in it, and click “OK”
- The new group is created, and will be added to the list.
To edit a Main/Sub Group name:
- Select the Main Group by clicking the corresponding radio button
- Click “EditGroup”
- A pop-up box appears. Enter the Main/Sub Group name in it, and click “OK”
- The new Main/Sub Group name is updated.
To DELETE a Main/Sub Group:
<<WARNING>> This operation will delete a Main/Sub Group, and all the corresponding records will be deleted, including all Sub Groups associated with that Group, all products associated with it, and any other related information. This is a permanent operation. Be absolutely sure you want to do this before performing this operation.
- Select the vendor by clicking the corresponding radio button
- Click “DeleteGroup”
- The Main/Sub Group name is deleted, and will be removed from the list.
How to Change Individual Product Information (Product List Page)
To add a new
Product:
- Click “Add Product” Button
- A pop-up box appears. Enter the Product name in it, and click “OK”
- The new Product is created, and will be added to the list.
REMEMBER: You must edit the product description, vendor affiliation, and applicable information in order to display it on the web. For this purpose, you will be directed to that product’s editing page. See below for information on the product editing page.
ALSO: For any new product entered, its default vendor will be Yokogawa. This can be changed on the Product Editing page (see description below).
To edit a Product name:
- Select the Product by clicking the corresponding radio button
- Click “Edit Product”
- A pop-up box appears. Enter the Product name in it, and click “OK”
- The new Product name is updated.
To DELETE a Product:
<<WARNING>> This operation will delete a Product, and all the corresponding records will be deleted, including all descriptions and images associated with it, and any other related information. This is a permanent operation. Be absolutely sure you want to do this before performing this operation. Clients may not be able to access any specification documents you have previously related to this document (see relating and un-relating documents below)
- Select the Product by clicking the corresponding radio button
- Click “Delete Product”
- The Product is deleted, and will be removed from the list.
How to Use the Product Editing Page
To edit a Product name:
- Click “EditProductName”
- A pop-up box appears. Enter the Product name in it, and click “OK”
- The new Product name is updated (here and in product list)
To edit a product description (any general information about the product):
- Click “EditProductDetail”
- A pop-up box appears. Enter the product detail in it, and click “OK”
- The new product detail is updated.
To update a product’s vendor (or change from default of Yokogawa)
- Select from the vendor drop-down list box
- Click “UpdateVendor”
- The vendor for this product is updated.
To add a new Model
Number:
- Click “AddModelNumber” Button
- A pop-up box appears. Enter the Model Number in it, and click “OK”
- The new Model Number is created, and will be added to the list.
To Delete a Model Number:
- Select the Model Number by clicking the corresponding radio button
- Click “DeleteModelNumber” Button
- The Model Number is deleted, and will be removed from the list
To change a product’s image (or add one for a new product):
- Click “UploadNewImage”
- A new page appears. Follow the instructions on the upload form conscientiously.
- The new product image is now updated, and will be added to the product page.
To DELETE a product’s image:
<<WARNING>> This operation must be executed before uploading a new image if an image already exists for a particular vendor.
- Click “DeleteImage”
- The vendor logo is deleted, and will be removed from the product.
Product Specification Documents:
Note that the Adding
and/or Deleting product specification document process does not have the same effect as Relating or Un-relating a specification document.
To add a new document:
- Click “AddNew”
- A new page appears. Follow the instructions on the upload form conscientiously.
- The new document is now updated, and will be added to the product page.
To Delete a document:
<<WARNING>> This operation will permanently delete a particular specification document from the system. Any other product also listing this document as related will not be able to list this document. To only remove the reference to this document from this particular product and NOT from other products, please see the section entitled “Relating and Un-relating existing Specification Sheets” below.
- Select the document by clicking the corresponding radio button
- Click “DeleteDoc” Button
- The document is permanently deleted, and will be removed from the library (unless subsequently uploaded again later)
To edit a document description (any general information about the document):
- Select the document by clicking the corresponding radio button
- Click “EditDescription”
- A pop-up box appears. Enter the document detail in it, and click “OK”
- The new document detail is updated.
Relating and Un-relating Existing Product Specification Documents
Note that the relating or un-relating product specification document process does not have the same effect as adding and/or deleting a specification document. To permanently remove a specification document, please see section above. In order to relate or un-relate an existing document, it must first have been uploaded by selecting the appropriate product and then clicking “AddNew” to upload.
To Unrelate a document from a product:
- Select the document by clicking the corresponding radio button
- Click “UnrelateDoc” Button
- The document is removed from the list, but remains in the database. If this document is currently associated with other products, it will not be removed from their lists. If you wish to relate this document to another product in the same Sub Group, see below procedure.
To Relate an existing document to a product (or new product):
- Select from the document drop-down list box
- Click “View” to determine if this is the correct document for this product
- The document will be displayed in a new browser window.
- Click “RelateDoc”
- The requested document for this product is added to the list.
Adding and Deleting
Employee and Department Data
How to Change Department Information
To add a new
Department:
- Navigate to the Directory Page.
- Click “AddDept” Button
- A pop-up box appears. Enter the Department name in it, and click “OK”
- The new Department is created, and will be added to the list.
REMEMBER: you must input a department’s physical address and telephone number (regions also) for a new department to gain full functionality.
To edit a Department name:
- Select the Department by clicking the corresponding radio button
- Click “EditDepartment”
- A pop-up box appears. Enter the Department name in it, and click “OK”
- The new Department name is updated.
To DELETE a Department:
<<WARNING>> This operation will delete a Department, and all the corresponding records will be deleted, including any related address or telephone information. This is a permanent operation. Be absolutely sure you want to do this before performing this operation.
- Select the vendor by clicking the corresponding radio button
- Click “DeleteGroup”
- The Department name is deleted, and will be removed from the list.
How to Use the Department Editing Page
This page determines a department’s physical address and telephone number. Individual employees may be associated with a single department or many departments (see below, “Relating and Un-relating Existing Employees”) The department editing page can be reached by first navigating to the Directory and then clicking on a department to edit. Client requests will be
To edit a Department’s Address, City, State, or Zip
- Click appropriate button
- A pop-up box appears. Enter the Department name in it, and click “OK”
- The Department information is updated, and will be added.
To edit a Department’s Telephone or Fax Number
- Click appropriate button
- A pop-up box appears. Enter the information in it, and click “OK”
- The Department information is updated, and will be added.
To add a new Region:
- Click “AddRegion” Button
- A pop-up box appears. Enter the Region (zip code) in it, and click “OK”
- The new Region is created, and will be added to the list.
To Delete a Region:
- Select the Region by clicking the corresponding radio button
- Click “DeleteRegion” Button
- The Region is deleted, and will be
removed from the list
How to Change an Employee’s Department Affiliation
Each employee may be
entered into the directory without being associated with a particular
department. Until they are “related” to
a department, they will not be listed in the web directory. To facilitate
transfer of an employee from one department to another without having to
recreate the employee’s personal data by deleting and re-entry, this process is
used. Similar to the scenario with
product specification sheets, Adding and/or Deleting an employee completely
does not have the same result as relating or Un-relating an employee to/from a
department.
Relating and Un-relating Existing Employees
To Un-relate an existing employee to a department:
- Select the employee by clicking the corresponding radio button
- Click “UnrelateEmployee” Button
- The employee is removed from the list, but remains in the database. If this employee is currently associated with other departments, it will not be removed from their lists. If you wish to relate this employee to another department, see above procedure.
To Relate an existing employee to a department:
- Select from the employee drop-down list box
- Click “RelateEmployee”
- The requested document for this product is added to the list.
Setting “E-mail Request” Recipient
The web site contains a process wherein customers can navigate to a product description page and then request more information about a particular product. Requests are routed by two criteria: zip code entered by the customer - applicable to department region, and that department’s pre-determined email recipient. The default email recipient for all departments is Mario Malanche. The current email recipient s displayed on the department edit page.
To determine a department’s email recipient:
- Select from the employee drop-down list box
- Click “Update”
- The requested employee will now receive all requests for this department based on department regions (zip codes).
How to Change Employee Information
To add a new
Employee:
- Navigate to the Directory Page.
- Click “AddEmployee” Button
- A pop-up box appears. Enter the Employee name in it, and click “OK”
- The new Employee is created, and will be added to the list.
REMEMBER: you must subsequently add an email address and telephone extension for this employee (see below)
To edit an Employee name:
- Navigate to the Directory Page.
- Select the Employee by clicking the corresponding radio button
- Click “EditEmployee”
- A pop-up box appears. Enter the Employee name in it, and click “OK”
- The new Employee name is updated.
To edit an Employee Email Address:
- Navigate to the Directory Page.
- Select the Employee by clicking the corresponding radio button
- Click “EditEmployee”
- A pop-up box appears. Enter the Employee Email Address in it, and click “OK”
- The new Employee Email Address is updated.
To edit an Employee Telephone Extension:
- Navigate to the Directory Page.
- Select the Employee by clicking the corresponding radio button
- Click “EditEmployee”
- A pop-up box appears. Enter the Employee Extension in it, and click “OK”
- The new Employee Telephone Extension is updated.
To DELETE an Employee:
<<WARNING>> This operation will delete an Employee, and all the corresponding records will be deleted, including any related email address or telephone information. This is a permanent operation. Be absolutely sure you want to do this before performing this operation.
- Navigate to the Directory Page.
- Select the Employee by clicking the corresponding radio button
- Click “DeleteEmployee”
- The Employee name is deleted, and will be removed from the list.
Adding and Deleting News Articles
Dynamically updated news articles are a new feature to this version of the RM Controls web site. The administrator may want to update this frequently with product updates, company sales events and specials, or other information for the customer’s perusal.
To add an article:
- Navigate to the News Page.
- Click “Add Article”
- Follow the instructions on the next page conscientiously. The article will be dated automatically when “Add Article” is clicked. Enter a title and body text to the article. You may paste in text using the edit menu, mouse right-click, or keyboard shortcuts from any approved publication or other source.
- Click “Add Article” when done adding text and title.
- The new article is added to the archive. The most recent article will be the target of the “Latest News” link on the home page of the web site.
To edit the article:
- Navigate to the News Page.
- Enter the new title in the title box.
- Click “Update Article”
- The new text is applied to the article.
To edit the article’s title:
- Navigate to the News Page.
- Click “Update Title”
- The new title is applied to the article.
Adding Photos and Links to News Articles
To add a link to the article:
(Multiple links may be added for a single article)
- Navigate to the News Page.
- Click on an article’s title.
- Click “Add Link”
- A pop-up box appears. Enter the link URL in it, and click “OK”
- The new article link is updated.
To DELETE an article’s link:
- Select the link by clicking the corresponding radio button
- Click “DeleteImage”
- The image is deleted, and will be removed from the article.
To add an image to the article:
(similar to adding product image, above except that multiple images may be added for a single article)
- Navigate to the News Page.
- Click on an article’s title.
- Click “Add Image”
- A new page appears. Follow the instructions on the upload form conscientiously.
- The new article image is now updated, and will be added to the news article on the upper right margin when news is displayed.
To DELETE an article’s image:
- Select the image by clicking the corresponding radio button
- Click “DeleteImage”
- The image is deleted, and will be removed from the article.
Appendix A: Installation and Configuration
This section describes certain settings and preparation needed for the web site to be released properly. The project team will apply these settings for RM Controls. The following is merely a record of the settings needed.
File Preparations
Global.asa
Configuration
RMCWeb requires general settings in the global.asa file. The following variables must be set: (Note: the entries are examples)
- Application("connectionString") = "PROVIDER=MICROSOFT.JET.OLEDB.4.0;DATA SOURCE=E:\web\admin\RMCWeb.mdb"
- Application("docPath") = "E:\web\docs"
- Application("imagePath") = "E:\web\images"
- Application("newsPath") = "E:\web\news"
- Application("cssPath") = "RMCstyle.css"
The variable connectionString is the driver and location to the database.
The variable docpath is utilized by the asp scripts to upload documents
The variable imagePath is utilized by the asp scripts to upload images
The variable newsPath is utilized by the asp scripts to write news text files to the server
The variable cssPath is utilized by every asp page to format content
Web Site Directory Configuration
The following folders are required in the virtual directory for the site to function:
- /docs (location of all product specifications)
- /images (location of all product and vendor images)
- /include (location of all sub routines for the management console)
- /navimages (location of all images not relating to products)
- /news (location of all news text)
The following directories must be given write and modify permissions under NTFS:
- /docs
- /images
- /news
Right click each directory and select security permissions. Add IUSR_<servername> and select read, write, and modify. To finalize click apply or OK.
Database File Configuration
To allow database inserts, updates, and deletes under NTFS please perform the following steps:
- Select the database .mdb file
- Select Properties
- Select the security tab
- Click the Add button
- Add the servers IUSR account
- Give IUSR read & execute, read, write, and modify permissions
- Click OK
ASP file configuration
Add the following files to the web sites home directory:
- addNews.asp
- archive.asp
- categories.asp
- editNews.asp
- emp.asp
- index.asp
- leftNav.asp
- MCcategories.asp
- MCdept.asp
- MCdeptInfo.asp
- MCleftNav.asp
- MCnav.asp
- MCnews.asp
- MCprod.asp
- MCsCategories.asp
- MCselection.asp
- MCvendors.asp
- Nav.asp
- News.asp
- processForm.asp
- prod.asp
- RequestForm.asp
- sCategories.asp
- selection.asp
- uploadDoc.asp
- uploadImage.asp
- uploadVendorLogo.asp
- vendors.asp
Add the following files to the “include” directory:
- deptSub.asp
- log.asp
- newsSub.asp
- sub.asp
- vendSub.asp
Internet Information Services Configuration
Enable Reverse DNS for IIS
Enable RDNS ;Command-line Method:
cscript adsutil.vbs set /w3svc/EnableReverseDNS "TRUE"
This will allow the site to log user’s IP, as well as, their domain.
Appendix B: Database and Code Documentation
This section lists specific information about the database the web site accesses to produce all of its content. Also listed in this appendix are all the names and parameters of functions used in the implementation of this system.
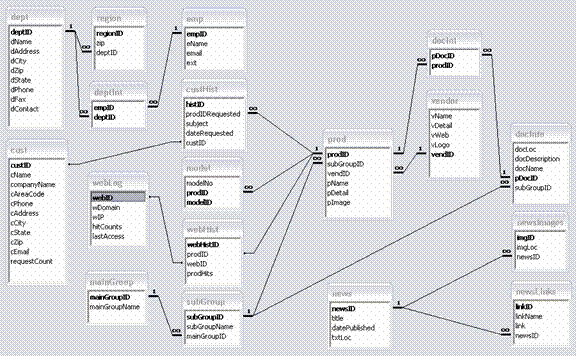
Database
RMCWeb has a total of 18 tables to store information regarding departments, employees, products, web site hits, and vendors. Below is the entity relationship diagram for RMCWeb.
Referential Integrity is enforced in all tables.
Visual Basic COM Code
RMCSQL
Purpose: RMCSQL utilizes disconnected recordsets to return values for querying purposes. This component supports select statements only. Each function returns an html table string which is then displayed via asp.
Class Modules
DBQuery
Purpose: This class module is utilized by all querying functions to initiate a database connection and return a disconnected recordset.
Functions:
Public
Function ReturnRecordset(Optional ByVal sSQL As String) As ADODB.Recordset
htmEmployees
Functions:
Public
Function ReturnEmployees(Optional ByVal cString As String) As String
htmNews
Functions:
Public
Function ReturnNews(Optional ByVal cString As String) As String
Public
Function ReturnNewsRS(Optional ByVal cString As String, _
Optional ByVal newsID As Long) As ADODB.Recordset
Public
Function ReturnNewsImages(Optional ByVal cString As String, _
Optional ByVal newsID As Long) As ADODB.Recordset
Public
Function ReturnNewsLinks(Optional ByVal cString As String, _
Optional ByVal newsID As Long) As ADODB.Recordset
htmProducts
Functions:
Public
Function ReturnCategories(Optional ByVal cString As String) As String
Public Function
ReturnSubCategories(Optional ByVal cString As String, Optional ByVal
MID As Integer) As String
Public Function
ReturnProdNames(Optional ByVal cString As String, Optional ByVal
SID As Integer) As String
Public
Function ReturnProdInfo(Optional ByVal cString As String, Optional ByVal
PID As Long) As String
Public
Function ReturnMaxDocID(Optional ByVal cString As String) As Long
htmVendors
Functions:
Public
Function ReturnVendors(Optional ByVal cString As String) As String
MCEmployees
Functions:
Public
Function ReturnDepartments(Optional ByVal cString As String) As String
Public
Function ReturnDeptInfo(Optional ByVal cString As String, _
MCVendors
Functions:
Public
Function ReturnVendors(Optional ByVal cString As String) As String
MCNews
Functions:
Public
Function ReturnNews(Optional ByVal cString As String) As String
MCProducts
Functions:
Public
Function ReturnCategories(Optional ByVal cString As String) As String
Function ReturnSubCategories(Optional ByVal cString As String, Optional ByVal
MID As Integer) As String
Function ReturnProdNames(Optional
ByVal cString As String,
Optional ByVal SID As Integer) As String
Public
Function ReturnProdInfo(Optional ByVal cString As String, Optional ByVal
PID As Long, _
Optional ByVal SID As Long) As String
MCUser
Functions:
Public
Function RetrieveUserID(Optional ByVal cString As String, _
Optional ByVal IP As String) As Long
Public
Function RetrieveCustID(Optional ByVal cString As String, _
Optional ByVal UID As String) As Boolean
Public
Function getEmail(Optional ByVal cString As String, Optional ByVal
cZip As String) As String
RMCMC
Purpose: RMCMC utilizes ADODB.command objects to issues update, delete, and insert
SQL queries.
Class Modules
DBExecute
Functions:
Public Function ExecuteQuery(Optional ByVal sSQL As String) As Boolean
Employees
Functions:
Public
Function AddDept(Optional ByVal cString As String, Optional ByVal
dName As String) As Boolean
Public
Function EditDept(Optional ByVal cString As String, Optional ByVal
deptID As Long, _
Optional ByVal dName As String) As Boolean
Public
Function DelDept(Optional ByVal cString As String, Optional ByVal
deptID As Long) As Boolean
Public
Function EditAddr(Optional ByVal cString As String, Optional ByVal
deptID As Long, _
Optional ByVal dAddress As String) As
Boolean
Public
Function EditCity(Optional ByVal cString As String, Optional ByVal
deptID As Long, _
Optional ByVal dCity As String) As Boolean
Public
Function EditState(Optional ByVal cString As String, Optional ByVal
deptID As Long, _
Optional ByVal dState As String) As
Boolean
Public
Function EditPhone(Optional ByVal cString As String, Optional ByVal
deptID As Long, _
Optional ByVal dPhone As String) As
Boolean
Public
Function EditFax(Optional ByVal cString As String, Optional ByVal
deptID As Long, _
Optional ByVal dFax As String) As Boolean
Public
Function EditZip(Optional ByVal cString As String, Optional ByVal
deptID As Long, _
Optional ByVal dZip As String) As Boolean
Public
Function AddRegion(Optional ByVal cString As String, Optional ByVal
deptID As Long, _
Optional ByVal zip As String) As Boolean
Public
Function DelRegion(Optional ByVal cString As String, Optional ByVal
regionID As Long) As Boolean
Public
Function EditName(Optional ByVal cString As String, Optional ByVal
empID As Long, _
Optional ByVal eName As String) As Boolean
Public
Function EditEmail(Optional ByVal cString As String, Optional ByVal
empID As Long, _
Optional ByVal email As String) As Boolean
Public
Function EditExt(Optional ByVal cString As String, Optional ByVal
empID As Long, _
Optional ByVal ext As String) As Boolean
Public
Function AddEmp(Optional ByVal cString As String, Optional ByVal
eName As String) As Boolean
Public
Function DelEmp(Optional ByVal cString As String, Optional ByVal
empID As Long) As Boolean
Public
Function UnrelateEmp(Optional ByVal cString As String, Optional ByVal
deptID As Long, _
Public
Function RelEmp(Optional ByVal cString As String, Optional ByVal
deptID As Long, _
Optional ByVal empID As Integer) As
Boolean
Public
Function SetEmail(Optional ByVal cString As String, Optional ByVal
deptID As Long, _
Optional ByVal empID As String) As Boolean
News
Functions:
Public
Function AddNews(Optional ByVal cString As String, Optional ByVal
title As String, _
Optional ByVal
txtLoc As String) As Boolean
Public
Function UpdateTitle(Optional ByVal cString As String, _
Optional ByVal newsID As Long, _
Optional ByVal title As String) As Boolean
Public
Function DelNews(Optional ByVal cString As String, Optional ByVal
newsID As Long) As Boolean
Public
Function AddImage(Optional ByVal cString As String, Optional ByVal
newsID As Long, _
Optional ByVal imgLoc As String) As
Boolean
Public
Function AddLink(Optional ByVal cString As String, Optional ByVal
newsID As Long, _
Optional ByVal linkName As String, _
Optional ByVal link As String) As Boolean
Public
Function DelImage(Optional ByVal cString As String, _
Optional ByVal imgID As Long) As Boolean
Public
Function DelLink(Optional ByVal cString As String, _
Optional ByVal linkID As Long) As Boolean
Products
Functions:
Public
Function AddProduct(Optional ByVal cString As String, Optional ByVal
SID As Long, _
Optional ByVal pName As String, _
Optional ByVal vendID As Long) As Boolean
Public
Function UploadImage(Optional ByVal cString As String, Optional ByVal
PID As Long, _
Optional ByVal
pImage As String) As Boolean
Public
Function DelImage(Optional ByVal cString As String, Optional ByVal
PID As Long) As Boolean
Public
Function AddModel(Optional ByVal cString As String, Optional ByVal
PID As Long, _
Optional ByVal newMod As String) As
Boolean
Public
Function DelModel(Optional ByVal cString As String, Optional ByVal
modelID As Long, _
Optional ByVal PID As Long) As Boolean
Public
Function AddDoc(Optional ByVal cString As String, Optional ByVal
PID As Long, _
Optional ByVal docName As String, _
Optional ByVal docLoc As String, _
Optional ByVal docDescription As String, _
Optional ByVal SID As Long) As Boolean
Public
Function EditDoc(Optional ByVal cString As String, Optional ByVal
pDocID As Long, _
Optional ByVal docDescription As String)
As Boolean
Public
Function DelDoc(Optional ByVal cString As String, Optional ByVal
pDocID As Long) As Boolean
Public
Function UnrelateDoc(Optional ByVal cString As String, Optional ByVal
PID As Long, _
Optional ByVal pDocID As Integer) As
Boolean
Public
Function RelateDoc(Optional ByVal cString As String, Optional ByVal
PID As Long, _
Optional ByVal pDocID As Integer) As
Boolean
Public
Function UpdateProdName(Optional ByVal cString As String, Optional ByVal
PID As Long, _
Optional ByVal pName As String) As Boolean
Public
Function UpdateVendor(Optional ByVal cString As String, Optional ByVal
PID As Long, _
Optional ByVal vendID As Long) As Boolean
Public
Function AddMainGroup(Optional ByVal cString As String, Optional ByVal
mainGroupName As String) As Boolean
Public
Function EditMainGroup(Optional ByVal cString As String, Optional ByVal
mainGroupID As Long, _
Optional ByVal mainGroupName As String) As
Boolean
Public
Function DelMainGroup(Optional ByVal cString As String, Optional ByVal
mainGroupID As Long) As Boolean
Public
Function AddSubGroup(Optional ByVal cString As String, Optional ByVal
mainGroupID As Long, _
Optional ByVal subGroupName As String) As
Boolean
Public
Function EditSubGroup(Optional ByVal cString As String, Optional ByVal
subGroupID As Long, _
Optional ByVal subGroupName As String) As
Boolean
Public
Function DelSubGroup(Optional ByVal cString As String, Optional ByVal
subGroupID As Long) As Boolean
Public
Function DelProduct(Optional ByVal cString As String, Optional ByVal
PID As Long) As Boolean
Public
Function EditProductDetail(Optional ByVal cString As String, Optional ByVal
PID As Long, _
Optional ByVal pDetail As String) As
Boolean
User
Functions:
Public
Function CreateUserID(Optional ByVal cString As String, _
Optional ByVal IP As String, _
Optional ByVal domain As String) As Boolean
Public
Function LogUser(Optional ByVal cString As String, _
Optional ByVal UID As Long, _
Optional ByVal PID As Long, _
Optional ByVal lastAccess As String) As
Boolean
Public
Function LogRequest(Optional ByVal cString As String, _
Optional ByVal PID As Long, _
Optional ByVal cName As String, _
Optional ByVal companyName As String, _
Optional ByVal cAreaCode As String, _
Optional ByVal cPhone As String, _
Optional ByVal cAddress As String, _
Optional ByVal cCity As String, _
Optional ByVal cState As String, _
Optional ByVal cZip As String, _
Optional ByVal cEmail As String, _
Optional ByVal subject As String, _
Optional ByVal UID As Long, _
Optional ByVal queryType As String, _
Optional ByVal timeStamp As String) As
Boolean
Vendors
Functions:
Public
Function AddVendor(Optional ByVal cString As String, Optional ByVal
vName As String) As Boolean
Public
Function EditVendorName(Optional ByVal cString As String, Optional ByVal
vendID As Long, _
Optional ByVal vName As String) As Boolean
Public
Function EditVendorURL(Optional ByVal cString As String, Optional ByVal
vendID As Long, _
Optional ByVal vWeb As String) As Boolean
Public
Function DelVendor(Optional ByVal cString As String, Optional ByVal
vendID As Long) As Boolean
Public
Function EditVendorDetail(Optional ByVal cString As String, Optional ByVal
vendID As Long, _
Optional ByVal vDetail As String) As Boolean
Public
Function DelVendorLogo(Optional ByVal cString As String, Optional ByVal
vendID As Long) As Boolean
Public
Function UploadVendorLogo(Optional ByVal cString As String, Optional ByVal
vendID As Long, _
Optional ByVal imgPath) As
Boolean