Disclaimer: The information provided here is for reference only. Use external powerpack at your own risk.
I bought my first digital cam, the Nikon Coolpix 880 and is happy with it. I did not purchase the optional(lucky those who had those in the package) rechargable battery and the charger at S$180. Too expensive for me and one charge will last only for 90mins.
I read about the MAHA batterypack at DPreview . But too expensive for me as I have to pay for shipping expenses to have them send to Singapore. Luckily there are many people who faced the same problem and had designed and handmade some battery packs. See the links below. I learned from them and set out to made my own batterypack.
The 880 accept a DC 8.2V input. However the MAHA batterypack rated at 7.2V worked with the 880. If AA batteries is used, I need 6 of them to get 7.2V and they may not last long with one charge.
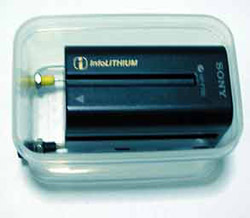
Then I recalled I had a Sony Digicam Infolithium battery (P/N NP-F730)rated at 7.2V 2700mAh. Sound perfect!

Infolithium battery (P/N NP-F730)rated at 7.2V 2700mAh. The terminals are marked at both ends of the battery and are female (holes).
The idea is to place this battery in a box which has 2 connectors that plug into the tve and -ve terminals of the battery. The DC plug power cable will be connected to these 2 connectors.
Having thought this out, I went around to look for the correct parts. I am in Singapore. The best place to buy electronic parts is at SIM LIM TOWER which is at Rochor road. it is right across SIM LIM TOWER, the place to get your computer and photgraphic accessories.
Here is what I bought:
- DC in cable - This come with a cable and a whole row of L-shaped plugs to suit the different DC in plugs. The one that fit the 800 is 2.1/5.5mm. (S$5.50)
- A pair of female connectors. I chose the low profile model in order to achieve a more compact design. (S$1.00 each)
- A pair of male connectors. Again, small size design are chosen.(S$0.70 each)
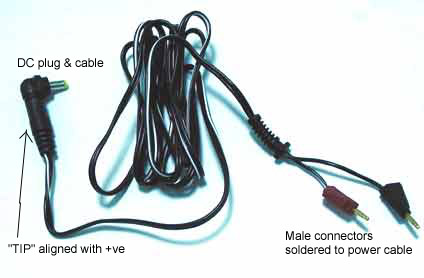
The picture above shown the connectors connected to the powercable. According to specs, the outer of the plug is negative while the tip is positive. Therefore make sure the word "TIP" found on the powercable is connected to the positive end of of the plug. Solder the red male connector to the cable with the white strip. Check with a multimeter to make sure.
I need a box. After running through a few supermarkets and shops, I managed to find one to fit my needs. Cost me S$1.99 for two. It is made of plastic, light and easy to burn to holes on the sides to fit in the female connectors. (see pictures below)

The legs of the 2 connectors touch the terminals of the battery. If you cannot find a box of the same size, you'll need to stuff some paper to push the battery up to touch the connectors.

Here is the complete setup:

This solution is clean and cheap, provided you already have an Infolithium battery, else you may have to fork out US$70-100 to get one and more money for a charger. Right now , I cannot tell you how long a charge will last. I hope to do some test and post the info here.
Update: After using the battery pack for a few times in the field, I found that the contacts between the power cable and the battery is not very good. This resulted in the camera losing power at times. I am now using paper to stuff the battery up in the box tight, leaving it no room to move around.
If you have any comments or suggestions kindly email me.
I learnt from these kind people who share their experiences: