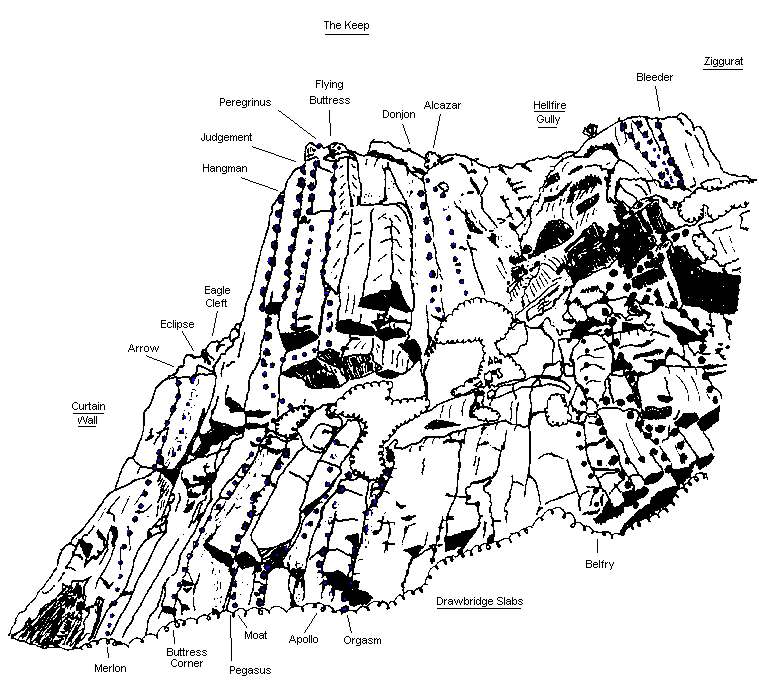
 Castle Rock
Summary

Solid rock, good climbs in most grades and easy access make Castle Rock Christchurch's most popular crag. You can find somewhere sheltered to climb on most days. Probably the crag with the longest tradition of climbing in canterbury, Castle Rock is handily located just above the heathcote valley. It offers a good mix of traditionally protected routes up to about grade 24, and even a few bolt protected harder routes (most notably 'the cave route').
How to get there
Access by car is along the summit road from either Mount Pleasant or Dyers Pass Roads. The car park is on a hairpin bend. Look for the metal stile. Don't leave your valuables in your car or they may be stolen!!! From the stile, a track leads down around the bottom of the cliff on the western side. The usual gearing-up/lunch spot is in The Cave at the bottom end of the crag.On foot, Castle Rock can be reached from the head of the Horotane Valley, or from the tunnel portal/Bridal Path area in the Heathcote Valley. The Lyttelton bus stops near the tunnel. Rumours of alpine faggots walking up from the Bridal Path wearing plastics and crampons are entirely true.
History
This is definitely the longest-used rockclimbing area in the Canterbury region. Many of the routes were aided, and the area was regarded as just a belaying training area. Unfortunately, there was little recorded history prior to Don Hutton's 1968 guide, though there is a mention of rock falls in 1967 (hence the name Cannonball Gully for the area left of the Cave). So all the names of existing climbs originated from the 1968 guidebook editors, and no first ascentionists are credited. One preserved early name, from 1940, is `Hamilton's Crack' for Hawk/Eagle Cleft. After the publishing of the first guide, there was little development. Then in 1971 Rob Rainsbury added *Gibbet 18. Allegedly he thought it was the normal finish to ***Gargoyle 16 and became committed. Also that year, Bill Denz led the very necky **Alhambra 18 with minimal pro. 1972 saw Colin Dodge complete **Court Jester 20, the first climb at this grade at Castle Rock. Rob Rainsbury added the excellent **Rawhide 18. Murray Judge (the Southern Raider) pulled off the plum of ***Judgement 20. In 1974 John Barnett did **Executioner 19.Little was added then until 1978. As some of his earliest efforts in NZ, John Allen added *Bill's Hat 21, **Marc Bolan Memorial Arete 19 and Corkscrew 19. 1979 saw an increase in activity and visitors such as Tobin Sorenson, who did the testing *Ex Cathedra 24 and soloed *Breakfast of Champions 21. John Allen came out with Passion Play 23. Rick McGregor produced the bold classic **Peregrinus 22 and Dave Fearnley added Sid Vicious Arete 21, one of his earliest new routes.
1980 saw John Allen become the Uncompromising Vulture 22, following John Howard's good efforts in placing all the protection. Allen and his team then turned their attention to the steeply overhanging Barbican Wall. *Tales of Machismo 24 and *Wall of Shame 23 resulted. The last route was aptly named as it represented the first `real' use of a bolt at Castle Rock. Allen paid `fifty cents a day' for a student labourer to drill the hole, which took 2 days with Mike Law's massive sandstone bit. 1981 saw Brian Fish do the other obvious lines on this wall, the pumpy **Poetry in Motion 25 and Jeni's Gang 24. Visitor Charlie Creese added Roof of the World 24, and Dave Fearnley did the last of the cracks on the Keep, *The SS 24.
Fearnley published a guide to Castle Rock in 1982, which contained some 130 routes for the Rock, which was nearly 100 more than the 1968 guide. Following that there was a definite slowing of pace. Perhaps Castle Rock has basically been mined-out!
Climbing Notes
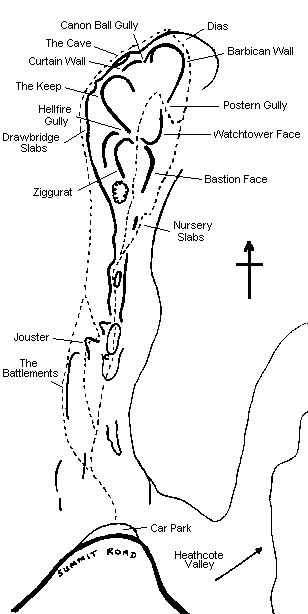
The routes are described from L to R, starting on the east (back) side the rock. The small bits of rock on the hillside below Castle Rock and facing the tunnel are also included here.The usual descent routes from the top of the main area of climbing are either of two gullies. The Eastern gully, on the backside (facing the tunnel), leads to the Barbican Wall area. Hellfire Gully leads to the top of Drawbridge Slabs. Descents from other areas are fairly straight forward.
The Dr Rock Buttress
A rather small and remote bit of rock overlooking the tunnel entrance. Identifiable by the words 'Dr Rock' chipped on its R side.
| Crick | 18 | 6m |  |
Climb the steep crack on the wall facing the road.
| Peaches | 20 | 7m | John Allen '80 | |
The arete L of Herb. Quite technical with the crux near the top. Devious pro - double ropes essential.
| Herb | 24 | 7m | John Allen '80 | |
A technical testpiece. The wall and prominent diagonal crack above the roof. A nasty move on the wall leads to underclings and then jams in a very flared crack. Desperate right to the top. CD for pro.
The following routes are nn the small buttress between Doctor Rock Buttress and The Blackboard.
| un-named | 21 | Joe Arts '98 | |
| un-named | 22 | Joe Arts '98 | |
| un-named | 22 | Joe Arts '98 | |
| un-named | 18 | Joe Arts '98 | |
one the wall above
| Chickenhead Soup | 17 | 8m | Phil Stuart-Jones '93 | |
Climb the wall and crack in the middle of the wall right of the main overhang. Pro in the RH crack and chickenhead (if you dare!).
The Blackboard
The righthand end of the lower line of cliffs. So named for the amount of chalk on the wall. Most of the routes are best described as microroutes, important for their technical difficulty more than for the magnificence of the lines.
| Who Killed Bambi? | 20 | 8m | Tim Morrison '81 | |
The huge technicoloured corner with a large overhang at the L of the wall. Climb the inverted yellow steps of the main overhang then out onto the top of the RH wall. Serious and sustained.
| Amazon Grace | 23 | 10m | Dave Fearnley '83 | |
Start as for W.K.B. then hand traverse the break to arete, place CDs and continue phlegmatically upwards.
| * Biggles Tears a Tendon | 24 | 5m | John Allen '80 | |
Superb. Use the highly technical secret move to climb the very fingery wall.
| Watch Closely Now | 18 | 4m | John Allen '78 | |
Jam the black crack (hard) or use the holds just R (quite hard) or both (not so hard).
| A Star is Born | 20 | 5m | John Allen '79 | |
Starts at finger lock. Get to the big hold, then scare yourself in the easy-looking groove.
| One Inch Rock | 25 | 5m | John Allen '79 | |
Start as for Pepperoni Breakfast but move L on sloping hand holds onto L wall. Do impossible mantle and finish moving L.
| Pepperoni Breakfast | 19 | 5m | John Allen '78 | |
The groove with the trick start. From large loose-looking block move R onto small ledge, then grasp holds near summit and go.
Nursery Slabs
The lower and smaller left slab has several routes up it, the larger right hand slab besides the remains of the pine tree has about 3 independent lines (all with no pro). A good are to take beginners top-roping, alternatively drag them around to drawbridge slabs.
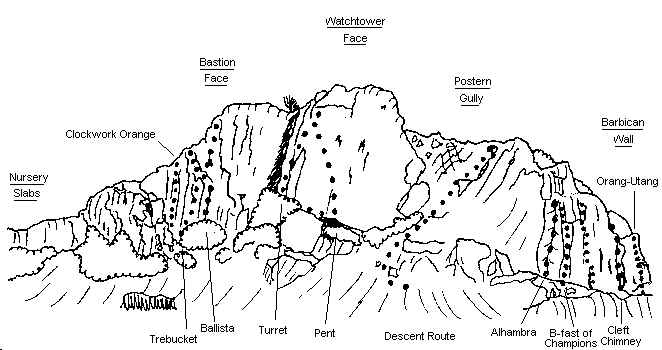
Bastion Face
This and the next large piece of rock, Watchtower Face, make up most of the `red side' (East) of Castle Rock. The climbing is characterized by balance climbing on adequate holds, with more seams than cracks, hence rather poor pro. Nursery slabs (20m L of Bastion Face) are two short slabs good for practising balance climbing. This side of Castle Rock tends to be sheltered from the southerly, but gets very little sun in winter and even in summer the climbs take a bit longer to dry. The other characteristic of this side is the profuse growth of red algae (which acts to decrease the coefficient of friction).
| * Clockwork Orange | 17 | 13m | Bryan Carter '73 | |
The orange slab on the left of the next significant wall. Battle left around the bush and then up, tending right at the top (crux). Pro in dirty crack near top left.
| Pass the Moloko | 21 | 13m | Phil Stuart-Jones '94 (tr) | |
The arête between CO and BtR. Not entirely independent. Some of the top holds may pull off. No pro at all.
| Born to Rot | 17 | 13m | Dave Fearnley '81 | |
The L-hand of the two grooves. Climb the groove and move R to finish. No pro at all.
| * Trebucket | 14 | 14m | |
The R-hand groove - has had enough traffic to remove the algae. Straight up the groove, with the crux near the top. Not one of the better protected 14s.
| Ballista | 9 | 13m | |
The easy groove 3m R of Trebucket.
| Thumbscrew | 15 | 11m | |
Start 5m R of Ballista. Pulls through small overhangs on good finger jugs and then wander up to top. Sparse pro.
| Grapeshot | 12 | 7m | |
Climbs a series of ledges just L of the gully full of dirt. Not a classic.
Watchtower Face
| Gauntlet | 15 | 14m | |
Takes a line just L of the outside edge of Watchtower Face. Not too bad but miserable pro.
| Turret | 12 | 14m | |
Climbs the groove just R of edge. Hardest at the start.
| Pent | 9 | 14m | |
Start near Turret. Move R on big holds then up. Some pro.
| Sea Breezes | 18 | 15m | John Allen | |
Climbs the obvious line up the centre of Watchtower Face. Starts by moving up on large sloping holds, then in R-slanting groove line with good incut holds. Rather serious - some of the holds in the second half could come off and the runners are extremely poor.
| The Zephyr | 19 | 15m | Dave Fearnley '87 | |
A deceptively steep climb up the face R of Sea Breezes, unprotected and loose.
| Gurgle | 12 | 12m | |
Mildly devious line up R edge of face. The climbing is almost as good as the name.
Barbican Wall
This wall begins with the groove lines on the eastern side, continues rightwards as a steep wall, past the chimneys and eventually ends above and L of the Cave. The main part of the wall `overhangs like a sausage' and consequently the climbs are rather hard. On this part of the wall many of the holds are loose and there is often a distinct lack of natural pro.
| Babylon | 15 | 12m | Phil Stuart-Jones '93 | |
A bit contrived. The groove and block left of Alhambra. Up the licheny groove without using the prominent rib on the left, then up onto the block at the top. Pro at the bottom consists of slings on vegetation...
| ** Alhambra | 18 | 11m | Bill Denz '71 | |
The blank V-groove at the L end of the wall. Climb easily up to base of groove, then delicate bridging to the top. Wires at the base of the groove may make it a safe lead if your belayer is on the ball.
| * Senile Decay | 19 | 11m | Joe Arts '80 | |
The arete R of Alhambra, climbed mostly on its L side. Crux near top. Place (dubious) wires in both Alhambra and Breakfast of Champions.
| * Breakfast of Champions | 21 | 13m | Tobin Sorenson '79 (solo) | |
The prominent corner. Climb mostly on R wall (no pro) to ledge (poor wires). From ledge move up groove (crux). Chickens can escape from the R end of the ledge. Serious.
| Dangerous Liasons | 23 | 13m | Dave Fearnley '87 | |
Climb the arete between Breakfast of Champions and Poetry in Motion (RPs for pro) to a resting place. Continue up the unprotected arete above. Very serious.
| ** Poetry in Motion | 25 | 13m | Brian Fish '81 | |
The L-hand line on the main overhanging part of the wall. Climb up to the bolt and make a series of lunges to reach what you thought was a good ledge. Climb overhanging corner above ledge. Harder than it looks. Sustained.
| * Tales of Machismo | 24 | 13m | John Allen '79 | |
The L-hand groove above the pedestal. Strenuous climbing on well-placed holds leads to crux at top. A serious proposition - below the crux the pro probably won't hold much of a fall, and some of the holds are loose. Extra pro (not enjoyed by the first ascentionist) by clipping the first bolt on J.G.
| *** Jeni's Gang | 24 | 13m | Brian Fish '81/Dave Fearnley '82 | |
Boulder up the right side of the pedestal, get yourself established then commit yourself to the wall, moving rightwards to the first bolt. Proceed up past the second bolt to the top. It's possible to get two good RPs in from the 'jug' above the 2nd bolt (though you won't quite hit the deck if you skip them), however there's no useful pro before the 1st bolt. Sustained, powerful, fingery and quite technical - a classic testpiece.
Brian Fish originally finished L in 1981, Dave Fearnley added the direct finish in 1982.
| Poultry In Motion | 24 | 13m | Phil De Joux '86 | |
Flap flap. A leftward traverse with independent moves.
| * Wall of Shame | 23 | 13m | John Allen '80 | |
The groove with two bolts in it, powerful moves low down with the crux between the two bolts. From the ledge at the top of the groove, move L to the thin crack (good nut pro) and climb this to the top (using both cracks also works, but is no easier and makes placing pro nearly impossible). Good moves, sustained.
| Whinging Mick | 19 | 13m | Dave Fearnley '79 | |
Swing L on jugs from base of Cleft Chimney. One hard move, then slightly dubious holds to ledge. Exit R from ledge. Only one runner very low down. Serious.
| Cleft Chimney | 10 | 6m | |
The L-R slanting slash. Easiest if you climb the R wall.
| Orang-utang | 15 | 6m | Murray Cullen | |
Layback the crack R of C.C. to the ledge. Exit L on jugs.
| Baboon | 15 | 6m | |
From bottom L of Portcullis Chimney, climb to ledge of Orang-utang then straight up corner.
| Portcullis Chimney | 14 | 6m | |
The R chimney. Climb it first facing one way then the other (or is it vice versa?). Quite technical unless you wear one large boot.
| Demilune | 12 | 6m | |
The first on the wall R of PC. R, up, then L using cracks.
| Fosse | 12 | 6m | |
Start R of Demilune in a small pod. Move up and finish just R of Demilune.
| Gobble | 12 | 6m | |
Pleasant with good pro. The crack 2m R of Fosse.
| War of Words | 17 | 6m | Steve Lassache '79 | |
The steep wall to L of Edited Line. Rather loose. Some pro.
| Edited Line | 15 | 6m | |
Black crack above small block. Better than it looks. Bridging with jams and holds. Good pro.
| Rack | 17 | 5m | |
The nasty-looking black forked crack R of E.L. Good pro.
| Aisle | 12 | |
The ledge sequence which traverses R below R and above P. Airy.
| Parapet | 10 | 5m | |
The easy blocks then tricky traverse R at base of Rack around into Cannonball Gully. Useful as a descent route.
Left Side of Cave
This area is a fairly steep slab with a vertical wall at its L end. The climbing is mostly in balance and fingery rather than strenuous.
| Gumby Snot | 18 | 7m | |
up the easy layback crack left of Corkscrew.
| * Corkscrew | 19 | 7m | |
From the ledge, move right and up the steep wall to a good layback hold, then straight up and over the top. Small wires all over the place. Sustained.
| *** Marc Bollan Memorial Arête | 19 | 13m | John Allen '78 | |
The rounded arete between Corkscrew and Escalade. Good wires in Escalade for the bottom half, and two marginal RPs just before the top crux - quite bold and sustained. Some people move onto the right-hand face at about half-height for a few moves - somewhat easier and allows better pro (by stepping right to the escalade pro crack).
| Escalade | 16 | 13m | |
Climb onto pedestal, then up the groove, moving R at the top. Good pro in the R crack. Sustained. Alternative direct finish (18) not so well protected during crux. True diehards can climb just the protection crack (19/20).
Escalade
| ** Rawhide | 18 | 13m | Rob Rainsbury '72 | |
The arete R of Escalade. Delicate balancy climbing on good holds. Pro only by leaning L to Escalade - not for the faint-hearted. Sustained.
| Rampart | 17 | 13m | |
The thin crack in the slab R of Rawhide. Quite delicate moves on hand holds in the crack. Subtle pro placements which run out.
| Sword in the Stone | 16 | 12m | |
The prominent crack through a small roof at the L of The Cave. Jam or use the secret hold past the overhang (crux), then move easily up the corner. The first part of Rampart can be combined with the second half of Sword to give a grade 15 route.
| Uncompromising Vulture | 22 | 12m | John Allen '80 | |
Climb the first part of Sword in the Stone then move R below overhang on small under-cling hold and up (crux) to climb the short corner. Adequate pro.
| Thick as a Vulture | 23 | 12m | Ton Snelder, Dave Fearnley '84 | |
Climb Uncompromising Vulture to the lip of the roof then hand traverse R to a large block. Scramble onto this and finish as for Thick as a Brick. A good route.
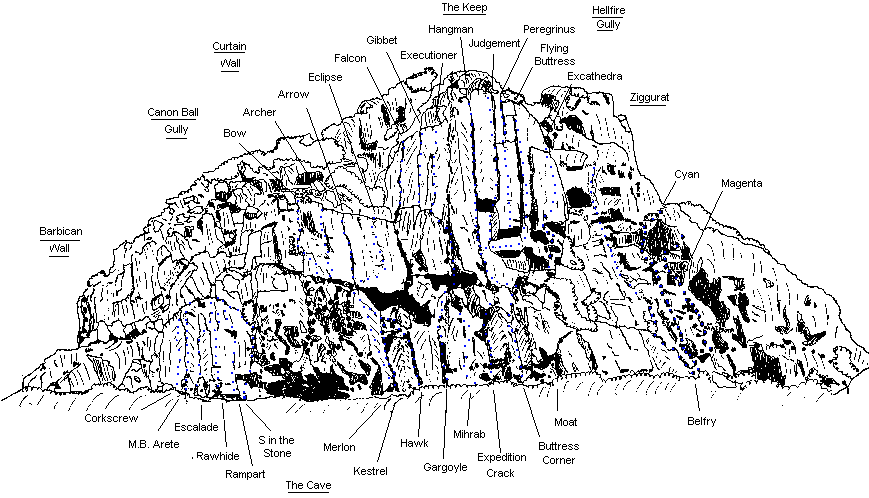
The Cave
The cultural hub of castle rock, the cave is the place most climbers seem to congregate to pass the time or escape the weather. There's also some damned hard routes starting out of here.
| *** Court Jester | 20 | 12m | Colin Dodge '72 | |
The prominent permachalked crack in the roof of The Cave. Swing up on big holds and solid wrist jams (crux) to an undercut hold and reach over lip to bucket. Above the lip either go straight up or diagonally R (both straightforward). Finishes at base of Curtain Wall. Strenuous but good pro.
| Thick as a Brick | 20 | 12m | Tim Morrison '81 | |
Start as for Court Jester through overhang then move L along ledge and up around corner.
| Cave Route | 26 | 12m | Ton Snelder, Dave Fearnley '84 | |
Move out R from the start of Court Jester via technical and powerful moves. Above the bolt more trick moves eventually lead back to Court Jester (bolt usually preclipped). No other pro 'til it's all over.
| Pack of Lies | 23 | 12m | Dave Fearnley '83 | |
Stack someone else's pack under the holds in the centre of The Cave. A few pulls lead to easier climbing. Essentially unprotected.
| ** Passion Play | 23 | 12m | John Allen '79 | |
Starts on R side of Cave at prominent crack. Moves L to a rest then out to a good under-cling (large CD). Crank on small holds over lip to fingerlock and jugs. Move L and finish as for Court Jester or move straight up through buttress to the bottom of Arrow. Strenuous.
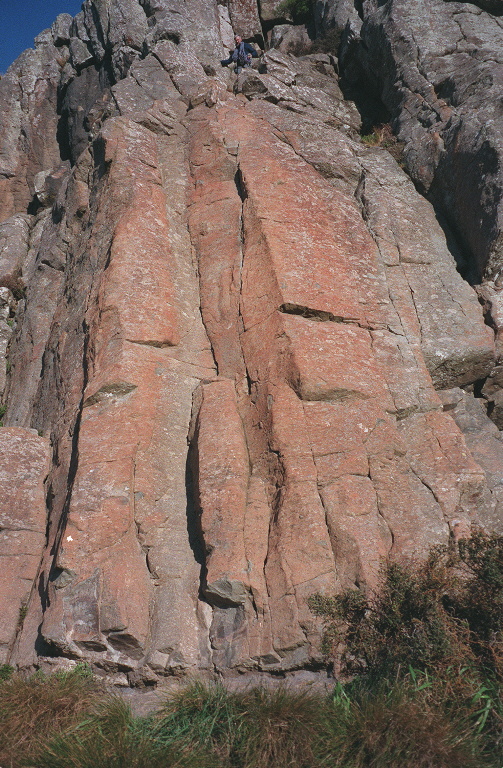
Curtain Wall
The second tier above the Cave. Quite steep and airy. The ledge above Arrow is exactly 20m above the ground so a 45m/50m rope can be used double. Most of these routes are usually run together with one of the lower routes to get to a decent belay.
| * Bow | 15 | 8m | |
The large, broken crack line on the L side of the Curtain Wall. Climb up on large but suspect holds to a wide crack (that used to be full of stones). You can avoid the widest part (at the top) by using a jug on the L. Adequate pro. Better than it looks. Good pro. Run this together with Sword in the Stone for an excellent 20m 15 (double ropes essential).
| Archer | 17 | 9m | Lindsay Main '79 | |
The small crack with an overlap. Face climbing leads to overlap then jugs lead to top. Mildly strenuous. Pro not great initially but improves.
| ** Arrow | 13 | 8m | |
The prominent wide crack on the right, usually reached by a stimulating traverse from the top of Kestrel or Hawk. Plenty of holds and a useful crack. Good pro. Sustained.
| Full Moon | 17 | 8m | |
Climb the wall up the thin crack between Arrow and Eclipse. Pro by moving left to Arrow.
| * Eclipse | 16 | 10m | Phil Stuart-Jones '77 | |
Traverse right from arrow along the lip of the roof, then straight up the vague crack in the middle of the face using good face holds. Adequate pro (small wires, hexes and cams). Sustained. There's a direct start thru the widest part of the roof from the aviary (about 24), added by Matt Vandenberg in '99.
| Eagle Cleft | 10 | 12m | Neil Hamilton '40s | |
The wide crack/chimney marking the end of the Curtain Wall. Great if you're a caver. Amusing pro but watch for nesting pigeons.
Right Side of Cave
Many of these climbs have become slippery due to years of people climbing on them.
| Merlon | 16 | 12m | |
Gain the Kestrel groove via reachy moves on the steep wall at the right hand end of the cave, then go straight up the slab left of Kestrel to the ledge at the bottom of Arrow. Pro in Kestrel.
| * Kestrel | 12 | 10m | |
The left-leaning crackline/groove on the right hand edge of the main cave. The crux is to join the iceplant in the groove by climbing the slippery black crack, or do a few moves up Hawk and a looong step left. The route ends on the Aviary ledges. Worthwhile pro is only available above the crux or in Hawk.
Combined with arrow this makes a classic first lead. Hardest at the bottom, though many beginners find the traverse left (to Arrow) freaky.
| Flight of Fancy | 17 | 10m | Lindsay Main '79 | |
Another 'fill-in', this time up the arete between Kestrel and Hawk. use any of at least three variations to reach the harder moves at the top. Pro in Kestrel, so a fall will hurt...
| * Hawk | 12 | 10m | Neil Hamilton '40s | |
The second groove/crack right of the cave. Slippery and unpleasant with some spaced pro. Inevitable guano from the pigeons in Eagle Cleft. Finish on the Aviary ledges.
| Tammy Wynette Arête | 22 | 10m | Ton Snelder '92 | |
The arete between Hawk and Gargoyle, keeping largely to the right hand side. Not surprisingly, it's not entirely independent. Pro in Gargoyle.
| *** Gargoyle | 16 | 22m | |
The third groove right of the cave and one of the more variable routes here, with a groove/crack, wall, overhang, and crack. At the top of the groove, trend rightward to the main overhang (a rest can be taken on the ledges to the left). Place some good pro at the overhang then layback or bridge your way over. Head up easier ground to the belay at the left-curving ledge with the rusty ring piton. Good pro but watch for loose stuff on the traverse R. Sustained with 2-3 cruxes.
| Between A Rock And A Hard Face | 18 | 12m | Paul Jackson | |
The thin face and arête between Gargoyle and Mihrab. Hardest part is getting off the deck. Pro in Mihrab. Left out of 'Canterbury Rock' as "too contrived", but no more so than Repeat Defeat or many other routes.
| Mihrab | 17 | 12m | |
Fight the increasing polish up the thin wall (22ish) to the ledge at 4 metres or step right from the remains of Gargoyle's pedastal. Use the thin crack and wall to its left to rise, and exit via the Expedition Crack cave, or continue up the groove between featured blocks to the main roof system before stepping right to the ledge below The Keep (or carry on up Gargoyle). For pro, thread the pegs with a wire, tape, or cord and/or use small wires/RPs and microcams in the crack.
| * Repeat Defeat | 21 | 8m | Joe Arts '81 | |
Up face and small arête between mihrab and expedition crack. A bit contrived but excellent bouldery climbing. Good pro in expedition crack (#0 cam useful). Sustained.
| * Expedition Crack | 17 | 12m | Murray Jones '71 | |
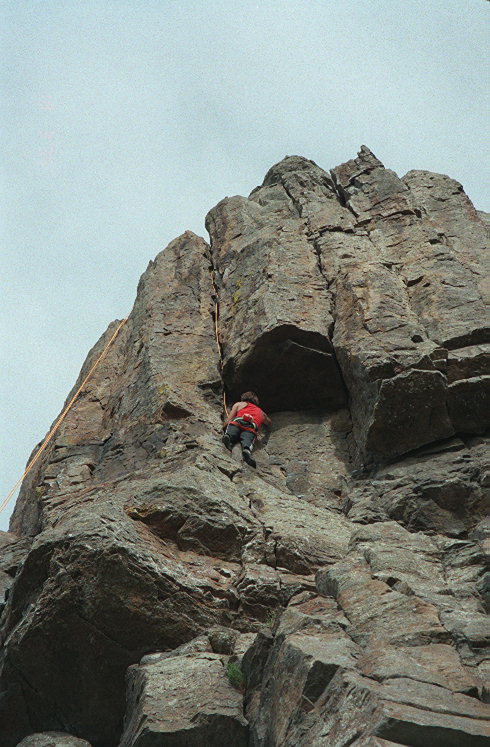
The very polished and slippery left-leaning overlap at the right hand end of the 'Mihrab Slab'. The crux bulge at one-third height can be laybacked, bridged, or thugged, then layback the crack to the cave with bollard and pigeons(!). Exit by climbing the right side of the cave to top out onto the ledge below the Keep. Alternatively, rap off the cave bollard. Pro adequate. Strenuous for the technique-impaired.

Bruce Wilson looking very much in control on 'expedition crack' (17). Unfortunately he fell off about 30 seconds later.
| Sid Vicious Arête | 21 | 11m | Dave Fearnley '79 | |
Up the bulging arête, then up (crux) off thin holds for good jugs at edge of pock and up the easier angled arête above. No pro 'til you're past the hard bit - pro above that by leaning into Buttress Corner. Thin and sustained.
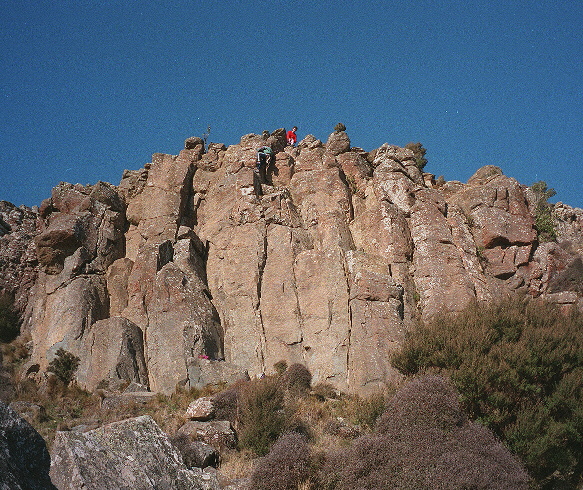
| ** Buttress Corner | 17 | 11m | |
Gaining the groove has been made much more difficult due to excavation, hold removal, and polish. Scant pro (poor RPs) protects the committing moves up slippery holds to reach the groove and a rest above the bulge. A spotter (or two!) is recommended. Pro and holds improve markedly above the bulge. Go straight up the groove or chicken out right at the flake.

Pete Moore heading up Butress Corner
| * Dead Rock Star Arête | 22 | 11m | John Allen '80 | |
The strenuous and technical boulder problem up the arete at the right hand end of the main front wall. Ape your way through a series of bulges making occasional use of fragile and decomposing holds to easier ground. Committing. No pro. Exit up the easier ground on the arete or via one of the neighbouring routes.
| Inquisition | 17 | 11m | |
Layback and smear up slab and arête to roof, then move left and up the arête and slab to top. No pro before roof, good above that. Alternatively start a few feet further right (14 and good pro).
| Pegasus | 16 | 10m | |
Up the easy crack to a small roof (crux) then up the easy wide cleft. Good pro.
| Moat | 9 | 10m | |
Start as for Pegasus but move R and up the obvious easy line.
| Apollo | 19 | 9m | Murray Judge '78 | |
The L exit from the small roof at the L side of the slabs. Technical jamming. Two left arms are an advantage.
| Petrel | 19 | 9m | Bill Atkinson | |
Goes over roof on quite reasonable holds, but contrived climbing. Stay on the same line above roof. No pro 'til it's far to late.
| Orgasm | 16 | 8m | |
The R exit (crux) from the small roof leads to a wide crack. Takes a bit of getting there and it's over too soon.
The Keep
The Keep is the large steep buttress that dominates Castle Rock. Some exhilarating all-time classics are on this piece of rock. Most climbs are overhanging with positive but often somewhat suspect holds. Fast climbing and not over-protecting the climbs can save your arms from a good pumping.
The ledge at the top of Judgement is exactly 30m above the ground, so if you're going to abseil off you need a 60m rope!

Looking up at the keep, 'gragoyle' on the left, 'hamgman','judegement' and 'flying buttress' on the right.
The following three climbs start from the narrow ledges above and R of Eagle Cleft.
| ** Falcon Crack | 15 | 14m | |
Popular. The prominent crack above Eagle Cleft. Steep sustained climbing with plenty of large holds. An optional extra is the boulder finish at the top.
| * Gibbet | 18 | 8m | Rob Rainsbury '71 | |
The groove line R of Falcon Crack. A thoughtful start leads to jugs. Sustained. Some pro. The first ascent was by mistake - it was assumed to be the finish to Gargoyle. The route can be extended by starting down in the Aviary and working your way up the crack in the right wall of Eagle Cleft until it joins the rest of Gibbet. Worthwhile.
| *** Executioner | 17 | 11m | John Barnett '74 | |
From the belay ledge on Gargoyle climb R onto the pedestal then up the thin crack R of Gibbet, mostly on good holds and occasional locks. There's one difficult bit in the middle and some wobbly holds at the top. Excellent pro but it takes strength to put lots in (espec at the top) - short but quite sustained.
The next climbs begin on the wide ledges with trees above Buttress Corner.
| **** Hangman | 17 | 18m | |
They don't come any more classic than this. The wide crack L of the main overhang. From the left of the belay ledge follow the crack to the top on good holds and optional jams and bridging. Sustained and good pro. The wall to the left provides challenging face climbing.
Hangman
| *** Judgement | 19 | 17m | Murray Judge '73 | |
...according to the law of gravity. Go hard on the offensive or your defenses will be exposed for the shallow fabrications they really are. The crack 2m R of Hangman. Crux moving out from under the roof. Exit either straight up or R up Peregrinus. Solid and sustained.
| ** Peregrinus | 22 | 17m | Rick McGregor '79 | |
Start as for Flying Buttress but climb the roof half-way across the undercling. The crux is just over the lip, where a semi-layback move leads to good holds. Continue up on the same line. Quite sustained. A small CD is useful on the overhang, and small wires for the crack.
| *** Flying Buttress | 16 | 17m | |
A superlative route. Climb the slab (no pro), shove something big up under the roof (#4 cam, #11 hex), then take a deep breath and ccc-commit yourself to the R-wards undercling (crux). Once over in the crack, relax, then bridge and jam to the top. Sustained, but has several rests and good pro.
| Flying Bastard | 23 | 17m | Dave Fearnley '82 | |
From the belay ledge, climb directly up through the roof to rejoin F.B. (protected by first climbing Ex Cathedra to the first runner).
| * Ex Cathedra | 24 | 17m | Tobin Sorenson '79 | |
Start beneath the layered overhangs R of Flying Buttress. Move L to a flake and CD placement. Move up on small holds to a jug and rest. Easier moves up and R to arete which is followed to top.
| Ex Cathedra Direct | 25 | 17m | John Allen '80 | |
Start as for Ex Cathedra, but above the roof take the formidable thin crack. Almost desperate (not the easiest 25 around). Using the L arete makes it easier. Excellent wires.
| * The S.S. | 24 | 14m | Dave Fearnley '81 | |
The S-shaped crack R of Ex Cathedra. Technical. Move up the groove to a bolt, then up the thin crack. Dyno L to jugs and up.
Hellfire Gully
At the bottom of this gully are the Drawbridge Slabs. These have no named climbs, but provide a lot of good balance climbing and some hard eliminates.On the L wall of the Gully are...
| Donjon Direct Start | 17 | 12m | |
Start 2m L of Donjon. Straight up to join the top of Donjon. Some pro.
| Donjon | 15 | 11m | |
Start at the base of the small groove. Awkward first move. Then move L and up on jugs. Quite serious and exposed.
| The Age of Chivalry | 17 | 11m | Lindsay Main '77 | |
Climbs straight up the groove that Donjon escapes from. Sparse pro, delicate moves, quite lichenous.
| ** Alcazar | 13 | 9m | |
Nice climbing on smallish holds. On the L side of the wall R of Donjon. Pro a bit sparse - not your safest first lead.
| Rambling Man | 12 | 7m | |
The R side of this wall. Exit over blocks to the top of Hellfire Gully.
| * Hellfire Gully | 6 | 30m | |
a trully alpine experience. Cavers can finish by grovelling under the block at the top. The main features of this route are: (1) It's a great classic ascended in 1913 by Edgar Williams. (2) It's a usual descent route from the Keep.
On the R side of the Gully are...
| Peter Tor-toise | 21 | 8m | Ton Snelder '84 | |
Climb the crack where the first protection for Bill's Hat goes. Thin.
| * Bill's Hat | 21 | 8m | John Allen '78 | |
High up in Hellfire Gully, on the right hand side of the bulging wall on the right hand side of the gully. Place what pro you can in the crack above the blocks (wires, very small cam). Sloping holds lead one out right to more of the same, followed by a strenuous reach up into a layback position then easier ground. Adequate pro, improves with height.
| Belfry | 7 | 16m | |
Climb the easy route up the wide cracks on the R side of the slab, then wander up on a similar line and move R below Bill's Hat. The bottom crack is the easy descent route.The next two 'colourful' routes plough through the lichen on the small roof below the traverse on the Belfry.
| Cyan | 16 | 20m | |
Start up the groove at the right hand side of the Drawbridge slabs. Meander up a crack (with tussock), wall and ledges to an airy position among loose blocks below the top roof/corner. Try to place something you can trust, and go through at the corner (crux). Finish up small slab to belay from the block a bit higher, right of Bills Hat. A bit alpine - good pro except at the crux...
| Magenta | 16 | 20m | John Stanton '71 | |
Start more or less as for Cyan, but at some point trend right and finally traverse the small slabs below the big red 'nose' of rock at the top. Finish right of this to the Cyan belay or for an exhilarating alternative follow the thin crack which splits the top block. A bit loose in places. Pro generally good.
| Yellow | 18 | 20m | |
An alternative first half to Magenta. Start in the same groove as the previous two routes, but climb the nose of rock at about 6m and to the right, either to its left or swing right below it then up. Pro in the left hand crack just above the nose. Head up the 'slab' to the loose blocks (pro) then over these and left to join Magenta just before it heads right below the top block. Not much pro at the bottom, but an enjoyable variation. A bit loose in places.
The next two routes climb the large roofs above and R of the slabs.
| Savage Slipstream | 20 | 14m | Rick McGregor '77 | |
The wide crack near the L edge of the roofs. Climb easily up blocks, then R across slab to the crack. Good holds and jams. Crux is getting your body over the lip. Brute strength may not be enough.
| * Squeezing Out Sparks | 20 | 14m | Dave Fearnley '80 | |
The twin cracks R of Savage Slipstream. Easily into a cave then up the wall to the roof. Good holds lead to the crux at the lip. Good pro.
| Zigzag | 14 | 14m | |
Tucked in a corner at the edge of the overhangs. Start as for Squeezing out Sparks, but exit via the forked crack (16) or zigzag up the easier line right of this, stepping around the roof. Going too far right will take you onto steeper ground with increasingly loose holds. There are also three ways of starting the bottom. By increasing difficulty; up the SOS line, the crack one metre right of this, and the groove/chimney two metres right, above the undercut. The latter of these is strenuous and has scant pro.
The Ziggurat
The small buttress above and R of Hellfire Gully. Descent can be made by dropping over the ridge to the East or traversing left to reach Hellfire Gully.
| Lightning Conductor | 19 | 4m | Phil Stuart-Jones '97 (solo) | |
The short wall left of Steeple. Follow the crack system heading right to left up the wall. Poor pro.
| Steeple | 17 | 6m | |
The L-hand of the two leaning grooves. Adequate small holds but no pro. Use a nut high up in Bleeder to avoid a serious plummet.
| Truant | 15 | 7m | C Griffiths '71 | |
The R-hand groove. Adequate holds and some pro at the top.
| * Bleeder | 15 | 6m | C Griffiths '71 | |
The prominent crack. Good jams and useful holds. Excellent pro. Sustained.
The Pallisades
Several of the routes here are commendable, especially if you wish to lead routes in the low teens on reasonable gear, but infrequent traffic means they tend to be a bit lichenous. The main features (L-R) are the bulging wall, Thrutch chimney, the half-height ledge left of Trapdoor, the Dicey block, the Exhibition Crack buttress, Treadmill groove, the Laraby overhang, and the fan-shaped buttress.
Martello Cliff
| Martello | 14 | 14m | |
`A circular masonary fort'. Obvious crack in the centre of the wall. Start left and move up and right to the crack and the first pro, then through the roof (crux) and up the crack. Finish up stepped lichenous ramps and anchor to a tree further back and left.
| Easy Peel | 10 | |
A 70s route. Start higher and a few metres right up a corner to a small roof, which is side-stepped on the left. Finish directly (harder) or slightly left. Minimal pro.
| Aeolian Fury | 21 | Lindsay Main '98 | |
Easy climbing to the slanting ledge (CD pro), move right a metre to the crack and up. Strenuous and technical. CD anchors.
| Citadel | 20 | Lindsay Main '98 | |
Start below the small cave and move up to the ledge, but then bridge straight up a crack to the headwall diamond with an angled roof. Up the wall and over the roof, slightly left to the top. Good pro though perhaps a bit subtle.
| Thrutch | 12 | 7m | Murray Cullen '72 | |
To the right of a small tube-shaped cave and around to the right on a ledge, then up the chimney.
Trapdoor Cliff
This is the section of cliff to the right of the Thrutch chimney.
| Wasp | 19 | 5m | John Allen '79 | |
Obvious crack a metre right of the Thrutch chimney. There is a direct start on the wall below, though most people start as for Thrutch and bash through the vege. Then climb the overhanging crack.
| Pedestal | 16 | Lindsay Main '97 | |
Start up a steep groove below a broadleaf, or two metres right, to the large sloping ledge. Then up a thin crack to a horizontal break; some pro possible.
| Trapdoor | 12 | |
Six metres right of Wasp, up a clean corner that divides the cliff and over the broom; then right at the top on a slab to skirt the overhang with an exposed move to finish. Some pro.
| Pepper-pot | 17 | Joe Arts '98 | |
Start as for Trapdoor and climb the corner with protection from the crack on the right. Place pro in slots over the bulge and move right; then step left on to the slab.
| * Treadmill | 12 | Lindsay Main '72 | |
Two metres right of Trapdoor, up an inclined corner tending slightly right to exit up a wide crack at the top.
| Blackbeard | 16 | Lindsay Main '97 | |
Start a metre right at a small broken corner. Up to a small ledge below an overlap, and pull through on good small holds. Rather dirty but good pro.
| Fusilier | 13 | Lindsay Main '79 | |
Takes a crack up the right side of the cliff over some large flakes. Good pro.
| Dicey | 19 | Phil Stuart-Jones '97 | |
There is a displaced Castle Hill-style boulder problem on the left of the large bulging cube. Start on small holds followed by an awkward mantle at the lip of the roof. From the ledge move right and up. No pro, don't land on the rocks.
| Mercenary | 12 | Phil Stuart-Jones '97 | |
Between this cliff and Exhibition Wall is this wide undercut chimney with several broom bushes. Steep bridging through the roof, then it's easy.
The next three routes are on a small reddish cliff, undercut at the base.
Exhibition Cliff
| Exhibition Crack | 22 | 9m | Brian Fish '81 | |
The flared crack line on the steep wall, overhang start, no protection.
| Anachronim | 16 | Lindsay Main '97 | |
Start about three metres right of Exhibition Crack and place protection in the crack. Traverse left under a small roof and around on to the wall and up. There's protection against a small horizontal knob for the finish.
| Millstone | 15 | 9m | Hugh Logan '80 | |
Start as for Anachronism or about a metre right. Up into the shallow chimney. Move left and finish up the face. Good pro.
| Stockade | 7 | 9m | |
Called Treadmill in Canterbury Rock. The gully on the right with an undercut start. When descending this climb face outward till about halfway down before turning around and facing in.
Laraby Cliff
This is very short cliff with a large square roof about two metres up.
| Nutmeg | 18 | 6m | Marty Beare '79 | |
Steep arete on the left with mostly good holds.
| Laraby | 21 | 10m 2p | John Allen '79 | |
Left-ward undercling traverse along the main roof line and up. There's a second "pitch" above the ledge, climbing the right side of the arete.
| Head Cleaner | 24 | 6m | Brian Fish '81 | |
Roof crack between Laraby and Yogi's Dream. Vicious.
| Yogi's Dream | 20 | 7m | Phil Stuart-Jones '80 | |
Either bridge up from the back of the cave and thrutch onto a blocky ledge, or grunt onto the ledge starting from the right. From the ledge bridge to the top. Good pro.
| Fastness | 16 | Charles Sparrow, 1970. | |
The smooth wall to the right of the overhangs, with a large ledge in the middle where Yogi's Dream finishes. Start slightly right of centre and climb on big holds, with no pro. From the ledge move right to the corner to place pro, climb the wall beside the corner for a few moves, and then move leftward across the wall to finish on the left (wires near the top).
| Wet Dream | 14 | 8m | |
The chimney and corner right of the overhangs. Purists can climb the chimney by easy bridging to the ledge five metres up, or otherwise climb over the large blocks. Then steeply through the undercut bit (crux) into the corner and bridge to the top.
The Fan Cliff
The name describes it well - a fan-shaped set of columns, a little higher up than the other cliffs.
| ** Lifestyle Asset | 19 | 8m | Joe Arts '97 | |
Sharp stepped arete on the left of the wall, with CDs at the start and two bolts. Excellent climbing with spaced holds, mainly on the right wall.
| Private Popokov | 17 | 8m | John Allen '77 | |
The broken corner up the centre of the Fan. Fairly serious with the best pro above the crux.
| Marshall Zhukov | 20 | 8m | Joe Arts '98 | |
Clip a bolt and mantle onto a block three metres right of Private Popokov, then step right and on to ledge past another bolt and up. Very balancy.
| Sabre | 16 | |
Very short crack just right of Marshal Zhukov.
The gully to the right can be used as a descent route though it is a little committing at the top. The next two routes are on the small cliff to the right of the vegetated gully and slightly lower. The best descent is the gully to the right and down through the kanuka (look out for polished rock along the summit ridge).
| The Sentinel | 10 | |
This climb takes a direct line on the blocky arete. Easy start among bushes, followed by a steeper bit to break through on to the final arete.
| Fusillade | 13 | |
Short but steep crack about four metres right. From the crack tend slightly left, or climb the crack directly for a harder variation.
Jouster Cliff
| * The Pinnacle | 8 | |
The arete on the left of the Jouster Cliff - an old route which was popular in the early 70s. Start in the north-facing corner and move on to the right arete. Steep and exposed for the grade but protection is good.
| Jouster | 12 | 8m | |
This route dates back to the 60s. Start near the arete (the original start would have been further right before the kanuka got big) and move slightly rightward on good holds. Pro is miserable but there are some possibilities near the top.
 The Battlements
This is the steep buttress that is usually the first bit of rock encountered
after leaving the car park. All the climbs are steep but usually well-protected.

| Galahad | 12 | 12m | |
A short groove full of munge at the extreme L end of the Battlements.
| Camelot | 20 | 12m | Lindsay Main '98 | |
the little wall between Galahad and Black Knight. One bolt and other pro.
| Black Knight | 17 | 12m | Colin Dodge '74 | |
The crack L of the overhang. Good holds at side of crack. Quite strenuous. Some pro from small wires.
| Roof of the World | 24 | 12m | Charlie Crees '81 | |
With a long sling, proceed up the wall to the bolt. Clip it and proceed over the blank overhang on good holds.
| Knight Errant | 15 | 12m | |
The crack just R of the overhang. Start as for Square Table. Awkward.
| Square Table | 14 | 12m | |
Mantle onto the ledge, then up the corner. Crux near top.
| Holy Grail | 16 | 12m | Don Hutton | |
Up the R-facing corner to the ledge. Bridge the steep groove above (crux). Reasonable pro. You can escape L to Square Table from the ledge.
| Dick Barton's Mate | 21 | 12m | Tim Morrison '82 | |
From the start of Holy Grail, climb the crack on the wall L of Excalibur. Step R near top, or go straight over if you're brave. Sustained.
| * Excalibur | 19 | 12m | Don Hutton '67 | |
The thin crack R of Holy Grail. Mainly face climbing on small holds. Sustained and quite strenuous with adequate pro.
| * Stonewalled | 22 | 12m | Paul Jackson '98 (solo) | |
straight up the face between the Excalibur and Guinevere avoiding the cracks on either side. Originally soloed, but it is possible to place some pro in Guinevere. Somewhat contrived, but sustained hard moves make a worthwhile route.
| * Guinevere | 18 | 12m | Don Hutton '67 | |
Good climbing with good pro up the steep crack to a ledge. Then easily to the top.
| * Broken English | 21 | 6m | Bill Atkinson | |
The wall R of Guinivere. Well-spaced face holds lead to one technical move and an extended reach to the ledge. Completely independent and excellent moves. Pro only in Guinevere. Sustained.
| Dragon | 16 | 11m | |
A short steep crack, climbed using good holds at the R of the crack. Pro not brilliant.
| Meat Sandwich | 16 | 6m | Bill Atkinson | |
The wall R of Dragon. Surprisingly good holds. No pro.
| * Knight's Entrance | 12 | 12m | |
Bridge the twin cracks, then move R into the chimney behind the pillar. Adequate pro.
| Window Cleaner's Entrance | 16 | 12m | John Howard | |
The wall R of Knight's Entrance. Start at thin crack, move up then R. up a line of jugs until nearly in Lancelot. Move left and go for top. Pro only if step onto Lancelot. Optional direct finish is about 18.
| * Lancelot | 14 | 10m | |
Steep crack with ample holds. Pro is much better since the crack was cleaned out.
| un-named | 15 | 10m | |
The slabby wall R of Lancelot.
| Little Red Rooster | 21 | 10m | Dave Fearnley '81 | |
The short but strenuous wall just R of Lancelot. Bolt for pro.
On the small buttress under the track near the car park is:
| Social Ostrich | 20 | Richard Thomson | |
Directly below Gargoyle Wall is a smallish cliff of reasonable quality with three routes on the right side, on the high narrow wall facing west.
You can get there either by traversing left from the bottom from Social Ostrich, dropping down the gully beneath the battlements, or from the cave drop directly down and traverse leftwards.
| Speights Invader | 16 | 20m | Calum Hudson '97 | |
Start at the toe of the buttress and climb up to the apex of the sentry box. Break out right, then tend left and follow the obvious weakness through small roofs. Crux at the top through the left hand notch.
| Night Of The Iron Sausage | 18 | 20m | Calum Hudson '98 | |
This route is in the centre of the wall. Four bolts, and natural pro between the first two. The crux is at the overhang finish.
| Mac Attack | 18 | 20m | Calum Hudson '97 | |
Right-most line of weakness, trending right through the final crux groove on the right side of the high point of the buttress.
Obscurities
Okay, so you've ticked all the routes at Castle Rock, here's some bizzare antics to keep you amused on those winter afternoons when you can't climb anywhere else :
Keep Girdle Traverse
there's a good traverse all the way from the top of Escalade right to the ledge beneath
Hangman.
Merlon/Peregrinus start up Merlon, then follow a direct line for the off-width at the top of Peregrinus. Good runners all the way, and only about grade 17 all the way. Crux is probably moving from the pedestal at the base of Executioner across to Hangman.
Bouldering
some good bouldering (some tall and steep enough to warrant a belay) is available down by the old toilet, beneath the Barbican Wall 'apron'. Also some very easy bouldering (ideal for beginners) on the slabs left of Corkscrew. Various eliminates and solos exist on the slabs between Orgasm and Belfry, the hardest being the leftmost groove and the right most groove. Don't forget the boulder (direct) start to Mihrab, a true classic, and if you've got fingers of steel you can try the really hard super-direct start on the left wall. Then there's the infamous ground level traverse from Inquisition to the Cave.