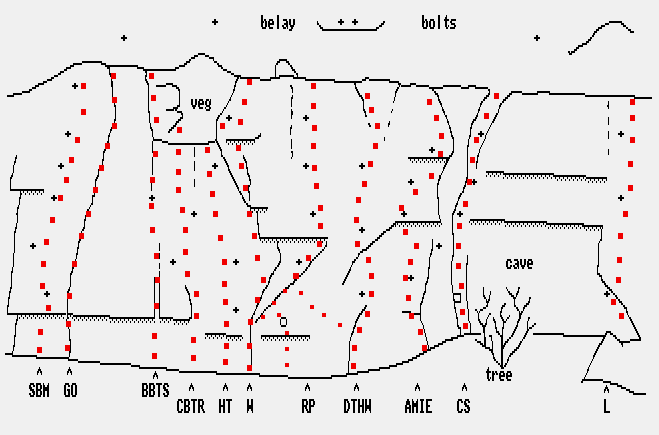
 Evan's Pass
© Phil Stuart-Jones and Joe Arts 1996, unauthorised commercial use prohibitted.
Located above the Lyttelton dump (NZMS 260 M36 900349), this cliff was largely ignored apart from one route by Lindsay Main in the late 1980's. A surge of development in 1995-6 has resulted in over twenty routes including several excellent lines, and scope for several more.
Being south facing, it gets virtually no direct sunlight, making it an ideal place to hide on hot nor-west days. It is also surprisingly well sheltered from the north-easterly, but is exposed to the southerly. The orientation makes it somewhat lichenous but it is surprisingly clean and dry.
Grazing animals (particularly rabbits) have stripped most of the native vegetation in the area except what they can't reach. The result is an area with little other than grass and broom but with a good collection of native plants on the cliff itself including ferns, shrubs, and extensive clumps of orchids. Care has been taken to avoid damaging these plants and if you are cleaning new routes, please respect this approach. There are also numerous skinks and geckos around the top of the cliff - please consider their habitat requirements when moving rocks.
Routes are up to 22m in length, on steep rock of a type similar to that at Lyttelton Rock and tend to be sustained and strenuous. With a few exceptions, the routes are partly or totally bolt protected, ie. some routes require other gear as well, but watch out for crumbly rock. Be warned that some holds which look totally integrated have proved to be surprisingly mobile...
Due to the scarcity of convenient bollards, there are bolt anchors on top of some routes, but most of these are set back from the edge somewhat. All routes can be top-roped from the bottom using a 50m rope if you've got a long (10+m) sling to get over the cliff edge; belaying from the top being the alternative. Watch out for loose rocks while handling ropes or moving around on top.
To get there, turn towards Godley Head at Evan's Pass and park just by the first cattle stop. Cross the fence somewhere above the road and follow one of the tracks on the Sumner side of the ridge (there is a bench track of unknown origin) for about 200m. The cliff line becomes obvious just to the right of the plateau on the ridge. Cross the fence on the right and traverse around the base of the cliff, or follow the fenceline to get to the top.
This crag still has a lot of loose rock - climb accordingly. As the dump below the crag is still in use, it's best if you confine your climbing to times when the dump is closed (evenings, sunday, saturday afternoons), as any rock fall has a tendency to keep going down the hill.
Descriptions are from left to right.
The road (left hand) end is generally less steep, with more vegetation, looser rock and fewer clear lines. The centre of the crag has the best rock and most obvious lines. A bit right of the cave the rock is a bit rotten, but then improves again. Many of the routes need further ascents to confirm the grades.
descriptions are from left to right

At the left-most end is a short wall.
| Pling! | 19 | 4m | Phil Stuart-Jones '96 |  |
An interesting problem up the crack in the middle of the wall. Pro only when its too late (soloed).
| Huh? | 15 | 5m | Phil Stuart-Jones '96 | |
The questionably shaped, partly offwidth crack to the right side. Pro adequate (soloed)?
The buttress above has at least two routes (soloed) in the low teens but the rock is a bit loose in places and is largely uncleaned. Pro is sparse. Just right of the first small wall is an area of circular features, then smooth orange rock, then a pinkish wall with a single circular mark.
| Destamination | 21 | 22m | Phil Stuart-Jones '96 | |
Boulder up the wall (crux) to the first bolt, then easier ground. Go up the overhang to jugs then a ledge with a shrub. Step left of this and tackle the right-leaning overhanging arête above. Four bolts and other pro (if desired).
Right of the vegetated and decaying grooves is the first of a sequence of walls with obvious low overlaps which continues around to the main area.
| Culturallly Hazardous Endeavours | 22 | 20m | Joe Arts '96 | |
At the left hand end of the first 'overlap wall'. Through the overlap then small roof to ledge. Two more bulges await above, each with a bolt (the upper one being shared with the route to the right). Four bolts and belay chain.
| Un-named | 18 | 22m | Jason Tweedie '96 | |
Climb to the overlap then pull gingerly on the loose block in the bottom of the groove. The loss of this will add several numbers to the grade... Continue up the bulging wall then the groove in the wall above. Pro imminent.
Right on a pair of shallow grooves with a central nose is:
| Unruly Asiatics | 19 | 20m | Joe Arts '96 | |
The name has Roman origins. At the wiggle in the wall is a right-leaning arête. Stay on the wall on the right side of this, then up the steps above. Four bolts.
Next there is a semi-detached pillar with a bush at top and bottom. Right of this is a short colourful wall with two cracks; the left one being full of moss and choss, the right one being almost clean. The wall with the bulge left of the chossy crack awaits ascent. Hopefully, some form of top anchor will eventually appear allowing one to circumvent the horrid scramble off through the scrub above these lines.
| No Appeal | 18 | 6m | Phil Stuart-Jones '96 | |
Between the two cracks. Make some use of the right hand crack as you work up the wall on variable holds. A small wire halfway up the crack at about 5m may slow you down if you drop off. Step right at the orchid at the top and join SE. Soloed while cleaning.
| Summery Execution | 16 | 6m | Phil Stuart-Jones '96 | |
The pink and white wall on the right, left of the Weetbix Wall. Start to the left or right, then up. A small wire in the left hand crack and pro in the right hand crack are all you get. Again, a rap point would be useful. Soloed while cleaning on a hot nor-west day.
The left-facing wall above the pillar and alcove which looks like a stack of weetbix has been named The Weetbix Wall. Very original. Right of the alcove is a short, dirty, flaring offwidth which awaits some routebagging masochist. Then there is the next 'overlap wall' which terminates beyond the hedge and tree. At the beginning of it is:
| Box of Fluffy Ducks | 23 | 10m | Joe Arts '96 | |
Up the flakey bottom wall to the overhang then crank and rock through to better holds. Up the wall above to the rap/belay bolts. Two bolts and other pro.
| The End of Summer | 20 | 10m | Marcus Thomas '96 | |
Up the left of the wall behind the hedge and tree. Three bolts with nice Petzl hangers. There are rap/belay chains on the ledge above.
Right of the hedge is a deep, dark, dirty drain of a chimney which appears to be populated by rabbits, possums, and quite possibly dragons. No-one has claimed an ascent of this yet although bones have been found at the bottom... Right of this on the next 'overlap wall' is:
 | ||||||||||||||||||||||
|
| Six Bolts Missing | 21 | 18m | Joe Arts '96 | |
Climb to the jug in the middle of the overhang at about 3m, then move up via the pocket to the right. Move back left up the slab. At this point you can either climb straight up through the gentle bulge on rather loose holds, or move up and left to a rest under the obvious roof then an awkward move back right. Either way, proceed straight up the rather loose, steep headwall. Six bolts.
| Glorious Obsolescence | 16 | 18m | Lindsay Main | |
The obvious right-leaning crack line which starts in a left-facing corner. The first route done on the crag and the main unbolted route. A bit dirty and loose, but once you're past teh bush, it's fun climbing that just keeps going!
| Burnt by the Sun | 22 | 21m | Joe Arts '95 | |
Crank through the last and largest overlap in the sequence using the fist crack towards the right hand end. Go up the wall above moving left of the crack as it peters out, then up to the crack system winding down from the top. Exit via the crack in the right-facing top corner. Pro in the top and bottom cracks and two bolts.
| Cooled by the Rain | 21 | 18m | Phil Stuart-Jones '95 | |
First led in heavy mist. Bridge the crumbly groove below the right end of the overlap, then lay-back up onto the wall above. Proceed up and over the bulging wall left of the shallow groove at the top. A rap chain here could usefully serve at least two routes. Purists can do the two lumps above while others grovel off through the vegetation to either side. Pro in the bottom crack at about 4m, then three bolts (shared with BBTS or HT).
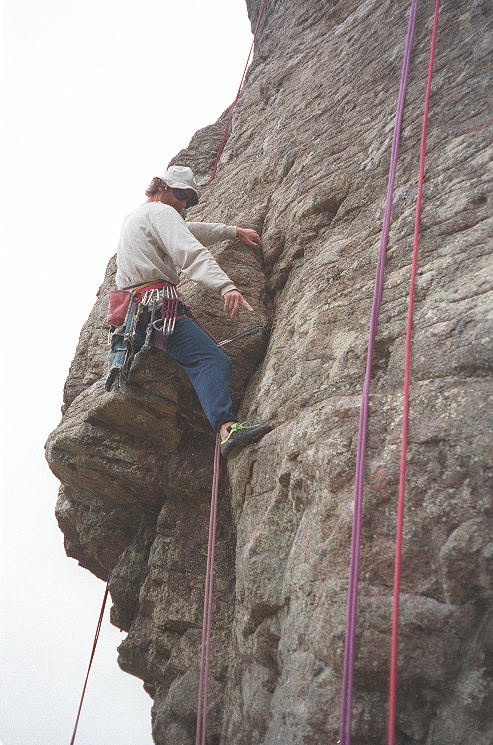
Phil just past the crux on CBTR
| Hat Trick | 19 | 21m | Phil Stuart-Jones '95 | |
Boulder up the wall just left of the corner with the thorny bush, then straight up the wall above exiting between the shallow groove and the fading corner which comes in from the right. Circumvent the scrub at the top by stepping right onto the top of W clipping the bolt as you go. Five bolts (shared with CBTR or W).
 Joe seconding Hat Trick in the rain
| Watchunder | 17 | 21m | Phil Stuart-Jones '95 | |
It's a bit loose... Bridge the corner with the thorny bush. Head left up the wall above the ramp then climb the wall/crack. As the crack peters out, go up the vertical crack and tackle the juggy overhang and wall above. Uses the first two bolts and fourth bolt of Hat Trick, some big pro in the main crack, and there's a last bolt on the top wall. Another may be added right of the upper overhang.
| Round Peg | 18 | 21m | Phil Stuart-Jones '95 | |
Boulder out the (currently) unprotected direct start (about 22) via the square hole at 4m or traverse in from the route to either side. The first bolt is at the top of the right-sloping ramp just under the rather loose roof. Move up past the right hand end of the overhang on good grips. Get your breath back on the ledge, then tackle the headwall staying right of the groove. Four bolts.
| Dumping the Human Waste | 19 | 21m | Joe Arts '95 | |
Up the flaring crack to a rest and the first bolt, then up, left around right-leaning overlap, and up to the big ledge. Head slightly right up the steep headwall then out left to gain the left hand right-facing crack. The other crack goes too. Three bolts plus pro in bottom and top cracks.
| A Mainly Inspired Enterprise | 21 | 19m | Phil Stuart-Jones '96 | |
Obtain a stance on the small rounded ledge in the wall just left of the cave. Reach up to clip the first bolt then up and right to better holds under the roof. The first bolt of CS protects the reach out left for the second bolt. Power left through the overhang then right, up through the top nose, and left up the top ramp. Five bolts (including the shared one) and a wire for the top.
| Cultural Safety | 23 | 18m | Joe Arts '95 | |
At the left hand end of the cave. Carefully bridge the chimney of very sharp rock then swing up the extremely steep eroding crack line (try not to increase the grade) and out through the right-leaning chimney at the top. Four bolts, plus other pro.
| Lottery | 19 | 17m | Phil Stuart-Jones '95 | |
At the right hand end of the cave. The pro is tricky at the bottom but there is little practical alternative. Clip the first bolt from the ledge (you may need a stick), then swing out around the arête and up to the block and pro placements. Straight up staying right of the top groove for steeper but better rock. Three bolts plus other pro.
A route with enjoyable moves has been top-roped on the wall right of the cave (about grade 17), but the rock is so loose that pro is a problem. Most of the rock right of this is very vegetated or very(!) steep.
At the far right of the crag, is a small, steep slab with chain anchors on top.
| The Red Wire Strikes Back | 18 | 8m | Joe Arts '96 | |
The crack on the left of the cleanest part of the wall. One bolt and other pro.
| Slippery Sloping Slaps | 21 | 7m | Joe Arts '96 | |
The route up the middle of the slab. Two bolts to clip on the way to the chains.
A boulder problem to the right has been soloed. Up to the big pocket then escape right (about 12) or persevere up and leftish (about 16).