The Office 2000 WordArt tool, is very similar to the WordArt program from Microsoft Office 97. You can create these special effects from either the Insert | Picture | WordArt... menu or by a mouse click on the Insert WordArt Drawing toolbar icon, it looks like a slanted blue uppercase letter A with a shadow to the right.
![]()
When you do either of the above the following dialog box of pre-made shapes opens.

Select a WordArt style to apply in your document from the above samples. The Edit WordArt Text dialog box, shown below, will open for you to enter the text that will take on the look you have chosen.

You must enter the text with the font style and size at this time. Just click where it says Your Text Here and begin typing your own text for the WordArt.
You can move and size the WordArt drawing object with the mouse just as you would with any other drawing object.
You can edit a selected WordArt object by clicking the WordArt command on the Format menu or by right-clicking the WordArt object and then clicking Format WordArt. You may also double-click a WordArt object to redisplay the Edit WordArt Text dialog box.
You may at any time edit your WordArt object to add or change the words from the original. Just double-click the object to reopen the dialog box, place your mouse cursor at the point in the text that has to be changed. When finished click on the OK button. Reposition the object attractively on your document if necessary.
Choose Insert | Picture |WordArt... then pick any shape you wish. Type My Example.
 Double-click the new object. Then insert the cursor in the middle of the text My Example and type Newer.

Select the object once again, then click on the Shape button on the WordArt toolbar. It says ABC on the face of the icon. A grid of 40 different shapes appears.
![]()
Select a different shape for your WordArt object.
 Now let's change the appearance of the fill color, texture, and perhaps the line and shadow treatment as well. (This could be addicting and time consuming so don't let the boss catch you spending too much time having all this fun!)
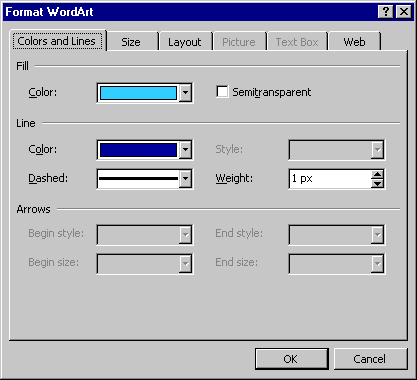
Click the WordArt object to make it active then click the icon with the paint can and brush.
 This is an example of the dialog box presented to you. See that the first tab is selected, it says Colors and Lines. The next step is to drop down the arrow next to the color box in the Fill portion of the dialog box (upper-third). As you can easily see, this format box controls just about everything you would want to do with this object.
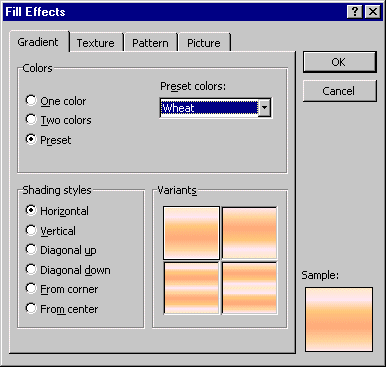
Choose a Preset color arrangement from the Gradient tab of the dialog box. I chose Wheat in a Horizontal arrangement. Experiment with several until you find one that suits you.


Next we will try using the Texture tab. Double-click the WordArt object to see what it looks like with a texture instead of a fill.
Choose a texture from the list. In this example I chose the water drops texture. There are 24 different textures for you to try.


The Patterns tab of the Fill Effects dialog box allows you to play not only with color for the foreground and background, but pattern lines as well. (If time permits you can play in this sandbox too!)
The last dialog box is for Pictures to be used as fills. If you have the CD for Office 2000 there are Bitmap Photos that can be used for picture fills. I chose to insert an image of three paint cans and a brush. You'll have to experiment for a bit until you find the right picture to use.

We haven't looked at some of the other interesting features of WordArt. You can change the Shadow shape, color and line color very easily. Let's give it a try. You'll need to create a new WordArt, we'll chose a rather simple design so that it will show off the effect.
Remember to save your work from time to time just in case! Graphics can be very memory intensive and just at the moment you think it's done, poof, you crash and all your work is gone!
These are some of the tools that Word 2000 provides to you for working with drawings and shadows. On the Drawing toolbar you'll see on the far right end two icons that deal with Shadow and 3-D. Select your WordArt object then choose the 2nd icon from the right end.

![]()
The pop-up menu (below), will appear for you to select a shadow type to suit your whimsy. If you select the Shadow Settings... button at the bottom you will be given more choices to use and a lot more control. There may be times when your shadow color would be more appropriate if it matched the color used in the background instead of the silver color that is defaulted. More Shadow Colors... gives you more colors to work with than you'll know how to handle! Experiment if there is time.


In the example below I chose the color in the top row of the second column, then I chose More Shadow Colors... to pick a slightly lighter shade to suit me.


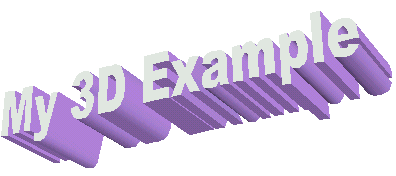
Next we will play with the 3-D feature. The 3-D feature will change the look of your work so let's create a brand new WordArt choosing the 1st option which is very plain and will allow us to be a little more creative.

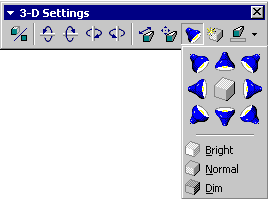
Be sure to select the WordArt object then click on the 3-D button on the Drawing toolbar, it's the first on the right and looks like a cube.
![]()
Next choose the direction and amount of extrusion desired for your object. You may wish to experiment with the lighting (angle of direct light to create the 3-D effect) by clicking on the blue lamp icon from the 3-D Settings toolbar. There are 8 angles to choose from, each will be demonstrated on the center cube. You may also choose Bright, Normal or Dim lighting. (The ways to tweak this puppy are almost endless, so don't get too carried away.) You may choose a color for your extruded portion as well as the face of the object, more fun for you!

You will not be able to create a drop-shadow for this 3-D object since the shadow clings to the object already. So spend a little quality time with your object and choose just the right colors to suit your document.
Copyright © 2001 & 2002 Professor Al Fichera
Back to MS WORD 2000