Tip: You will not create the form now. The data source will be created first.


Mail merge provides a way to create custom documents for mass mailings. Merge in its simplicity combines a main document with a data source. For example, you may want to send a letter with the same basic information to several individuals. In this case, you create a basic form file—a letter. In Word, this basic form is called the main document. The parts of the form, which are different, are called fields. Labels and envelopes are other examples of form files.
The complementary file is a data source file, which contains field information to insert into the form. The data source is usually a mailing or address list of names—a database. A data source can be merged with several different main documents to produce letters, mailing labels, and envelopes.
The main document and the data source can always be modified and easily merged again if mistakes occur; otherwise, each individual document would have to be individually edited, (not unlike the days when each letter had to be typed individually).
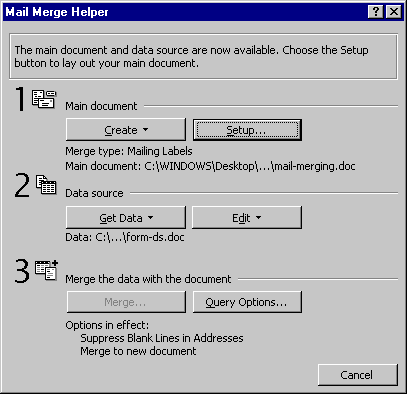
The Mail Merge Helper provides step-by-step procedures for creating a merged document.
| FIELDS | RECORD 1 | RECORD 2 | RECORD 3 |
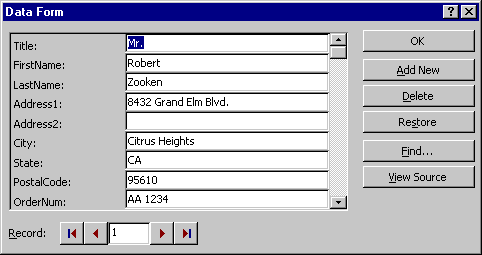
| Title | Mr. | Mr. | Ms. |
| FirstName | Robert | William | Judy |
| LastName | Zooken | Batey | Elstenson |
| Address1 | 8432 Grand Elm Blvd. | 5240 Sobey Circle | 3180 Woodlake Hills Rd. |
| Address2 | P.O.Box 3248 | ||
| City | Citrus Heights | Orangevale | Fair Oaks |
| State | CA | CA | CA |
| PostalCode | 95610 | 95662 | 95628 |
| OrderNum | AA 1234 | AB 1002 | AC 2234 |
The Form you'll be using is reproduced below. There are two ways to enter data records into your Database. One is with the Form below or the Table that is produced from this Form. It is completely at your discretion as to the format you choose to enter data. For an employee not completely comfortable with Microsoft WORD 2000 Tables, perhaps the form would be the best method for them. The Table is shown below the Form.
This is the Database Toolbar that appears when you are in the Table viewing mode. Each column heading is a Merge Field; each row is a unique Record.

| Title | FirstName | LastName | Address1 | Address2 | City | State | PostalCode | OrderNum |
| Mr. | Robert | Zooken | 8432 Grand Elm Blvd. | Citrus Heights | CA | 95610 | AA 1234 | |
| Mr. | William | Batey | 5240 Sobey Circle | P.O.Box 3248 | Orangevale | CA | 95662 | AB 1002 |
| Ms. | Judy | Elstenson | 3180 Woodlake Hills Rd. | Fair Oaks | CA | 95628 | AC 2234 |

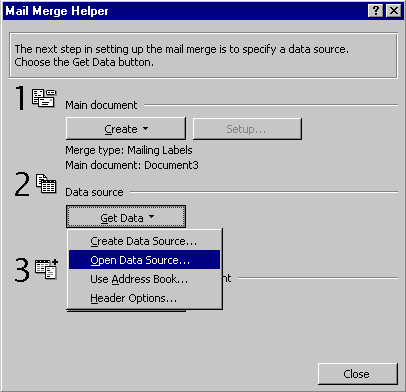
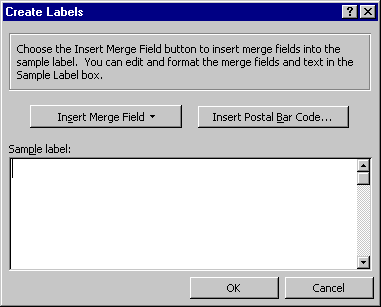
After clicking [OK] on the last record entered for the data source file, you will see a blank screen with the mail merge toolbar ready for action. Choose the [Insert Fields] button to display all fields set up in the data source file. Or, choose the Edit Data Source button on the Mail Merge Toolbar shown above, it's the last button on the right side.
Date (Insert Date and Time… from the Insert menu; choose option 3; Update automatically)
[Enter] key 4 x (Note: Include a space between each merge field for normal spacing.)
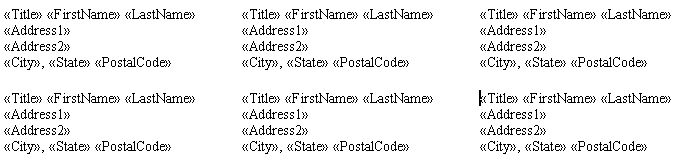
<<Title>> <<FirstName>> <<LastName>>
<<Address1>>
<<Address2>>
<<City>>, <<State>> <<PostalCode>>
[Enter] key 2 x
Dear <<Title>> <<LastName>>:
[Enter] key 2 x
This letter is to confirm receipt of your generous order from the Folsom Market Widget Experience. We are processing your order today and you should expect delivery in three (3) days.
[Enter] key 2 x
<<Title>> <<LastName>>, would you please refer to this order number
<<OrderNum>>, when calling or corresponding about your purchase.
[Enter] key 2 x
Please accept our sincere thanks for being able to serve you.
[Enter] key 2 x
Sincerely,
[Enter] 4 key x
Mary A. Wildt
Ordering & Shipping Department
Folsom Market Widget Experience
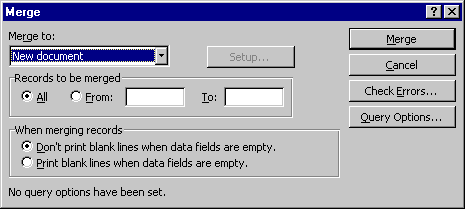
Choose the [Mail Merge] button (3rd button from the right) on the mail merge toolbar, Merge to New Document, to perform the merge.
Please note that the option button next to “Don’t print blanks lines when fields are empty” is to be chosen. This means that if information is blank in one record the blank line will not be evident when data for that record is printed. (In these exercises, the second address <<Address2>> may be blank in some of the merges since not all will have a P. O. Box number). The Check Errors… and Query Options… can be set, but that's for a more advanced look at Mail Merging and not included in this basic tutorial.
Click on the [Merge to New Document] button on the Mail Merge toolbar. The merged label form appears. If the text is too small, choose [CTRL]+[A] or Edit | Select All to change to a larger point size. (You'll see a page of labels such as these shown below. When merged to your database, each label will reflect the database chosen and will be ready for sticking and mailing.)
Since merged documents require more than one file (see Window on the Menu Bar to display documents in use), you can close all files by depressing the [Shift] key while clicking on File on the Menu Bar. Choose Close All. When you choose Close All you are prompted to save changes to any open documents and to give names to any unnamed documents before Word closes the files.
If you plan on using these labels on a regular basis, save each with a unique name and you'll be able to print them without using Mail Merge. And, you thought this was hard!
Copyright © 2001 & 2002 Professor Al Fichera
Back to MS WORD 2000