 ISUAL
ISUAL  RTS &
RTS &  RAFTING
Featured Art Project: Heartfelt Tokens
Featured Art Links: Dennis P Jordan & Angela's Creativity Web
"Consider, in like manner, the revelation of the light of the Name of God, the Incomparable. Behold, how this light hath enveloped the entire creation, how each and every thing manifesteth the sign of His Unity, testifieth to the reality of Him Who is the Eternal Truth, proclaimeth His sovereignty, His oneness, and His power. This revelation is a token of His mercy that hath encompassed all created things." --Bahá'u'lláh (Gleanings..., p. 190)
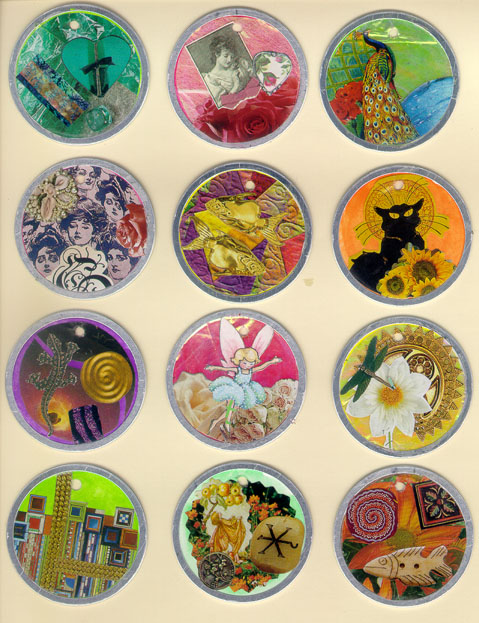
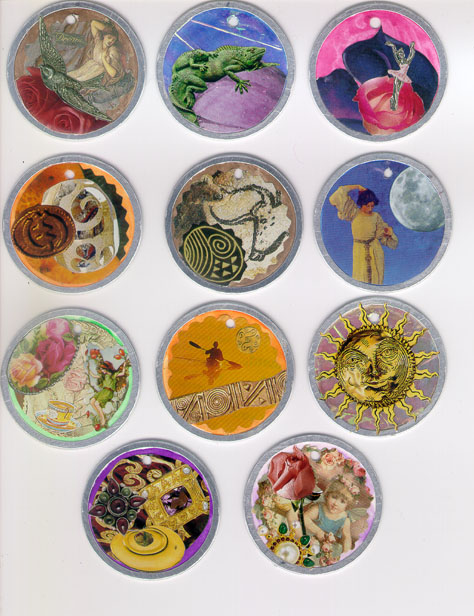
I usually make these tags in batches using several different colors of paint so I can use lots of different colored papers and images. It’s great to have a lot of tokens already prepared for quick gift giving or timely thank you. With a little advance planning these tokens would be an excellent activity for any group of artists ages 5 and up. Parents might also consider making these with their children for Teacher Appreciation Day. Supplies: metal-rimmed round tags (I used 1-7/8” tags); stickers or images cut from magazines; watercolor paints; paintbrush; 1/6” or 1/8” silk ribbon; glue stick; unlined 3”x5” cards; pens or markers; scissors; hole punch; envelopes. Optional items: rubberstamps and ink pads; labels for laser or inkjet printer; beads, sequins, charms, buttons, etc.; liquid glue for attaching heavier items.
Click to see more tokens!
 General tip: If you decide to make a set of tokens, plan to do this project in stages over 2-5 days. Paint one day, choose a major background element the second day and glue it down, lay your tokens out select images on the third and fourth day, attach ribbons and complete cards on the fifth. I do not attach any dedication (or token designation stickers- -thanks, love, best wishes, etc.) until I actually know who the token is going to, this way I can choose the appropriate image and inscription.
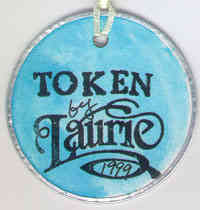
If your tags come with a white string, remove it as it gets in the way. Base coat the front and back of the tag with the watercolor of your choice and let dry completely. On back of tag (where the metal rim is slightly thinner and a bit wrinkled) write or rubberstamp the word “TOKEN” and sign your name.
On the front of the tag arrange flat decorative elements like stickers, images cut from magazines, uplifting words, and patterned or textured papers. When you are satisfied with the arrangement, glue all the elements in place. In the examples shown here I did not attach any 3-d items, but I encourage you to add any sort of embellishments you wish. You should use a strong glue that dries clear.
I like to lay my tokens face up on a table and go through my stash of small precut magazine images. First I find one major background paper or image for each token, and then I pull out at least 2 or 3 interesting elements for each token. Then I arrange these elements and trim as needed before gluing down.I’ve found it helpful to make a circular cardboard template (slightly smaller than the inside diameter of the front metal ring) to use as a cutting guide for background pieces. If you have a stick of Post-It repositionable glue it works great to hold the template in place while you cut.
If the hole in the tag has been covered by paper or images, re punch or other wise open it again now. Cut a 5”-6” piece of coordinating ribbon. With the front of the tag facing you, fold the ribbon in half and push the folded end partially through the hole in the tag. When a ribbon loop is seen through the back of the tag, slip the other free ends of the ribbon through the loop and pull them to from a slip knot.
Presentation:
Your TOKEN is now ready to give – if you’d like to attach it to a card here’s how:
Holding your card with the 3” side on top, make 2 or 4 holes near the top of the card (see picture).
If you have chosen to punch 2 holes, feed each ribbon end through one hole to the back of the card. Cross the ends in the back and feed the ends through to the front of the card and tie in a bow to secure. If you have 4 holes, feed the ribbon ends through the two middle holes then back through the two outer holes, tie in a bow to secure.
When you give your Heartfelt Token you can write a personalized message/dedication on the card by hand and you can also use a preprinted label to help convey your thoughts.
Here are some ideas for labels:
A Token of My Affection
A Token of My Esteem
A Token of My Love
A Token of My Thanks
A Token of My Admiration
A Token of My Warmest Birthday Wishes
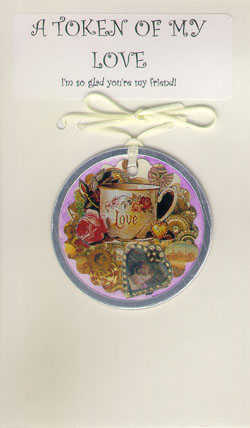
Remember to sign your name on the card and put it into a coordinating envelope.
Other themes to consider are: a special day or event in your life; a photo montage of the important people in your life--using color copies not the actual photos; colors and words to inspire you; as a gift for a friend select images that relate to that person or words and images of things you've done together; baby shower, birthday, or wedding gift--images, colors and words that correspond with the event. Come up with other ideas? Please write and tell me what you've done: art4all@gmail.com Send me a photo!
Sunday School variation: Small children can make simple tokens using crayons and stickers to give to their parents or other honored member of the community. Using the tags original white string – tape string to index cards preprinted with a dedication and optionally, insert into envelope.
Holiday variation: Write or stamp a holiday message on the back of the token; decorate the front with a single image or sticker; on card write “A TOKEN of my [holiday] wishes”
Kit idea: (Great for teens) Make a kit so your favorite creative friend can make their own mini tokens. In a ziplock bag place: 5-10 blank tags (with strings removed); an equal number of 5”-6” lengths of white ribbon; a selection of stickers; a small glue stick; a small box of colored pencils; index cards with holes pre-punched; sheet of self-adhesive labels with a selection of dedications (You can make these at Hallmark stores on machines they have there – you will have to choose one saying though so pick something general like “A Token of My Best Wishes.”); and print out the preparation and presentation instructions I’ve written above.
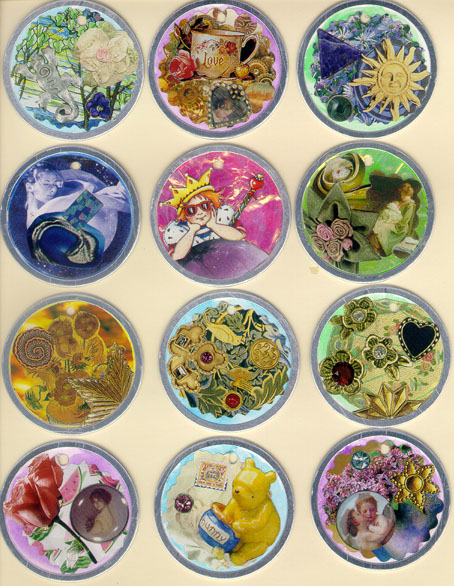
I have two more sets of tokens scanned in if you'd like to see them click HERE and HERE TOO!
Back to top.
Dennis P. Jordan Dennis Jordan is a studio artist working in printmaking, collage and letterpress and owner operator of Jordan Printery. I have purchased his wonderful papers and his work is truly unique. His site is always changing and full of surprises and wonderful ideas.
Angela's Creativity Web This site is devoted to information on creativity (and running a home-based business). It includes a free online creativity course and other information on developing your creativity.
Back to top.
Back to:
Visual Arts & Crafting
Homepage
This page hosted by ![]() Get your own Free Home Page
Get your own Free Home Page