Nifty Homemade Tools
Here are some homemade gadgets that I have found to be useful either in the workshop or out at the range. All of these items are simple (even if you have two left thumbs), and are inexpensive to make. If you would like to add your own useful (simple) homemade gadget to this list, email me at vikings@mebtel.net .
Varmint Al's Bi-Fur-Pod
I can't take credit for this one. As the name states, we owe our thanks to Varmint Al for this handy, simple, and useful tool. I made a few of my own refinements to
Varmint Al's Bi-Fur-Pod, and if you build one, I hope you do, too. New innovations will keep making these tools progressively better.
|
 My refinements are minor. I used 3/4" square wood 36" long. My pivot bolt is also 5-1/4" from the end. I inserted 3 fiber washers (like the ones on electrical outlets and switches) between the sticks, next to the bolt head, and next to the nut. I also used a little white litium grease between the sticks. Before I tightened the nut, I put a little locktite on the bolt. Then I slightly squashed the nut in a vise to tighten the threads so it won't work itself loose. Instead of two large nails with the heads hack sawed off being epoxyed into the ends, I epoxied and drove two large screws into the end, and ground the ends so that 2" of sharpened end is exposed. I also painted them with flat black rust-o-leum paint to protect them. I rubbed mineral oil into the wood legs to help preserve them, too. To keep the legs from 'clapping' together when I walk, I drilled a hole through the 'nail' ends, and put a piece of string tied with a slipknot for quick, easy, silent removal. I think Varmint Al relies on nut/bolt tension to avoid this, but I have to believe that the two legs will loosen up over time.
|
|
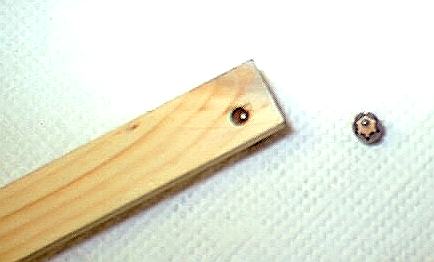
 Stick ends with painted, ground screws and
'slip-knot' string. Stick ends with painted, ground screws and
'slip-knot' string.
|
Powder Measures
|
 Here's a little tool that comes in very handy at times for those who do not have a powder measure, or when an adjustable powder measure is not readily accessible or convenient to use. While this tool can be viewed as a 'rough' powder measure, surprisingly consistent volumes / weights of powder can be thrown with it. For a rough measure, make sure it delivers a charge that is slightly UNDER weight, and then use a powder trickler to bring the powder weight to the desired level. Here's a little tool that comes in very handy at times for those who do not have a powder measure, or when an adjustable powder measure is not readily accessible or convenient to use. While this tool can be viewed as a 'rough' powder measure, surprisingly consistent volumes / weights of powder can be thrown with it. For a rough measure, make sure it delivers a charge that is slightly UNDER weight, and then use a powder trickler to bring the powder weight to the desired level.
|
To make one of these tools, take a 'sacrificial' fired rifle case of the same type that you are reloading, with the spent primer still in the primer pocket. Now cut the top off near the shoulder. Cut it so it holds slightly less than the amount of powder that you normally load, if making a 'rough' measure. Cut it so it holds EXACTLY the same amount, if making an 'exact' measure. Solder a large nail or piece of heavy wire to the case body for a handle. Now you have a powder scoop that either gets you in the 'ballpark', or gives you an exact measurement. This tool is mostly useful for those who do not have a regular powder measure, or if you load in the field. If the case is measured and cut carefully, you can throw exact powder weights (you're really throwing a VOLUME of powder) with this tool. It's only drawback is lack of flexibilty - ONE volume of A GIVEN POWDER per tool. an equivalent volume of two different powders will NOT necessarily weigh the same !!
Rifle Cradles
|
 These are easily crafted from 1x6 pine lumber, or 3/4" plywood. I use these to hold my rifles when doing light gunsmithing work in the shop (clamp them down to your bench), cleaning either in the shop or at the range, or I sometimes use the 'front' rest as a rifle rest for target shooting. If you use the front rest for target shooting, be sure to use a durable material for your padding, as recoil will pulverize fragile materials.
Cut two 8" - 8.5" sections of 1x6. One will be your base, and the other is the upright. Put the base aside. Take the upright, and drill a hole corresponding to the width of your rifle's forestock) so that the low point of the hole is centered about 2 inches down from one end. Make a cut on each side of the hole from the near end so you have a clean 'U' shaped cut out of the wood. Use wood glue and 2 or 3 screws to secure the uncut end of the upright to the center of the base. Add padding to the U-shaped cutout, and you're done. Repeat this process for the buttstock, remembering to measure the depth of your (narrower) U-shaped cut so that the rifle's muzzle is lower than the action so if you use the cradle for cleaning, solvent does not run back into the action. I cut the U shaped channel 2" wide and 3.5" inches deep on my buttstock holder.
|
Stuck Case Remover
|
 It's often said that there are two kinds of reloaders - those who have stuck a case (or two) in a resizing die due to lack of caselube, and those that will. Well, I fell into the latter category for about 12 years ... then I recently swiched into the first category. Of course, I did not have a stuck case remover tool, it was late at night, and I needed to finish loading a bunch of rounds for the next day! (... as we all know, Murphy is alive and well.) So what did I do? I did what every good engineer (or other self-sufficient type) does - I improvised. I knew that these tools existed, but had never seen one nor did I know how they worked. What ended up happening was that I actually re-invented this tool on my own. It's often said that there are two kinds of reloaders - those who have stuck a case (or two) in a resizing die due to lack of caselube, and those that will. Well, I fell into the latter category for about 12 years ... then I recently swiched into the first category. Of course, I did not have a stuck case remover tool, it was late at night, and I needed to finish loading a bunch of rounds for the next day! (... as we all know, Murphy is alive and well.) So what did I do? I did what every good engineer (or other self-sufficient type) does - I improvised. I knew that these tools existed, but had never seen one nor did I know how they worked. What ended up happening was that I actually re-invented this tool on my own.
|
Here's what I've got in my homemade stuck case remover kit:
 3 large flat washers   - 1.5" outside diameter, 5/16" inside diameter
 3 or 4 smaller washers - 5/8" outside diameter, 5/16" inside diameter
 1 piece of pipe        - 2" long,   11/16" outside diameter, 1/2" inside diameter
 1 piece of pipe        - 1/2" long, 11/16" outside diameter, 1/2" inside diameter
 1 (1/4-20) bolt        - 1" long
 1 (1/4 20) bolt        - 2 1/4" long
 1 (1/4-20) nut
 1  #7 drill bit
 1 (1/4-20) tap
 1 piece of paper that tells me what drill / tap to use
I've used this kit to remove small rifle cases (with small primer pockets) from their sizing dies. If you want to remove stuck case that have large primer pockets, you may want to use a slightly larger drill, tap, and bolts to ensure that you thread securely into the case head. This is necessary because you need a strong hold of the brass to extract the case.
If you get a case stuck in your die, use the tool as follows:
- Drill out the case's primer pocket ( #7 drill )
- Tap the primer pocket ( 1/4-20 tap )
- Screw the resizing die halfway into your press from the bottom
- Spray a little penetrating oil where the case meets the die
- Place a washer(s) over the threaded die hole in your press
- Pass a bolt through the washer(s) and thread the bolt into the case until it is hand-tight
- Turn the bolt with a wrench to slowly draw the case out of the die
- Use the pieces of pipe as required as spacers until the case is drawn completely out of the die
Sabot Bullet Seating Stick
|
 This is simply a long, thin wood stick (about 1/4" thick) with a hole drilled in the end. For seating .22 caliber bullets into a sabot, the hole should be about 5/32" in diameter - large enough for the bullet tip to pass through, but narrow enough to catch the bullet ogive. Simply place the bullet on your bench, place the bullet into the sabot, place the tool over the bullet, and press down.
Here's some general information about sabots, and more information if you want to learn about reloading with sabots.
|
Wind Flags
|
 This one's real simple and easy and I'm sure others have made these, too. Funny thing, though - I never see anybody else with their own flags at the rifle range, but they're happy to read mine. You can easily make wind flags by taking a long, thin (1/4" to 3/4") piece of wood and glueing / stapling a ribbon of some sort to one end. I use two different ribbons - one heavy and one light - to increase the range of wind speeds that one can judge. The heavy ribbon is of the 'police line' type, and the light ribbon is surveyor's tape. Make them about 18" - 24" long. Tie or clamp one to your shooting bench, one to your target holder, and a few in-between.
Mark Bonner sent me HIS wind flag design (Thanks, Mark):
I make my wind flags out of a piece of stiff wire - thin rod works even
better. Stick an old shell case, .308 is a favorite of mine, with a piece of
surveor's tape tied to the case on top of the rod. Poke it in the ground, wrap it around a fence post. Even a light wind will show the direction as the case will pivot on top of the rod. I like simple.
Got about a dozen around my deer blind where they double as yardage markers
and wind flags. Took a lot of yahooing from my lease buddies ... at first! Bet
there are 50 to 60 scattered around the lease now! - Mark Bonner
It's a good idea to 'calibrate' your flags, and to do this, you should make the lengths of each type of ribbon equal (eg all 'police line' ribbons = 24", all surveyor's ribbons = 18", ...). Find an open area with varying wind. Next, secure a flag in an upright position, and step back - but stay in the vicinity. Using a wind meter, quickly sketch the position(s) of the ribbons for varying wind speeds. With a little practice, and your sketches handy, you will soon become good at reading your flags.
Occaisionally, I forget my wind flags. However, I make sure that I have a backup. - I keep a spool of surveyor's tape in my range bag. I only remove it from the bag at the range if I forgot my wind flags. When this happens, I staple (or "push-pin") a couple 1-foot strips to the target backing. Heck, it's better than nothing.
|
Vertical Rifle Holder
This one's REALLY simple. I made mine because I needed something to hold my rifles in a vertical position when I use my Outers Foul-Out II to clean rifle bores. It can also be used when soaking bores with cleaning solvents (NOTE : never leave solvents in your bore for more than 10 or 15 minutes, as serious damage can occur).
Take a piece of scrap lumber that's anywhere from 2-4" wide and 6-8" long. Thickness doesn't really matter (but bear in mind that you will have to drill through it), though I used a 2" x 8" piece of 3/4" plywood. Now drill a 1-2" hole (depending on how thick your rifle barrels are) 1/2" - 1" from one end. You're done! Slip this over your rifle barrel, stand your rifle next to your workbench, and then clamp your 'vertical rifle holder' to your bench. If the floor and/or your rifle's buttplate are smooth enough to make it possible for your rifle to slip, place a small piece of rubber between the buttplate and floor.
Range Box
This one is from Bill Wade at
Centerfire Central. He built a range
box to hold all his shooting equipment. I think this is a great idea, simply because the shooting ranges that I use are just too far away from my house to 'make a quick run home' if I forget something. Plus, if I'm alone, I have to pack everything up and take it all with me if I expect to ever see it again. Bill's range box is made from wood (some maple), and he complains about the weight - claiming he will build a new (lighter) one someday. I think I'm going to try to find one of those BIG sturdy clear plastic tubs (with a lid, of course) to haul my gear. I plan on building trays and section dividers out of 1/4" plywood. I should be able to find something on the order of 24"L x 18"W x 18"H.
Joe Dioso's Plans
Here's Joe Dioso's Shooting Furniture & Accessories Page. It includes : shooting bench, portable target stand, and front rest plans. He also posts really good (and free) targets. Enjoy.
Shooting Bench Plans
Reloading Bench Plans
I hope this information proves useful to you. Good shooting from the
Spirit of '76
Gun Page!!
Last updated : 04 January 2001