You can make your blocks appear to float by over sizing your outside triangles (and squares in the case of a lone star quilt).HINT: This is also a good way to even up a quilt top that didn't come out "quite square"! |
What this will do is add extra background space around you central design between the central block and the first border. This way, you don't have to add a border of the same fabric as the background to make it float. |
| Step 1: To do this, cut you background pieces several inches larger than you normally would. Depending on how much of a border you want around your central design, this can be anywhere from 2 inches to 10 inches or more. Whatever you want. | 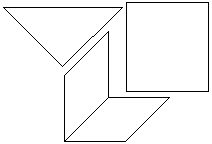 |
| Step 2:
It is very important for this to work, that you mark your background piece
with a stitching length that is exactly the length of the piece you
are inserting.
This will be the measurement from the 1/4" corner seam line to the other 1/4" corner seam line. That way you won't have some points longer than another which will result in a rippled top. Align your pieces before sewing by putting the two pieces right sides together and then insert pins in the two reference points and match. |

Measure your diamond then mark that measurement on the setting square or triangle. |
| Step 3: When
you sew in these extra large background pieces, you can see from circle
#1 that when you come to the end of the diamond piece, you overlap
and sew at an angle to the square background piece.
To help you sew this more easily, you can trim off the extra background fabric that extends past your diamond before you set in the next piece. (Circle #2). To do this, line up a ruler with the diamond edge and trim off with a rotary cutter or mark and cut with scissors. |

Before trimming, make sure that the seams are ironed flat and the piece is laying really smooth on your surface. |
| Step 4: When
you are done, trim all the outside edges even and square. The best
way to do this is to measure at intervals across the quilt top from
the perpendicular center seam to where your want your outside edge to be.
Draw a line from mark to mark, then trim. If you have a large
"square-up" type ruler use that to make sure your corners are square.
You will have extra fabric beyond the star (red circle) and your block will appear to float against the background. |
 |
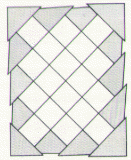
| This technique also works for square quilt blocks in
quilts set on point. Make all your outside setting squares and triangles
larger, sew in, then trim.
This technique adds a border around your blocks and again might *fix* a quilt top that is *off* a little. (Here, sew the four corner triangles on last). |
 .
. . .
. . |