
How I built my 20" F5 Dobsonian
|
|
Secondary cage: Secondary cage: I finally decided to build the traditional double ring instead of the more easier to build single ring. Single ring secondary cages tend to be thick and broad this eats up their potential for a light secondary cage. Single rings left the secondary mirror unprotected during transportation and storage. The height of my secondary cage is based solely upon the dimension of the secondary / focuser combination. Additional baffling will be done through a removable external baffle as well as an internal baffle inside the focuser. That�s more than adequate if you observe from a reasonably dark site. With the baffle installed I don't feel the urge for a light shroud. The black sheet of plastic baffle is not Kydex. Sorry but I don't remember the exact name. I rung up a dozen of plastic production companies for a material that is black by nature, heat resistant for up to at least 80 degrees Celsius, UV resistant, has a rough structure on at least on one side. Finally I ended with a 2 of 1-meter really gorgeous 2mm thick ABS (?) material for 99 Euros only to find out that 2mm are way too thick and heavy. Urg !!! At my second attempt I ordered a 0.8 mm material. Yeap. The shine site of this ABS was too shiny in my opinion. So I put this side inside the tube were it is covered by black-flocked paper. The dull side out is much more forgiving in terms of scratches or small dings. German Tamers use often extra thin multiply to connect their rings. Thin multiply applied with carpenters glue make an extreme ridged secondary cage that cannot be disassembled. Sadly after a while sun, moisture and rough handling often tend to crack these thin plies. To allow complete disassembly of the secondary cage, the plastic is not glued to the inside edge of the rings. Instead it is supported up and down in 4 mm wide and 4 mm deep rim made with a router. In Germany the "metal-flowers" as described in Krieges book are really hard and expensive to get. And these Flowers are fabricated for inch tubing. So even if you have one, chances are that they will not fit right into the tubing. If you mean that you must have them ask in a bicycle shop. But be prepared to pay 5 to 8 Euros for one. I have made some aluminium inserts. Press fit them into the tubes and drive a small bolt through the tube and the inserts. |
| Focuser: Focuser: The focuser board sports a 2-inch focuser from William Optics. In Germany these focuser are sold a under the label of "baader planetarium". First I opted for a Feathertouch Focuser, which is made by a German guy (!) in the states, but, the Feathertouch turned out to be much to heavy and it has a very wide inside travel. If you plan to install a filter slide right behind your focuser check the inside travel of your desired focuser. You don�t want to have neither your precious filters scratched by the focuser tube nor a thick filter box to provide enough clearance between your focuser and your filters. The helical focusers are fine. Lightweight and very low in they�re profile. But for me a bit complicated to use. So I settled finally for the crayford baader focuser. For visual work the baader/williams is more than adequate. The only problem with this focuser are the to "lips" on the base. These lips allow the focuser to be mounted on a round tube. But due to the relatively large diameter of my secondary these lips just ad unnecessary height. So I removed the lips with a milling machine. The focuser is mounted on 4 mm thick plywood and stands on 4 spring-loaded M6 screws to allow for collimation of the focuser. 4 mm thick plywood is far to thin, for a focuser board. The strength results from the arrangement of the Filterslide mechanism on the backside of the focuser board and a slight curving of the board provided from the 4 mm rim in which the focuser board is pressed in. The mechanism is mounted parallel to the optical axis. So the Filters are always protected from dew or finger smudges. The filter slide is the most used "add-on" of my dobsonian. It is equipped with a 2 inch OIII Filter from astronomics. With it the veil nebula is a real threat. |

|

|
Truss Tube:
I opted for the traditional 8 Truss-Configuration. Since 6 Trusses make for a slightly bigger mirrorbox or secondary-cage
in order not to interfere with the light-path. The Trusses are 25mm diameter aluminium tubing with
1mm wall thickness. They are extremly light. In Order to get a warm grip in cold nights I covered
the poles with black leather (artificial leather).
Mirrorbox: The mirrorbox is made from 12mm thick baltic birch plywood. The inside corners are reinforced with corner braces. Additionaly large triangles in the corners deliver an enormous stiffness to the box. All round cutouts were made with a router. The Mirror Box is small. That means I cannot put my secondary cage inside the box. This cage in box designs are in my opinion a thing from the past. It leeds to a big, bulky and heavy mirrorbox. See also the critic of Michael J�ger (german!). During transport and storage the secondary cage rests on top of the mirrorbox, were it is hold and centered by the round cutouts. The finish of the outside of the mirrorbox as well as all other wooden parts are made with a two component transparent polyurethane finish. (With a little help from my relatives who run a woodworking shop. Yes you got me I was lazy that was not done by myself ! Shame on me). |
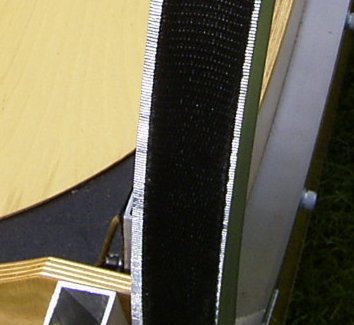
| Altitude-Bearing-Material: New and as far as I know unique at the time as I showed up with it at BTM in 2002 is the altitude bearing material. I found that simple polyethylene strap material for the altitude bearing gives an amazingly smooth motion. You can also use polypropylene webbing. Do not use polyester webbing! Polyethylene (Nylon) is best. This webbing material can be found in nearly every Home-improvement-store. At a very reasonable price and in different colours. (As a German ATM'er I have chosen the serious looking black one! Which gives a good contrast to the aluminium bearings ;-), if you want to go fancy use green, blue or yellow. I have not found that the color makes any difference. It is very easy to apply and gives a buttery smooth motion around the altitude axis. It delivers more friction than the paper solution I am using for the azimuth but this helps balancing the dobs while changing eyepieces. Don't glue the belt on your bearings. They are held by friction and tensions alone on the bearing. By the way. If you know a source were to get this stuff with widths of 30mm let me know. |
|

| Azimut-Bearing-Material: Structured brass eloxated aluminium sheet (In Germany ask for "Messing eloxiertes Aluminium mit Raukornstruktur") has become a quite standard among advanced ATM'ers in Germany. This is indeed a very good material. And especially on bigger dobsonians superior to the traditional Teflon on formica solution. Remember that it should be eloxated. If you can't get the eloxated version you can use the non-eloxated version also but it is a bit stickier. You can get the non-eloxated version for free in an old icebox. I have found the "perfect move" in Teflon rides on silicon treated paper. If you are going to spent your dobsonian flocked paper (DC-Fix) to increase contrast don't throw away the paper were the flocked paper is attached too. It is treated in a way that nothing, even glue or a big dobsonian, can stick to it. Use a spray glue to attach the paper with it's back side on the downward facing side of your rockerbox. Pay attention not to wrinkle the paper. I am using this material since June 2002 (First Light). After nearly 4 years there is no tear down visible. Hey man this is just thin paper supporting a 20inch dobsonian. It must be buttery smooth... |
| Finder-Scope My first attempt in making a viewfinder ended in one with a square tube. Despite it's functionality it looked a bit odd. I wanted to have a round cylindrical tube. But how to make it without a lathe? Go for hole saw and buy a small sheet of 12mm thick multiply plywood. If you put two saws in the shaft of the hole saw you can make perfectly round an identical wooden rings with an inside diameter of 50 mm. Use a rain pipe with an outside diameter of 50 mm as a gluing jig. Than put the first ring on the rain pipe. Apply carpenters glue on it, than put the second ring on it and so on. Until the tube is long enough. Let it dry for a day and sand the outside of the tube with carbo 400 sanding paper for an extra smooth finish. Paint the inside flat black. Now you have a stylish woody finder. The dewshild is made out of black leather (artificial leather). It is the same stuff that I have used to cover my truss poles. Put an amici prism in it and your Super Pl�ssl eyepiece, which was retired since you have bought your new Tele Vues. Now you got a perfect finder, which puts the commercial models in shame. The coated lens doublet with an aperture of 52mm was purchased at a swap market for just 5 euros. The Finder is mounted right next to the eyepiece of the main instrument on the secondary cage for a fast change between looking through the finder and the main instrument |

|

Web Ring |
|
Next |
Previous |
Random |
List Sites Next 5 | Previous 5 | Join |