 Here
we are in the planning process. We found a way to save a whole piece of
$45 plywood between the two of us. Click here
to see how.
Here
we are in the planning process. We found a way to save a whole piece of
$45 plywood between the two of us. Click here
to see how. In
this photo, we are gluing the sheer clamps to the side panels. Note - you
can not have too many clamps! Notice our assortment of PVC clamps. My collection
of PVC clamps has quadrupled since then. You cannot have too many clamps!
Dan is drilling holes in all 4 bottom panels at once to save time.
In
this photo, we are gluing the sheer clamps to the side panels. Note - you
can not have too many clamps! Notice our assortment of PVC clamps. My collection
of PVC clamps has quadrupled since then. You cannot have too many clamps!
Dan is drilling holes in all 4 bottom panels at once to save time. Dan
is stitching the bottom of his hull to the sides at the stern. We found
a piece of 6 gauge twisted copper wire at the recyclers. We cut it into
4" chunks and untwisted them to get 19 - #18 gauge pieces, and saved
having to buy several rolls of expensive copper wire. Cost of our scrap
copper: $1.50.
Dan
is stitching the bottom of his hull to the sides at the stern. We found
a piece of 6 gauge twisted copper wire at the recyclers. We cut it into
4" chunks and untwisted them to get 19 - #18 gauge pieces, and saved
having to buy several rolls of expensive copper wire. Cost of our scrap
copper: $1.50. Shawn
is stitching the bottom of his boat to the sides near the bow. I found
it easiest to get inside the kayak to guide the wires through the holes
rather than trying to fish them through from the outside.
Shawn
is stitching the bottom of his boat to the sides near the bow. I found
it easiest to get inside the kayak to guide the wires through the holes
rather than trying to fish them through from the outside. Here
our boats are nearly stitched together. Notice the sticks between the bottom
and side panels in the middle of Dan's boat in the background. These sticks
keep the bottom from falling down between the side panels.
Here
our boats are nearly stitched together. Notice the sticks between the bottom
and side panels in the middle of Dan's boat in the background. These sticks
keep the bottom from falling down between the side panels.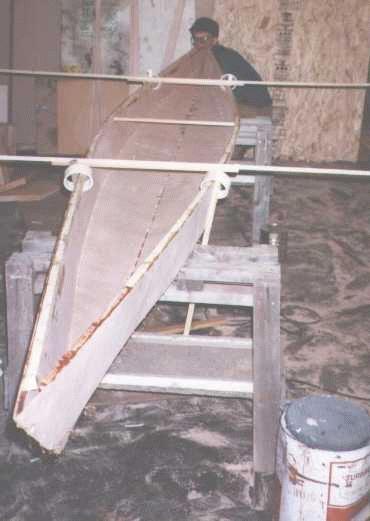 Shawn
is checking to make sure there is no twist in the boat before committing
the joints to epoxy.
Shawn
is checking to make sure there is no twist in the boat before committing
the joints to epoxy. We
laminated our deckbeams from Douglas fir. The fir was way too stiff
to bend cold, so we soaked it in hot water and put it in the hot oven for
about 20 minutes. We cut some 15" radius clamping forms from a 2x10and
bent the strips between them. Once they had cooled and dried, we epoxied
each set of 4 strips, wrapped them in plastic wrap, and clamped them back
between the forms. The finished Doug fir deckbeams are even stiffer than
ones laminated of strips of marine ply!
We
laminated our deckbeams from Douglas fir. The fir was way too stiff
to bend cold, so we soaked it in hot water and put it in the hot oven for
about 20 minutes. We cut some 15" radius clamping forms from a 2x10and
bent the strips between them. Once they had cooled and dried, we epoxied
each set of 4 strips, wrapped them in plastic wrap, and clamped them back
between the forms. The finished Doug fir deckbeams are even stiffer than
ones laminated of strips of marine ply! We
mixed up a mixture of fast-curing epoxy (which still took 10-12 hours to
cure at 50 degree temperatures), wood flour (saved from our belt sander's
dust bag) and cabosil (silica fume). We spread fillets over the joints
with rounded plastic spreaders cut from the sides of yogurt and ice cream
cartons. These joints were then covered with 'glass tape and more coats
of epoxy. This is one area I used too much epoxy on. The fillets just need
to be a small curve that will smoothly bridge the transition from panel
to panel.
We
mixed up a mixture of fast-curing epoxy (which still took 10-12 hours to
cure at 50 degree temperatures), wood flour (saved from our belt sander's
dust bag) and cabosil (silica fume). We spread fillets over the joints
with rounded plastic spreaders cut from the sides of yogurt and ice cream
cartons. These joints were then covered with 'glass tape and more coats
of epoxy. This is one area I used too much epoxy on. The fillets just need
to be a small curve that will smoothly bridge the transition from panel
to panel. We
fiberglassed the boats in the cockpit area to protect the hulls from our
big feet, gravel, etc., and coated the entire interiors with epoxy.
We
fiberglassed the boats in the cockpit area to protect the hulls from our
big feet, gravel, etc., and coated the entire interiors with epoxy.
Here is another area I used too much epoxy (excess weight) on. When wetting out fiberglass, use a squeegee, and only use enough epoxy to wet it out. I didn't know the difference then, but my glass was floating in the pools of excess resin. I also filled the weave on this glass, which is unnecessary inside the boat.
We then fit the fore and aft bulkheads in place with a fillet of thickened epoxy and some glass tape on either side. Great Falls, MT got a cold snap, so we had to hang the boats up until we could at least heat the shop to 70 degrees and glass the hulls and install the decks.
The boats were decked with -3mm doorskins. I know CLC doesn't recommend using doorskins for kayak building, but we figured the deck didn't need as much structure as the hull, and we had hoped to shave off 3 or 4 pounds.
However, as a beginning boatbuilder, I overbuilt it, so the weight savings weren't there! With the bulkheads and deckbeams, though, the deck is well-supported. I did have to add a patch of glass over my knees, as I was cracking the deck with upward pressure when I rolled the boat. It works well now.
Doorskins, with some minor reinforcement, are an adequate substitute for Okoume for deck material.
We neglected to use the CLC-recommended ring shank nails, and instead tried to substitute duct tape and bungie cords. This wasn't enough, so we used a few steel paneling nails. The decking process was a bit stressful, so we didn't pause to capture the "Kodak moment"! We did deviate from the plans schedule a bit in decking the boat before glassing the hull. This way, the hull glass covers the edge surface of teh deck, and when sanding down the edge of the deck, no glass is sandwd away, either.
 Shawn
is sanding down the edge of his deck at the sheer line.
Shawn
is sanding down the edge of his deck at the sheer line.  Both
boats draped with fiberglass, awaiting epoxy.
Both
boats draped with fiberglass, awaiting epoxy. Epoxy
brushed in to saturate 6 oz. glass.
Epoxy
brushed in to saturate 6 oz. glass. We
then fitted coaming rings by gluing small mahogany blocks edge-to-edge
rather than using stacked plywood. The end result looks pretty good. The
cockpit outfitting was completed with a hand-carved ethafoam seat and hip
pads, minicell thigh braces, and a hand-sewn backband.
We
then fitted coaming rings by gluing small mahogany blocks edge-to-edge
rather than using stacked plywood. The end result looks pretty good. The
cockpit outfitting was completed with a hand-carved ethafoam seat and hip
pads, minicell thigh braces, and a hand-sewn backband. I
'glassed in tiedowns under the foredeck for a knee tube. Bungies holding
the knee tube also hold a pump. I epoxied in a pair of rails that will
hold adjustable footbraces, but for now, I just use blocks bolted to the
stainless T-nuts for footpegs. There is also a coated vinyl cable epoxied
into the front surface of the deckbeam for a security cable.
I
'glassed in tiedowns under the foredeck for a knee tube. Bungies holding
the knee tube also hold a pump. I epoxied in a pair of rails that will
hold adjustable footbraces, but for now, I just use blocks bolted to the
stainless T-nuts for footpegs. There is also a coated vinyl cable epoxied
into the front surface of the deckbeam for a security cable.