
Standard Disclaimer: This plan describes the construction of my Double Diamond exactly as I built it. It is very likely that you will disagree with some of the design choices - I don't claim to be a master kite builder so feel free to adapt it.
If you build this kite I would very much appreciate hearing from you.
| Sail and Tail | Any type of quality ripstop nylon or polyester. |
| Spars |
|
| Connectors |
|
| Miscellaneous |
|
The sail consists of 2 diamond shaped layers (no surprise there :-), each of which is composed of 4 instances of the basic element as shown in Fig.1 (48K) and Fig.2 (48K). The measurements include a seam allowance but no hem allowance; I used spinnaker tape to edge-bind, so I did not require any hem allowance.
Note the grain of the material when cutting the basic elements. To ensure symmetry, follow this order in putting together the pieces:
Reinforce each of the corners with Dacron. Sew small loops of line to the corners; I use these together with the split caps instead of spar pockets. On the rear diamond add a number of beads to each loop; these will enable you to adjust the sail tension. Fig.4 (38K) and Fig.5 (37K) will give you a better idea of what I'm talking about. Note that the spars must extend out at least 1", since we will later be attaching an exterior tensioning line.
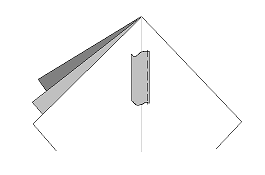
On the front diamond add dacron reinforcements at the points where the bridle line passes through the sail. On the rear diamond sew on the central dacron reinforcement as shown in Fig.6 (38K) and cut out the semi-circular holes for the spars to pass through.
Now add the sleeves for the horizontal spars. Don't do the vertical sleeves yet! These can only be added when the 2 diamonds have been sewn together, since the seam runs underneath the sleeves.
It's time to put together the 2 diamonds. Work from top to bottom to minimize the impact of any inaccuracy. It's also a good idea to use some double-sided tape to hold the material in place while you're doing this critical seam.
Finally add the vertical sleeves as shown:

Add loops to the top and bottom tip like you did for the corners. The tensioning beads go on the bottom loop. To complete the sail, melt holes at the bridle points.
The frame is really simple and very similar to a box kite: just a spine and 2 horizontal spreaders in an X-shape. To achieve the X-shape we need an exterior tensioning line. This goes around the outside of the sail, connecting and stabilizing the horizontal spreaders. Add a 10" piece of bungee to each segment to achieve the desired tension. Fig.7 (41K) shows the fully assembled kite.
This is simple tube tail. The dimensions are given in Fig.3 (34K). The tube opening is reinforced with a strip of dacron. Melt 4 symmetrical holes into this to attach the tail bridle lines (approx. 10" long). Use a swivel to attach the tail to the kite.
Attach the kite's bridle lines. The kite uses a classic 3 point bridle which lets you adjust the angle of attack and also eliminate any horizontal assymetry the kite might have.
| [Patrick's Kite Site] | [Gallery] | [Bookshelf] | [Plans] | [Site Map] |