 |
 |

PART
TWO - SEAMLESS REPEAT EDGE PATTERN
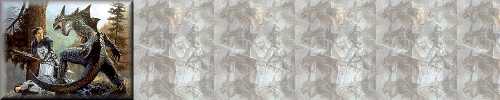
These are the images we will be using...
 |
 |
|
Working Image Size =
267 x 200 Pixels
|
Seamless Tiled Pattern HEIGHT
=200 Pixels
|
If you've been following along (switching from browser window to your
Paint Shop Pro 5 window), you've just
created your first picture overlay background tile. But it was boring,
remember. Or, maybe it's just the picture I chose. It obviously
wasn't one that I believed would make a great graphic or it would be displayed
in my graphics section. But it's a good example of how you can
make a picture more exciting. But now we're gonna make it even more
exciting by creating a seamless repeat edge pattern. Ready?
-
Okay, remember our original picture? Well, it's back there somewhere.
We're going to use the resize method once again. Just to refresh
your memory, choose IMAGE from the topmost
toolbar, then RESIZE, which brings up the
RESIZE WINDOW. Here you choose
PIXEL SIZE, HEIGHT=200
(which automatically sets the size for the width at 267, we want to make
the picture height equal to or a multiple of our FILL picture),
making sure that RESIZE TYPE=SMART
SIZE, and RESIZE ALL LAYERS and
MAINTAIN ASPECT RATIO ARE
CHECKED and click OKAY.
-
You'll probably need to sharpen the image ('cause making it smaller also
makes it look sorta blurry), so choose IMAGE,
SHARPEN, and SHARPEN
(from the fly-out menu). Now make sure your background color is white
(just click on the square of color underneath and use the dropper tool
to pick white). Okay, next we enlarge the canvas by choosing IMAGE,
CANVAS SIZE, which opens the CHANGE
CANVAS SIZE WINDOW,
and choose, NEW WIDTH=1000
(so it won't re-tile on large screens, I use a 1024 x 768 display on a
17 inch monitor and it does a little, but that's okay.) NEW
HEIGHT=200 (the height of your picture).
Make sure that CENTER IMAGE HORIZONTALLY and
CENTER IMAGE VERTICALLY ARE
NOT CHECKED, BOTTOM=0,
TOP=0, LEFT=0,
RIGHT=(JUST CLICK INSIDE
THIS BOX AND IT SHOULD AUTO SET), if not, do the math. Subtract
the width of your picture from the width that you're setting it to, and
put the result in the window. Click OKAY,
and your image should look similar to this:

-
All right, now we get to use the magic wand! Click on the MAGIC
WAND on the toolbar which will automatically change the CONTROLS
WINDOW (if you've left it open... you should, you know, it's
easy to move around and then you don't have to keep trying to remember
what the icon looks like). Under TOOLS CONTROL,
MATCH MODE=RGB VALUE,
TOLERANCE=0,
FEATHER=0, SAMPLE
MERGED IS NOT
CHECKED. Now CLICK IN THE WHITE AREA
which will magically select the entire white area (hence the name, Magic
Wand), you can tell it's selected because it's surrounded by a blinky dotted
line. [NOTE: If the blinky dotted
line is inside of your picture, click undo until your picture's back, and
choose a background color that isn't in your image.]
-
Okay, we're gonna use the paint can again, more properly described as the
FLOOD FILL TOOL. On the CONTROLS
WINDOW (which will automatically change to the flood fill controls),
we choose FILL STYLE=PATTERN,
MATCH MODE=NONE,
TOLERANCE=0,
OPACITY=75 (remember to change this),
SAMPLE MERGED IS
NOT CHECKED, now click on OPTIONS.
This opens the FLOOD FILL OPTIONS WINDOW.
Choose FILL STYLE=PATTERN
(which should already be chosen for you), BLEND MODE=NORMAL,
NEW PATTERN SOURCE=IMAGE_NAME (Which
is whatever you named the picture overlay tile we created above).
Now CLICK INSIDE OF THE SELECTED AREA,
the white part and the overlay will be tiled upon it.
-
Now, while the newly filled area is still selected, from the topmost toolbar
choose SELECTIONS, INVERT.
You will notice that your picture is now selected. I do this last
so I can decide which effect will look best after the fill. In this
instance, I kept it simple by buttonizing it. Choose IMAGE,
EFFECTS, BUTTONIZE
which will open the BUTTONIZE WINDOW.
I set this at HEIGHT=15,
WIDTH=15, OPACITY=100,
and TRANSPARENT EDGE IS
CHECKED. By the way, my FOREGROUND COLOR=BLACK
and BACKGROUND COLOR=WHITE.
Now go to SELECTIONS,
SELECT NONE (after
you do this for awhile CTRL+D is easier) to get rid of that stupid,
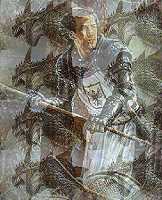
but useful, blinky line. Here's the finished product:
 Click on the image above to
view background.
Wait... as long as we're buttonizing:
Click on the image above to
view background.
Wait... as long as we're buttonizing:
-
Let's make a matching button... for this one we'll use Image 1, you remember...
the dragon fill. First let's size it properly by choosing IMAGE
from the topmost toolbar, then RESIZE, which
brings up the RESIZE WINDOW.
This time, the first thing we do is make sure that MAINTAIN
ASPECT RATIO IS NOT
CHECKED, then choose PIXEL
SIZE, HEIGHT=50 and WIDTH=200,
making sure that RESIZE TYPE=SMART
SIZE, and RESIZE ALL LAYERS IS
CHECKED and click OKAY. Doing
this distorted the image slightly but it will be covered with text, anyway.
If you wanted to, you could create a new image 50 x 200 pixels and use
the fill method to create a tiled image.
-
Now we buttonize again (we don't need to select anything, since we're buttonizing
the whole image) by choosing IMAGE, EFFECTS,
BUTTONIZE which will open the BUTTONIZE
WINDOW (notice that buttonize is the only
effect available... all other effects require a selection of some kind)
. I set this at HEIGHT=5,
WIDTH=10, OPACITY=100,
TRANSPARENT EDGE IS
CHECKED, FOREGROUND
COLOR=BLACK and BACKGROUND
COLOR=WHITE.
 |
 |
 |
|
Original Button
50 x 200 Pixels
|
Resized 75%
38 x 150 Pixels
|
Resized 50 %
25 x 100 Pixels
|
-
Why not just make a small button in the first place, you ask? Because,
in my experience, it's easier to apply the text and effects (yes, this,
too, is another tutorial) to the larger button and then shrink it down.
A very important NOTE: Don't forget
to make several copies of the button image before applying text and effects,
chances are you'll need more than one! What? Oh, okay, I almost
forgot. To COPY AN IMAGE, click on it
to make sure it's the current image, then CTRL+C
to COPY,
and CTRL+V to
PASTE.
CONGRATULATIONS!!!
If you've been following along (switching from browser window to your
Paint Shop Pro 5 window), you've just
created your first seamless repeat edge pattern. But it's still blah.
Or, again, maybe it's just the picture I chose. You also learned
how to buttonize, change canvas size, and copy and paste. One hint
when using the seamless repeat edge pattern backgrounds. Make a two-column,
single-row table on the page. In the example above, I created a TRANSPARENT
SPACER GIF for the left column of my table by creating a NEW
IMAGE, WIDTH=225,
HEIGHT=500, BACKGROUND
COLOR=WHITE, then I chose COLORS,
SET PALETTE TRANSPARENCY, then that window
with the stuff about reducing the colors to 256 came up, so I clicked OKAY.
Now the SET PALETTE TRANSPARENCY WINDOW
opens. Choose SET THE TRANSPARENCY VALUE TO...
AND PLACE YOUR CURSOR IN THE IMAGE AND CLICK
(you'll notice that the eye-dropper comes up, okay the Dropper, and this
"picks up" the color number and sets it into the the value window.
Then click OKAY, COLORS,
VIEW PALETTE TRANSPARENCY, and your window
will be white and gray checked, which is the default transparency background.
Now SAVE AS 225spacer.gif,
and you're done. Easy, huh? But now we're gonna make it yet
more exciting by creating a Wild Tile from this same picture.
Ready?


|